EverWeb’s BackUp and Auto Save Features
June 14th, 2018
Each year Apple’s WorldWide Developer Conference (WWDC) spawns new beta releases of Apple’s iOS, macOS, watchOS and tvOS. WWDC is also the time of year that highlights the need for backing up our operating systems and data on a regular basic. With EverWeb, backing up your Project files is always a good idea. Backing up the data on your computer should be something you do regularly, but you can also use EverWeb’s backup tools to create multiple backups of your Project files that you can rollback to if ever you need to. Here’s how…
Backing Up Your EverWeb Project Files
To use EverWeb’s Backup feature you will need EverWeb version 1.8 or higher.
- To backup your Project files, first launch EverWeb.
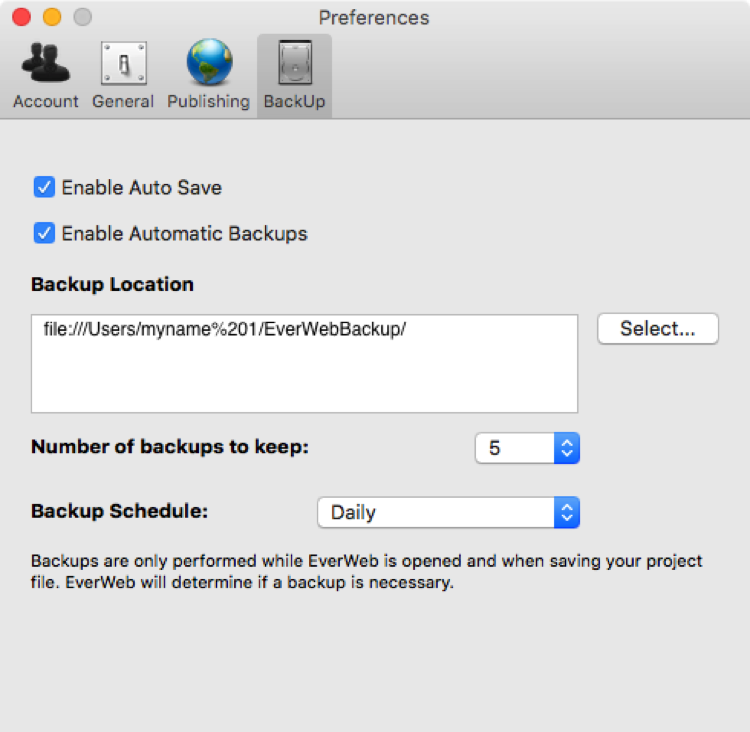
- In the EverWeb-> Preferences menu select the ‘Backup’ tab. (See figure above)
- Checking the ‘Enable Auto Save’ box automatically saves your Project file at regular intervals as you work in the Project. It is recommended that you check this box so that if, for example, your computer goes down due to a power cut, you will only lose the last few keystrokes of work.
- To enable the backing up of your project files, check the ‘Enable Automatic Backups’ box. Any Project files you may have will be backed up when you next open it.
- Enter the ‘Backup Location’ by clicking the ‘Select’ button. Navigate to your desired backup location. This can be either on a local hard disk, a network drive or in the Cloud using services such as Apple iCloud Drive, Google Cloud, Dropbox etc.
- Select the ‘Number of backup copies to keep’. This is especially useful if you are trying something out that does not work and so need to rollback your Project file a few versions to undo the changes you have made. You can select to keep 1, 5, 10, 20 or 50 backup copies.
- Use the ‘Backup Schedule’ to choose whether you want to backup daily, weekly or monthly.
You have now set up your backup schedule and can exit EverWeb’s Preferences.
‘On The Fly’ Backups
If ever you want to backup a single Project file ‘on the fly’ you can do so easily from the Projects Window.
- Click the up/down arrow to the right of the Project file you want to backup.
- Select ‘Backup’ from the menu.
Restoring A Backup
If you need to restore a backup of your Project, use the instructions below. Note that if you have deleted the Project file, you cannot restore it as deleting the Project will also delete the backups as well. Your only recourse in this situation is to go to your computer or cloud backup. To restore a Project file that you have backed up:
- First go to the Projects Window
- Click on the up/down arrows to the right of the Project file that you want to restore
- Select ‘Restore from backup…’ from the menu
- You will see a list of backup Project files displayed. Select the backup of your choice then click on the ‘Select’ button to restore the file.
- You will see a warning message that restoring the project will overwrite the existing file. You can click ‘Restore Backup Project’ or you can ‘Cancel’ at this stage.
- To use the restored project file just double click on the Project file name as usual to open the project.
Creating a backup schedule and setting Auto Save on just takes a few steps and is something that every EverWeb user should do to safeguard their project from any potential mishap.
EverWeb on Social Media
You can also find EverWeb on the following social media platforms:
Twitter handle @ragesw


