Archive for the 'EverWeb' Category

SEO in EverWeb: Basics for Beginners

Thursday, April 1st, 2021

When you start to build your first website you may or may not, already know about SEO. It may be something that is extremely important to you. It may be something that you have no idea at all about. It may be something that you think might be important to you but it is shrouded in mystery that it seems almost magical or mind bogglingly confusing.

In this post, we are going to demystify SEO and explain what it is and why it can be important for you to implement it in your EverWeb created website.

What Exactly is SEO Anyway?

SEO is an acronym for Search Engine Optimization. SEO is a method by which you tune, or optimize, your website to its best advantage to Search Engines, such as Google, Bing and Alexa. The better you optimize your website, the better the chances are that your site will appear higher up in search engine results rankings.

When you enter a search term in to your browser’s search box, the search engine behind it (e.g. Google) will present you with a set of ranked results based on your search criteria. Simply put, you use SEO to improve your chances of ranking higher up in these such search results. As such, SEO can also be thought of as a process that is applied to your website. SEO is not hardware. SEO is not software. SEO is a methodology that you apply to your website.

Should Everyone Use SEO in Their Website?

Typically, you will want to apply SEO to your website if you run any form of business. Equally, you will probably want to apply SEO to your site if you just want it to be more visible on the Internet. On the other hand, you may not want to apply SEO at all to your site e.g. you may have a site just for personal reasons so it is not important for you to try to reach as many people as possible with your site.

Reasons to Apply SEO to Your Website

  1. Potentially higher rankings in Search Engine Results Pages. When done correctly, SEO will improve your rankings.
  2. Your Audience will be able to find you more easily! SEO is good to use as you can target the words that you think visitors will search on. If done correctly, your (potential) audience will find you more easily!
  3. Customer Reach: SEO can be a great way for potential new customers to find you!
  4. Better Customer Reach translates to more traffic to your site.
  5. SEO Is Free! You do not have to pay anything to apply SEO to your site. You should not have to pay anyone to apply SEO to your site!
  6. Improves Brand Awareness. Even if someone does not click on your website link in a search results set, the fact that you are visible may bring them back later to your site.
  7. The effect of SEO can also be measured from your site’s statistics so you can adjust you SEO to see what works and what does not work.

Investing in SEO in Your Website

Just like building a great looking website, SEO is an Investment – and it should be thought of as a long term investment. As your business grows and develops over time, so your SEO should be in step with your business at the same time.

As part of the SEO process you will use Keywords, or phrases, in your website to help search engines focus on what you think is important. These Keywords may need to change over time as your business changes. It is, therefore, always important to remember that your website is a dynamic tool and your SEO should be too.

SEO As a Dynamic Concept

Your business will probably change over time due to internal and external factors. The same is also true of SEO which is not static concept but a dynamic, evolving concept. Changes in SEO usually relate to changes made by search engines as they adapt to our ever changing browsing habits. For example, a few years ago, Google decided to prioritize searches made on mobile devices over those made on desktop devices. It seems obvious now that the priority for search has changed with the growth in mobile device usage over the last ten years.

EverWeb is always looking out for changes in the way the search engine giants change the dynamic around search. One such change, for example, comes in the upcoming EverWeb 3.5 which will automatically add Open Graph Tags if you have purchased EverWeb SEO Power Up addon.

How to Begin with Your SEO Journey…

SEO in EverWeb has always been baked in to the product which means that you usually do not need to focus on it if you do not want to. If you do want to apply SEO to its best effect in your site, the best way forward is to use our SEO for EverWeb Video Course. This concise course guides you through how to apply SEO to your site’s best advantage.

EverWeb gives you most of the tools that you need to implement SEO but you can go further using our SEO Power Up addon. This addon allows you more customization options than ever so that you can prioritize what you think is important for your site’s SEO. The addon also provides more information to search engines about your site’s pages, their importance and priority. Check out the link above for more details.

Using SEO in your site can be advantageous to your business if used in the right way and if you invest in it for the medium to long term. There is no mystery around SEO either, just some easy knowledge building and experience to find out what works best for your site!

EverWeb on Social Media

You can also find EverWeb on the following social media platforms:

Facebook

Flipboard

YouTube

X

Instagram

Using EverWeb’s Font Panel & Collections

Monday, March 22nd, 2021

One of the most important aspects of web design is your content. The text that you use tells your visitor a lot about your website, your company and its company culture. The way you present your site’s text itself also acts to visually reinforce these characteristics.

There are many ways in which you can style your text in EverWeb, from the simple TextBox to widgets that use the Styled Text Editor to EverWeb’s own blogging environment. Then there is also the Text Inspector which allows you even more styling options for your text.

Why Use the Fonts Panel?

All of the above features allow you to style text and some of these features offer unique properties, such as indented quotes in blog posts, or Text Direction in the Styled Text Editor. There is, however, always one tool that is always available to you at all times: The Fonts Panel.

In addition to its availability being ubiquitous in EverWeb, the other big advantage of the Fonts Panel is that it has the most amount of text styling features that you can find in one place. That is a valuable asset to your workflow when building your website! Save time and effort by doing most of your Text Styling in one place rather than having to flip from, for example, the Text Inspector to the Shape Options tab to Color Picker

Accessing The Fonts Panel

Accessing the Fonts Panel is easy. Click on the Fonts button in EverWeb’s Toolbar. To make things even easier, though, just press the Font Panel’s Command+T shortcut key instead. This will toggle the Fonts Panel on and of at the touch of a button.

You can access the Fonts Panel at any time. You do not have to have any text selected either, so the Fonts Panel can always be sitting there, ready for when you need it. If there is ever a time where you know you have called up the Fonts Panel but cannot find amongst the windows on your desktop, just go to EverWeb’s Window menu. At the bottom of the menu select ‘Fonts’ from the bottom of the list. The Fonts Panel will come to the foreground.

Working with the Fonts Panel

The Fonts Panel dialog box has most of the options that you will ever need to style your text. Choose your text font from the Font Family column, the font weight from the Typeface column and the font size in the Size column. To get exactly the right font size that you want, overtype the number that is highlighted under the word ‘Size’.

Why Use Collections?

You can also collect fonts in the Fonts Panel together in to a Collection, which you can then access from the column on the left hand side of the Fonts Panel. This is useful if you want to have certain fonts and typefaces easily available for your EverWeb website Project. You may, for example, want to have a specific Font Family and Typeface for your page’s title, subheadings, footnotes and so on. Grouping Fonts Family and Typefaces in one Collection gives you a quick, easy solution that will save you time and effort.

Adding A Collection to the Fonts Panel

To create a Collection

  1. Click on the ‘+’ symbol in the bottom left hand corner of the Fonts Panel.
  2. A new collection called ‘New-xx’ will be created where xx is a sequential number e.g. New-11. Double click on the new Collection name and rename it e.g. with your project file name.
  3. Next click on the ‘AllFonts’ collection which is at the top of the Collections column. All the fonts on your system will now be listed.
  4. Select a Font Family, and Font Typeface that you want to add to your new Collection e.g. Helvetica, Bold. Use the Search box to quickly find the Font Family if you need to.
  5. Your Font Family, Font Typeface should be highlighted in their respective columns.
  6. Next, click on the Settings Cog in the bottom left hand corner of the Fonts Panel.
  7. Choose ‘Add to Collection’ then click on the name of your collection from the list. The font will be added to your collection.
  8. Repeat the process for all the specific fonts styles that you use in your Project file.

You have now added specific Fonts Families and Font Typefaces to your collection. You can now apply these to your text selections. Once you have applied the font family and typeface from the collection, the only thing you will need to do manually is to select the font Size.

Alternatively, you could set up one Collection per Font Family/Typeface to represent your project files page titles, Subheadings etc. For example, you could create a Collection called ‘Title’ that has just a Helvetica Bold font in it. Another Collection, ‘SubTitle’, could have just one item in it e.g. a Helvetica Light Oblique and so on…

Adding a Default Body Text Style

As you may already know, you can set up a default base font family, font style and size in EverWeb so you do not need to add this in to your own Collection.

Use the Format-> Default Styles… menu option. When you click on the Body Text font, the Fonts Panel will appear if it is not already visible on screen, Change the Font Fa mily, Typeface and Size to the new default that you want. If you want to change the font color default, use the specific option ‘Body Text Color’ in the Default Settings dialog box and not the color swatch in the Fonts Panel.

When you have finished, remember to click on ‘Save’ to apply your changes. Any new TextBox, new widget that you add that uses the Styled Text Editor, or new blog post that you create will adopt the new default settings.

Other Uses of the Fonts Panel

One of the useful features of the Fonts Panel and its Collections is that you can immediately see which fonts are web safe. If you have downloaded Google Fonts, you will also immediately which Font Typefaces the font has.

The Fonts Panel is where you can apply other formatting features, such as Strikethrough, to your text. There is also an option for text shadowing so that you do not have to go to the Shape Options tab to achieve the effect that you want. With the Fonts Panel, it is all on one place.

Once you have finished styling your text using the Fonts Panel, just press Command+T to toggle for the dialog box to disappear!

EverWeb on Social Media

You can also find EverWeb on the following social media platforms:

Facebook

Flipboard

YouTube

X

Instagram

Spring Clean Your EverWeb Project File!

Thursday, March 4th, 2021

For those of our users in the Northern Hemisphere, spring is on its way which usually means it is time to do some spring cleaning after winter and get in to shape for the summer. So, why not do a little bit of spring cleaning on your EverWeb website project file as well?

When you create your website you will undoubtedly modify some of your ideas along the way. You may even find that you need to make sweeping changes as some of your initial ideas just don’t translate as well as you thought they would when you actually come to build your website’s pages.

Building a website can lead to lots of abandoned, and modified, ideas. It can also bloat your website project file size if you do not do some maintenance on a regular basis. So, keeping cleaning up your project file’s assets is worth doing on a regular basis.

Why Project File Maintenance is Important

There are a few reasons why maintenance is important and good to do once in a while:

  1. Smaller Project File, Faster Initial Loading. As project files grow, they will take more computer memory when loading so will tend to load slower over time as they get larger in size. Keeping your project file size down will help it load faster.
  2. Smaller Project Files Make Editing Your Project Faster. With each version of EverWeb we optimize its code and find ways to make important tasks such as page editing, previewing, publishing and published page responsiveness even more better than before. The other way to keep EverWeb’s performance excellent is to keep your project file is ‘mean and lean’ with a well designed website that uses optimized assets.
  3. Regular maintenance of your project file will also get rid of any clutter that you no longer need in your site. This makes it easier to organize and manage your assets.

The Clean Up!

  1. Check for Unused Assets: The first part of cleaning things up is to check to see if you have any assets that you are not using and will not be wanting to use in the future. To find these assets, just go to the Assets tab and click on the Settings Cog. From the dropdown menu that appears, select ‘Find Unused Assets…’ If Assets are found, they are highlighted in the Assets List. You are also asked if you would like these Assets removed, which is an action that cannot be undone. If you have any doubts, click ‘No’. The unused assets will still be highlighted so you can manually decide which ones to keep or delete. Deleting assets you do not need will reduce the size of your project file.
  2. Check the Size of Your Image Asset Files. Whilst on the Assets tab, click again on the Settings Cog. This time, select ‘Sort by File Size…’ This will sort the files in descending order of file size, so the largest file will be at the top of the list. Are there any files that are appear to be very large? As you probably know, if your page contains large image files, this will will drag on the loading speed of the page in a browser. Where you have large files, try reducing the dimensions of the image in an image editor (even Apple’s Preview will do) e.g. some stock images can be 5000 pixels wide when you typically only need image widths of about 1920 wide or less in your site. Furthermore, you can reduce the resolution of the image e.g. the image may be 600dpi when in a browser you may be able to use an image of 72-170 dpi without any noticeable loss in image quality. Once you have reduced the size of the image, you can use EverWeb’s Replace Asset feature to substitute the smaller image file for the larger.
  3. Manage Your Cache Files: Typically you will not usually need to manage your cache files, but if you are a bit low on hard disk space, you may find this useful to check, especially if you have a large project file. Go to the EverWeb-> Preferences-> Backup tab. Click on the ‘Manage Cache Files…’ button. You can choose to clear the EverWeb’s Preview and Publishing caches. Note that these files will be regenerated the next time you preview or publish your site. The last option is where you can clear your Backup files if you no longer need them. Remember, however, that if you delete the backup files they be moved to your computer’s Trash can from where they will be deleted according to your computer’s emptying trashcan schedule.

Remember: Keep Your Site Up To Date

Spring cleaning your site every once in a while is a good thing to do to keep everything working properly. If you have replaced some files to reduce the size of your project file and to help with page loading times, you may want to publish the full site using the File-> Publish Entire Site menu option. This can be especially useful if you have updated your version of EverWeb as your whole site will benefit from the new version’s optimizations!

And don’t forget, whilst doing maintenance on your site, check for things that may be out of date or need updating in your content. For example, if you have copyright notices on your pages, remember to update the year every year to keep up to date. If you’re site has news, now is a good time to update your home page and share the news! or is it time to update your blog with a new post. And don’t forget to give your SEO a freshen up too! In a changing world you need to keep your site fully optimized at all times!

Remember: Keeping your site fresh is the best thing you can do to keep your visitors coming back!

EverWeb on Social Media

You can also find EverWeb on the following social media platforms:

Facebook

Flipboard

YouTube

Twitter

Instagram

EverWeb’s Replace Assets Feature Keeps Your Site Always Up To Date!

Thursday, February 18th, 2021

The new Replace Assets feature that debuted in EverWeb 3.4 is a small but incredibly powerful addition to EverWeb‘s feature set.

Why Use Replace Assets?

Replace Assets simply replaces one image asset with another and is beneficial to use for a number of reasons:

  1. The feature replaces all instances of an asset in your site with the new asset that you have chosen. This includes where the asset has been used in widgets e.g. in EverWeb’s Image Gallery widgets, or even the FlexBox and Text Section widgets.
  2. The replacement asset inherits the attributes of the original asset. This is incredibly useful as it means that you do not have to do any reformatting in your website.
  3. The ‘One Stop’ Replacement. You save time and effort as you only need to replace the asset once. This can be an incredible boon if you need to regularly replace an asset in your site with an updated asset.

Caution!

If you replace an asset with another, you cannot undo this action. It is therefore recommended that you have a copy of the original asset stored somewhere in case you make a mistake and need to undo your asset replacement. The good news is that you can always replace a replaced asset with another asset.

It is also recommended that you backup your EverWeb site before you use Replace Assets. You can set regular project file backups in EverWeb-> Preferences which is recommended anyway. You can also instantly backup your project file at any time by clicking on the up/down arrows to the right of the project file name in the Projects window, then selecting ‘Male Backup…’ from the dropdown menu. Follow the instructions given in the dialog boxes to complete the backup.

How to Use Replace Assets

The replace Assets feature is super easy to use.

  1. First go to the Assets tab in the Inspector Window in EverWeb.
  2. Secondary click on the asset that you want to replace.
  3. If you are not sure that you have selected the right asset, either click and drag the asset a little bit out of the Assets tab, or use the Preview Eye to see what the asset is.
  4. Once you have secondary clicked on the asset, select ‘Replace Asset…”
  5. Locate the asset that you want as the replacement then click ‘Open’ to finish.
  6. The asset will be replaced.

Usage Cases for Replace Assets

There are many different ways in which you can effectively use Replace Assets to help save you time and effort, now and in the future!

  1. Rebranding: If you have updated your company branding, Replace Assets is the ideal one hit solution to updating your brand. For example, just replace your old company logo with the new one in the Assets List and the logo will be updated throughout your website.
  2. Change of location: If you have images of your business location in your site that need updating after an office
  3. Frequently Updated Images: Some websites have a fast turnaround of their content. If you are using image based content that needs replacing e.g. daily, weekly or perhaps monthly, then using Replace Assets could make this task easier.
  4. Making Text Importing Easier. If you import text in to your site on a regular basis, it may be easier to save this as a PDF file in the source app then use Replace Assets to replace the old PDF text with the new in your page in EverWeb. This will save you time formatting the text every time you import it in to EverWeb.
  5. Multi-lingual Websites. Sometimes you may have two websites that are essentially the same, for example you have a multilingual website. The pages for all languages are essentially the same in terms of layout and images, widgets used, social media icons etc. The only difference is the language the content is written in. If you need to update your images across each language site, Replace Assets will make this process a lot easier. Especially if all the pages for each language are in the one project file.
  6. In a similar vein as multi-lingual websites, you may find that you update two similar project files with the same images e.g. you may have online help pages for an app that is available for Windows and for the Mac. As there are some differences between the two operating systems you may have started by developing one website project file for the Mac app. After completing the project file, you may have duplicated the project file for the Window version of the product, as this is quicker and easier that building it from scratch. Replacing the images in the Windows project file is easy, just use replace assets to replace the Mac images with Windows ones!

Tips on Using Replace Assets

Here are a couple of tips on using Replace Assets:

  1. As mentioned above, make sure you have made a backup copy of your project file in case you need to rollback your changes.
  2. Always have copies of the original images that you are going to replace at hand in case you make a mistake and replace the wrong asset.
  3. Take care in naming your assets. Make sure to name your assets so that you can easily recognise each asset. This will make the replacement process easier, especially if you will be replacing assets on a regular basis. It will also reduce the risk of replacing the wrong asset by mistake. Usually it is best to follow the naming practices as outlined in our SEO for EverWeb video course, so that you better your SEO and have user friendly file names!

EverWeb’s new Replace Assets feature, is a small addition to the product that will save you time and effort, both now and in the future!

EverWeb on Social Media

You can also find EverWeb on the following social media platforms:

Facebook

Flipboard

YouTube

Twitter

Instagram

Contact Forms Enhanced Addon’s New Calendar and Select Time Form Controls

Thursday, February 4th, 2021

If you use EverWeb’s Contact Form Advanced widget with its companion Contact Forms Enhanced Addon, you now have two new form controls to take advantage of with the release of EverWeb 3.4.

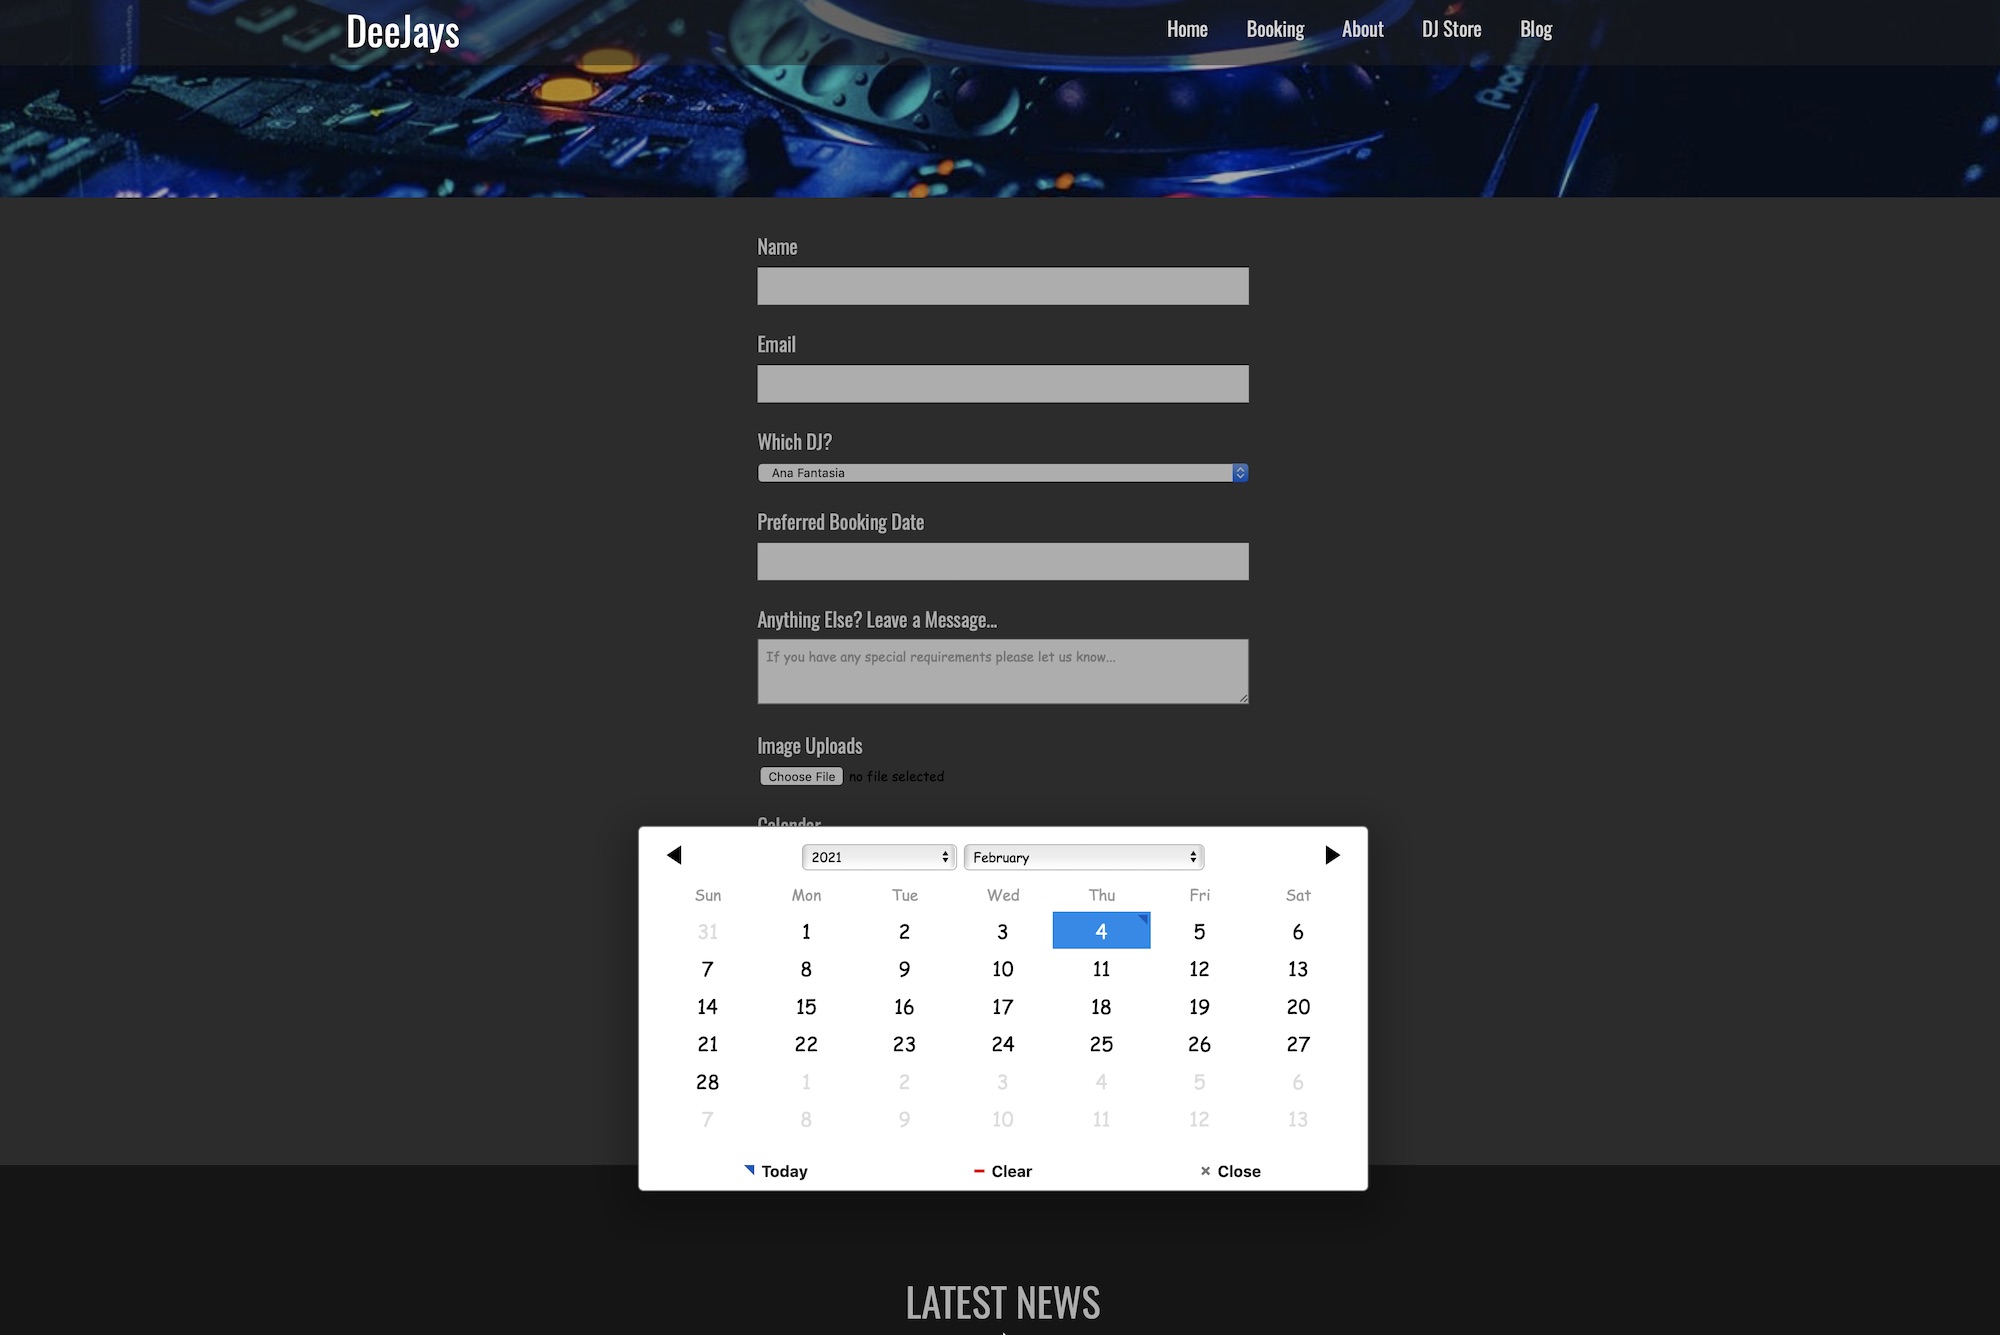
The Calendar and Select Time form controls help make it easier for your visitors to select date and/or time options directly from the contact form. The new controls are highly visual and fully customizable making it less likely that those filling in your contact form will make a mistake when choosing date/time combinations.

Better Control of Your Diary

Setting up calendar and/or a time slot lists in your Contact Form gives you more control of your own diary. EverWeb’s customization options give you control over your availability as you can block out days of the week when you’re not available, e.g. Sundays, and you can set your own working day availability for appointments and bookings.

Your contact form can now more easily be used as the front end to backend booking and reservation systems.

Visual Appeal for Your Visitors

For your visitors, the new form controls are easy on the eye and easy to interact with. When selecting the date and time for bookings and appointments your visitors will have a better overview of your availability.

You can format both controls to have exactly the right date and time formatting that you want, no matter where in the world you are, as there are seven different date formats included and four different time formats to choose form.

The Contact Forms Enhanced Addon

As you may already know, the Contact Forms Enhanced Addon is a supplemental product for use with EverWeb’s Contact Form Advanced widget . The Contact Forms Enhanced Addon can be purchased just by clicking on the Contact Forms Enhanced Add-On dropdown box in the Contact Form Advanced widget. Choose ‘Add Contact Form Enhanced Features…’ from the dropdown menu You will then be guided through your purchase.

After completing your purchase, click again in the Contact Form Enhanced Add-on field. In the dropdown menu, your purchase will be shown as, for example, ‘Contact Forms Enhanced 1GB (12345)’. Click on your purchase so that you can use all of Contact Forms Enhanced features.

Setting Up Calendar and Select Time Form Controls

If you are familiar with the Contact Form Advanced widget’s Form Controls, adding the new ones in to your form is just the same. In the Form Control section of the Widget Settings, click on the Add button under the Form Controls list. After naming the new Control, click in the Control Type dropdown menu below the Add button. From the list choose either ‘Calendar’ or ‘Select Time’. The Option List below the Control Type field will display all of the customization options available to use.

Customizing the Calendar Control

There are seven different date display formats available for you to choose from. There is also the option that when the visitor submits their form to you, the date format in the submitted email can be different to the display format. For example, your market may be in the US but you are based in Europe. You may, therefore, want your visitors to see the date in MM/DD/YY format, but you prefer to receive their submitted form in DD/MM/YY format as it is more compatible with your European backend systems.

The display of the calendar in the form is also highly customizable. Start by choosing how many years you want the calendar to display. For example, if you set the number of ‘Years to Show’ to 5, when you click in the Year field in the form you will see the five year range, 2019 – 2023 with the current year, 2021, in the middle. If you use the back arrow key to scroll the calendar backwards you can access dates before 2019. For example, if you choose May 31, 2017 and click in the year dropdown box, you would see 2015 – 2019, i.e. 5 years with 2017 in the middle . The same concept would apply if you scrolled the calendar a year in the future.

The Calendar Control’s options allow you to set the start and end point of the calendar. For example, I may want to limit the calendar to the five year period used in the above scenario. In this case, I would set the ‘Earliest Date’ field value to be January 1, 2019 and the ‘Latest Date’ to be December 31, 2023.

As mentioned earlier the Calendar Control allows you to block out specific days of the week. This is useful if you e.g. never work on a Sunday, or you always use Wednesday’s for admin and never have appointments. To set the blocked out date, just check the box next to the days you want to exclude from the calendar. Blocked out days appear greyed out in the Calendar display.

Customizing the Select Time Control

Use the Select Time control to schedule appointments. You can specify how long each appointment slot lasts as well as how long the working day is.

Once you have selected ‘Select Time’ from the Control Type dropdown menu, you can use its options from the Options List. In the same manner as for the Calendar control, you can choose to have your Display Time and Submit Time options set differently to each other. For example, if your customers are in North America, you may set the Display Time as 2:30 p.m. style, but if your business is based in Europe, you may want the Submit Time option to be 14:30 i.e. using the 24 hour clock which is more commonly used in Europe. The same is true for the List View option which is used to show the list of available time slots when your visitor clicks on the Select Time option in the form.

You have four different time styles to choose from for these three options.

Use the Interval option interval to set how long each appointment slot will be. The default is set to 30 minutes. Enter the amount of minutes that you want for your appointments e.g. 60, 90, 120 and so one. The list will automatically calculate the times of the appointment slots for you.

Last but not least, set the length of your working day using the Start Time and End Time fields.


EverWeb’s new Control Types will help you easily create visitor friendly booking and appointment contact forms as well as enabling integration with back end systems.

EverWeb on Social Media

You can also find EverWeb on the following social media platforms:

Facebook

Flipboard

YouTube

Twitter

Instagram

EverWeb, macOS Big Sur and Apple Silicon [UPDATED]

Thursday, January 21st, 2021

[UPDATE] Good News EverWebers! Our next release, EverWeb 3.5, will be a universal binary so will run natively on both Apple Silicon and Intel Mac’s. EverWeb 3.5 is currently in beta test, so we hope to have the public release version in the near future for you!

For Apple, 2020 was the year that the company broke with chip provider Intel with the introduction of Apple Silicon and the new M1 microprocessor chip in the 13″ MacBook Air, 13″MacBook Pro and the Mac Mini.

What impact does the move to Apple Silicon, and the introduction of macOS Big Sur, have on EverWeb? Find out below…

It’s Not The First Time…

This is not the first time that Apple has changed microchip providers for its hardware. It is actually the third time that Apple has changed the Central Processing Unit (CPU) architecture of its hardware. In 2005, Apple announced it was transitioning its hardware from PowerPC to Intel and before that, in 1996, it transitioned from the Motorola 68000 platform to the PowerPC platform.

Any change in the microprocessor architecture means that the Operating System software, and the applications that the OS runs, will also need to be reconfigured in order to be compatible with the new, underlying, hardware.

Why the Need for Change?

For Apple the reasons for transitioning to the new Apple Silicon architecture are clear. Its laptop, desktop and server offerings can leverage from the the same basic architecture that is found in iPhones and iPads. This makes integration and synergy between iOS an macOS a lot easier and seamless. The second reason is that Apple now has more end to end control, making both hardware and software more efficient in the process. We can already see this in the computational and speed improvements in the new M1 chip which takes CPU architecture to the next level of development. There is also the benefit of cost savings for Apple due to economies of scale as now its hardware uses the same basic CPUs in all its products. Lastly, the delay of new processors from Intel over the last few years has caused product delays for Apple, and Intel now lags behind its more agile competitors in the market.

Intel, Apple Silicon and macOS Big Sur

Apple has set itself the goal for the transition from Intel to Apple Silicon to be within two years. This is the same time frame as the switch from PowerPC to Intel. It is reassuring to know that this transition is achievable and should be relatively painless given Apple’s past experience of doing this.

The stage for the hardware transition has already been set with the introduction three Apple Silicon computers and the introduction of macOS Big Sur which runs on both Intel and on Apple Silicon architectures. In addition, macOS Big Sur now starts to take design cues from iOS and iPadOS again, helping Apple to further integrate their product ecosystem.

The two year product transition gives Apple time to update all its hardware to use Apple Silicon and gives software vendors time to repurpose their apps to be Apple Silicon compatible.

EverWeb 3.4 is fully compatible with macOS Big Sur on Intel machines. So what about compatibility with Apple Silicon? To understand how EverWeb works under Apple Silicon, let’s start with a bit of transition history…

Enter Rosetta and Rosetta 2

When Apple transitioned from PowerPC to Intel chips, it introduced a program called Rosetta. This program acted as a ‘Compatibility Box’ enabling apps designed for the old PowerPC architecture to run on the new Intel architecture.

Rosetta was very much a success for Apple, so it has leveraged this success and experience for the transition from Intel to Apple Silicon with the introduction of Rosetta 2. If you use EverWeb on an Apple Silicon computer, it will work through Rosetta 2 which will automatically ‘translate’ EverWeb from Intel to Apple Silicon. You probably will not even notice any difference using EverWeb under Apple Silicon as Apple years of experience in optimizing Rosetta make it work smoothly for most apps that need translating.

After installing EverWeb on your Apple Silicon based computer, when you first run the app, you may be asked to install Rosetta in order for EverWeb to run. If you have previously installed Rosetta on your computer, you will not see this message and EverWeb should launch as usual.

EverWeb as a Universal App

In summary:

  • EverWeb 3.4 and higher is fully compatible with Mac OS X 10.10 Yosemite thru to macOS 11 Big Sur.
  • EverWeb 3.4 and higher will run on Apple Silicon computers through Rosetta 2* running on macOS 11 Big Sur.
  • EverWeb 3.1 is available if you are running Mac OS X 10.7 – 10.9.
  • EverWeb 2.5.2 is available if you are running Mac OS X 10.6.

* In the future we will be releasing EverWeb as a Universal app. This means that EverWeb will support both Apple Silicon and Intel processors, using Apple Silicon as the default. As such, EverWeb will then run natively on Apple Silicon without the need to use Rosetta.

We will, of course, keep the EverWeb community reprised as to our progress in making EverWeb a Universal App.

If you have any questions about this article, please let us know in the Comments Section below. We’re here to help!

EverWeb on Social Media

You can also find EverWeb on the following social media platforms:

Facebook

Flipboard

YouTube

X

Instagram

Parallax Scrolling and Image Overlays in EverWeb

Thursday, January 7th, 2021

EverWeb 3.4 introduced the exciting new Parallax Scrolling effect. When you apply parallax scrolling as you scroll the page up and down, the foreground object moves and background image also moves, but at a slower speed. This gives the visual impression of motion and is a great effect to use in your website!

Prerequisites For Use Parallax Scrolling

To use Parallax Scrolling in your website you will need EverWeb 3.4 or higher. The effect can be used in any page layout type – Centered, Left Aligned or Responsive. The only other thing you will need is an appropriate image to use as a full width background image.

Choosing a Great Background Image

Perhaps the most important thing to consider when using Parallax Scrolling is the image itself. There are no specific rules in this respect but there are some useful hints that are good to remember:

  1. A simple page design will bring out the best in the Parallax Scrolling effect as the visual will be front and center and so more attention grabbing for anyone visiting the page.
  2. Use the most visually interesting images towards the top of the page if possible. This is a good way to hook visitors so that they continue to scroll down the page.
  3. Any ‘Call to Actions’, such as buttons on the page, should also be more towards the top of the page if possible.
  4. An image is a great way to tell a story so make sure that you use images that effectively do this. Using Parallax Scrolling at various points in your page is a perfect way to tell stories. Check out any news websites to see how they use this technique for in-depth stories on people or events.
  5. Check how the effect looks on different devices as Parallax Scrolling will look different on a mobile phone than on a desktop screen!

Setting Up Parallax Scrolling

Once you have found your image(s), you can drag and drop them in to the Assets List of your EverWeb project file. Alternatively, you can add these files in to your project when creating the Parallax Scrolling effect.

You can apply a Parallax Scrolling effect to any full width object has a background image. Begin by selecting the full width object that you want to add a background image to. This could be e.g. a full width TextBox, Shape or widget such as a Responsive Row widget.

After selecting the object that you want, go to the Shape Options tab in the Inspector Window. In the Fill section, click on the dropdown menu below the word ‘Fill’. By default, this dropdown menu is set to ‘None’. Change the option to ‘Image Fill’.

Use the Fill ‘Type’ dropdown menu to select the type of fill that you want. For Parallax Scrolling to be available, you must use either the ‘Scale to Fill’, ‘Stretch’ or ‘Tile’ option. When you select one of these options, the Parallax Scrolling section becomes available. By default, Parallax Scrolling is enabled.

Note that when you have Parallax Scrolling selected, you will not see the effect. To see the effect in action, Preview or Publish your site.

Image Overlays

The introduction of Parallax Scrolling to EverWeb, was accompanied by the introduction of a second feature useful image manipulation feature: image overlays. An image overlay is a color that is placed on top of the image. The opacity of the overlaid color can be altered to achieve the effect that you want.

This effect is often used when the background image needs ‘toning down’ so that the objects in the foreground become more visible. Previously in EverWeb you would have had to have covered the image with a rectangle shape and change the shape’s opacity to achieve the same effect.

EverWeb’s new Parallax Scrolling and Image Overlay features give you two new ways to create an even better website effortlessly!

EverWeb on Social Media

You can also find EverWeb on the following social media platforms:

Facebook

Flipboard

YouTube

Twitter

Instagram

Introducing EverWeb SEO Power Up Addon

Thursday, December 24th, 2020

EverWeb SEO Power Up is our exciting new Addon that adds more SEO features to EverWeb’s existing built in SEO capabilities. The new addon gives you more control and flexibility it can be used specifically on the pages in your website that you want to prioritize and optimize for SEO. As you would expect from EverWeb, SEO Power Up is simple and easy to use.

Who Can Use EverWeb SEO Power Up Addon?

Anyone can use SEO Power Up, whether you host with EverWeb or use your own hosting provider. The only other requirement is that you are using EverWeb version 3.4 or higher.

Purchasing EverWeb SEO Power Up Addon

It is very easy to purchase EverWeb SEO Power Up. Simply go to your Site Publishing Settings in your EverWeb Project file by either clicking on your project file name in the Web Page List, or by using the File -> Edit Publishing Settings screen. Tick the checkbox for ‘Optimize & Submit for Search Engines’. If you have not already purchased the addon, you will see a dialog box which will take you though the process.

If you have not checked this box but still use the features of EverWeb SEO Power Up Addon (described below), you will occasionally be prompted by popup messages reminding you that to use these features you need to purchase the addon.

Do I need to Install EverWeb SEO Power Up On Purchase?

There is no installation required for EverWeb SEO Power Up as all its features and functionality are directly built in to EverWeb. Just make sure that the ‘Optimize & Submit for Search Engines’ checkbox is checked in your project file’s Site Publishing Settings. To get to this screen, either click on your project file name in the Web Page List or use the File-> Edit Publishing Settings menu option.

Setting Up Site Pages with Advanced SEO Features

You can apply SEO Power Up Addon’s features to any page in your project file but it is recommended that you do so only on the pages that are most SEO important to you. This will help web crawlers focus on what is important in your site. The Home page of any site will undoubtedly a page you will want to apply SEO to so we will look at this as an example of how to use the SEO Power Up’s Addon’s features.

Start by going to the Page Settings tab in the Inspector Window. Scroll down and open the Search Engine Optimization section if it is not already open.

The ‘Include page in search engines’ check box should also be checked so that SEO Power Up Addon’s features are enabled. If the box is not checked, you will only be able to use the Web Page Description field which has moved in to the Search Engine Optimization Section in EverWeb 3.4.

Adding Keywords To Your Page

Add the specific SEO keywords, or terms, that you want to use on the page using the Keywords section. The keywords will usually be the primary and secondary keywords, or terms, that you have already found through your SEO keyword research.

In my example my website sells specialist golfing equipment so I could add the following primary and secondary keywords to my page: ‘Left Handed Golf Clubs’ and ‘Left Handed Putters’.

You can edit a keyword entry by double clicking on it, editing the field, then pressing Enter to finish. If you want to remove an entry, just highlight it then press the delete key on your keyboard.

EverWeb SEO Power Up and The XML Sitemap file 

EverWeb SEO Power Up creates an XML Sitemap file for your site when the site is published. This file informs Google, and other search engines, about the pages and files that you consider important in your site. The file also includes other useful SEO information for search engines about the files or pages you are targeting for SEO. 

Such information includes for example, when the page was last updated, how often the page is changed, and any alternate language versions of a page.

Your website’s XML Sitemap will be submitted to Google, Yahoo, Bing and Alexa notifying them of your updated site each time you publish something new.

Priority and Frequency

The Search Engine Optimization section of the Page Settings tab is also where you can assign ‘priority’ and ‘frequency’ to the important pages in your site, according to sitemap protocols.

To use these features, the ‘Include in XML Sitemap’ checkbox should be checked as this will make the ‘Priority’ and ‘Change Frequency’ fields available to you. 

If you have not purchased EverWeb SEO Power Up, you will be reminded of this occasionally when using the Priority and Change Frequency fields.

The Priority field has a can have a value between zero and one. Zero means that the page has no important, 0.5 represents a neutral importance and 1.0 is very important.

The following lists examples of the Priority values that should be assigned to your pages:

  • Priority value from 0.8-1.0: for pages such as your Home page and product information, major features and major category pages.
  • Priority value from 0.4-0.7: is often used for articles, blog entries, minor category pages and FAQs.
  • Priority value from 0.0-0.3: are used for old news pages and for those pages where the information is no longer relevant.

The Change Frequency field tells search engines approximately how often each page is updated. An update refers to actual changes to the HTML code or text of the page. Select the Change Frequency that is appropriate to the page. For example:

  • NEVER: Is used for pages that contain out of date news stories, old press releases etc.
  • YEARLY is used for Contact, “About Us”, login, registration pages
  • MONTHLY for FAQs, instructions and infrequently updated articles
  • WEEKLY: should be used for pages such as Product information page and website directories
  • DAILY: Is used for page types that include Blog entry index pages, classified advertisements and small message board
  • HOURLY: This category is used for major news update sites, weather information and forums
  • ALWAYS for pages relating to items such as stock market data and social bookmarking categories

The Priority and Change Frequency fields should only be used on the pages of your site that are SEO important. Pages that are not important e.g. an About Us type page, do not need any SEO settings applied to them.

For more information about other ways of improving your SEO, check out the  SEO for EverWeb Video course.

Publishing Your Site

Prior to publishing your website, go to the project file’s Site Publishing Settings using either the File, Edit Publishing Settings menu option, or by clicking once on the name of your site in the Web Page List.

Check the box ‘Optimize & Submit Website to Search Engines’ if it is not already checked. If you have not already purchased SEO Power Up and check the box, a dialog box will appear with options to purchase or remind me later.

If you have an EverWeb+Hosting 10GB or higher account, EverWeb SEO Power Up is free for you.

The robots.txt File

In addition to the Sitemap XML File, one additional file gets published when you publish your site – the robots.txt file. This file tells search engine crawlers which pages, or files, the crawler can or can’t request from your site. Crawlers can ignore the file if they want, but it is still useful to have this file created.

Exclusive to EverWeb+Hosting Customers: Gzip Compression

GZip Compression is a built-in exclusive feature for EverWeb+Hosting customers. Compression is enabled on EverWeb’s servers so that your websites load faster. GZip compresses and decompresses files intelligently between server and browser, so reducing the size of your website’s HTML, CSS and JavaScript files. The end result is reduced bandwidth usage and faster website loading!

EverWeb’s SEO Power Up Addon has some great features to give you additional SEO tools all within EverWeb. Stay tuned as we hope to add more features to this exciting addon in the future!

EverWeb on Social Media

You can also find EverWeb on the following social media platforms:

Facebook

Flipboard

YouTube

Twitter

Instagram

Adding Apple Podcasts To Your Website in EverWeb

Thursday, December 10th, 2020

When using Apple’s Podcast’s app on iPhone, iPad or on your Mac (or via iTunes depending on your macOS version) you can search, listen and download thousands of podcasts. If you want you can add these such podcasts from the Apple Podcast app in to your own website!

Finding The Podcast You Want

The resource to use to find the podcast you want to use is Apple’s Marketing Tools website. This website contains a number of different marketing resources for a variety of Apple’s services such as News, Apple TV, the App Store and so on.

Click on Apple Podcast Toolbox to access the Podcast Marketing Tools Portal.

To start, enter the name of the podcast that you want to embed in your website. This could be, for example, a specific podcast name or just the name of the podcaster.

In this example, I want to embed a podcast about the iPhone 12 that I recently listened to from the Apple Insider website. In this case, I just enter Apple Insider in the search box and press Enter.

In the results I can see Podcasts and Podcast Episodes. ‘Podcasts’ are like categories. Apple Insider has three categories. Each category will, therefore, contain Podcast Episodes. I can filter the search results by Type of Podcast and by country if I want to but in my example it is not necessary to do so.

As I want to find a podcast episode about Apple’s iPhone 12 I start by clicking on Apple Insider’s general Podcast category. On the next screen is a list of Podcast Episodes. Once I have located the podcast episode that I want, I just double click on its title. If you do not see the podcast you want, expand the section by clicking on ‘Show More Episodes’.

Podcast Embedding Options

You will now be on the Podcast Episode page which contains a number of different sections. For our purposes, we are interested in three sections: Content Link, Podcast Player and Short Link. We will look at each of these options and how to add each of them in to your EverWeb made website project.

Content Link

A Content Link is the hyperlink to the podcast episode you have elected. The link is the full URL All you need to do in the instance is to copy the Content Link to the Clipboard using the ‘Copy Link’ button.

Once you have copied the link, go to the place in your EverWeb Website where you want to add the link. For example, you could attach the link to a piece of text, an image, or a button. In this example, I am going to attach the link to a piece of text in my page. 

Highlight the Text that you want to use, then go to the Hyperlinks Inspector.  Click on the box to the left of text ‘Enable as hyperlink’ to enable the settings. Next, click in the ‘Link To’ field and select ‘An External Page’. If you would like the podcast to open in a new page when your visitor clicks on the link text, select ‘Open in new window’ as the Behavior. The last step is to click in the ‘URL’ field and paste in the link to podcast from the Clipboard.

You can customize the link formatting using the Hyperlink Formatting section. Once you have finished your customizations, use Preview from the Toolbar to test the link.

Short Link

To use a podcast episode Short Link in your website, start by clicking on the ‘Generate Link’ button in the Short Link section of the Podcast Episode page. When the link has been generated, you will see it displayed on screen. Use the ‘Copy Link’ button to copy the Short Link to the Clipboard. 

Next, follow the instructions from the Content Link section above to add the Short Link in to your EverWeb made website project, then test the link using Preview.

Short Link is sometimes used if it is not possible to paste long links in to your site. This is not a limitation in EverWeb so you can use either option. There may in fact be valid situations where you may want to use a Short Link to mask the full address. 

The advantage of using Content Link over Short Link is that the Content Link generally tells you the name of the podcast episode whereas the Short Link is only a randomly generated link name.

Podcast Player

The last option for embedding podcast episodes in to your website is by using the Podcast Player option. Use this option when you want to embed Apple’s Podcast player in to your website. The Podcast Player can be customized to have a light or dark background, and the player can be specifically sized if required. Additionally, the player has a ‘See more’ option so that visitors can explore more podcast episodes from the podcaster.

To use the Podcast Player, simply click on the ‘Copy Embed’ button to copy the embed code to the Clipboard. Next, go to the page in your EverWeb project file where. you want the player to be embedded. 

In this instance you will need to use EverWebs HTML Snippet widget, so go to the Widgets tab and drag and drop the widget on to the page.

Click inside the HTML Code Box and paste in the Embed Code from the Clipboard. Click ‘Apply’ to finish. If you do not click on Apply, the code will not be saved in the Code Box.

You will not see any change in the Editor Window once the code has been applied, so use Preview to test that the embed code works correctly before publishing your site. Using Preview in this instance is also useful as you can see if the Podcast Player is positioned correctly on your page.

Adding podcasts from Apple’s Podcast repository is easy and has the flexibility for you to add them to your website in exactly the way in which you want them displayed. For a video walkthrough of this EverWeb feature, just click on the image at the top of this page!

EverWeb on Social Media

You can also find EverWeb on the following social media platforms:

Facebook

Flipboard

YouTube

Twitter

Instagram

EverWeb’s Hyperlink to Current Page Feature

Thursday, November 26th, 2020

EverWeb’s Hyperlink to Current Page feature gives you an easy way to add a ‘Go to Top’ of page function to your Master Page and you can also it with Scroll Position in your Master Pages!

Many websites use a long form page format style. This style of page is particularly useful on mobile devices where it is often preferable to scroll up and down a long page rather than clicking back and forth to different pages. This page style, therefore, makes a ‘Go to Top’ of page feature a good idea to implement. Your visitors can quickly jump back to the top of the page. 

You can add a Go To Top of page feature on a page by page basis which is what you have to do if you are using any version of EverWeb up to version 3.3. EverWeb version 3,4 adds the new Hyperlink to Current page feature which means that you can now add a Go to Top feature within your Master Pages which will save you lots of time and effort.

Adding a Go To Top of Page Feature

  1. First go to your Master Page and add your ‘Go to Top’ of page icon, image or TextBox. In this example, the Master Page has a responsive page layout. It is, therefore, a good idea to place the Go to Top TextBox in a Responsive Row widget within the Footer area. If you are using a Centered Page Layout, add the TextBox button directly in to the Footer area.
  2. Once you have added your own Go to Top object, keep it selected and go to the Hyperlinks Inspector. Click on the checkbox to ‘Enable as Hyperlink’. This will make all of the Hyperlink options available to the object.
  3. Set ‘Link to’ as ‘One of my pages’, set ‘Behaviour’ to ‘Default’ and set the ‘Page’ field to ‘Current’.
  4. You have now finished the set up of the Go to Top featue.

Attach the Master Page to a regular page, if you have not done so already, then preview or publish your site to test. Any page that uses the Master Page will now include the Go to Top of page button.

Using Scroll Position with Hyperlink to Current Page

As mentioned above, you can also use Hyperlink to Current Page with Scroll Position in a Master Page.

  1. If you have not done so already, create a Master Page. In this example, the Master Page will have a Responsive Page Layout.
  2. Remove any unwanted objects from the Master Page. In my example, my Theme Template contains a Full Width Navigation which I will keep and place at the top of the page.
  3. Next, add a Responsive Row widget to the page, below the Navigation Menu widget.
  4. With the Responsive Row widget still selected, add a TextBox button to the Responsive Row. In my example I have added the text ‘Contact’ to the button. When the ‘Contact’ button is pressed, the page will scroll down to the Contact section of the page.
  5. Add a Contact Section to the Footer area of the page containing information that is to appear on all of the pages of my site.
  6. The page structure is now complete. The Contact button in its responsive row and the full width Navigation Menu widget form the ‘header’ of the Master Page.
  7. There is nothing below the ‘header’ until the Footer area. This area will be where content is inserted when the Master Page is attached to a regular page.
  8. Set the Minimum Content Height of the Master Page to 500 pixels.
  9. The ‘header’ and Footer area sections are now adjacent to each other. This is not a problem because when you add content to your regular page (with the Master Page attached), a gap will open up between these sections to allow for content to be added. Remember that the Content Height setting is a minimum setting and expands as you add content as needed.
  10. To create a hyperlink to my Contact section of the Master Page, go to the Contact section of the page. This is where we are going to create a Scroll Position.
  11. Click in the Contact section to select it, then click on Scroll Position in the Toolbar and choose the ‘Set Shape As Scroll Position’ option. Name the Scroll Position ‘Contact’ then click OK to finish.
  12. Now go to the Contact button at the top of the page to attach the hyperlink. Double click on the word ‘Contact’ to select the text.
  13. Go to the Hyperlinks Inspector and click on the checkbox to ‘Enable as Hyperlink’. In this example, set ‘Link To’ as ‘One of My Pages’, the ‘Page’ field to ‘Current’ and set ‘Position’ to ‘Contact’. The Position field is used for Scroll Position names on the page.
  14. The set up is now complete.

Now create a blank page, or use an already existing page, and attach the Master Page to it.

In this example, the page appears to have no content in it. If you drop a Responsive Row widget on to the page, for example, the widget will be placed between the ‘header’ section (i.e. the Navigation Menu widget and the button responsive row) and the Footer area.

One the content that you want has been added, preview the page to test the Contact button.

EverWeb on Social Media

You can also find EverWeb on the following social media platforms:

Facebook

Flipboard

YouTube

Twitter

Instagram