Archive for the 'Hosting' Category

EverWeb’s NEW Contact Forms Enhanced Addon

Thursday, September 26th, 2019

EverWeb 3.0 adds important new features to the Contact Form Advanced widget such as Spam protection using Google’s reCAPTCHA. a styled Submit button and a new placeholder text field. The widget also takes EverWeb and Customer Relationship Management (CRM) to the next level with the introduction of the Contact Forms Enhanced Addon.

Why Use Contact Forms Enhanced Addon?

Contact Forms Enhanced Addon allows you to create a database of contact information from the contact forms visitors to your website have submitted to you via the Contact Form Advanced widget. 

This information is stored securely in your EverWeb Client Area where it can be easily accessed and downloaded in to a comma separated variable (CSV) file.

The Contact Forms Enhanced Addon is a great way to keep important customer information gathered by the Contact Form Advanced widget in one place. For example, the email addresses gathered from the contact form could be used as the basis for a mail shot to existing, or potential, customers.

The replies to questions on your Contact Form could help you better target specific groups or market segments. Or you could use the email addresses gathered so that you could send a regular newsletter to your customers via, for example, MailChimp. There are numerous possibilities.

Contact Forms Enhanced allows you to set up each Contact Form with a unique name. This is perfect if you have more than one contact form in your website, or where you have an EverWeb account that has multiple websites attached to it that each has its own contact form. The unique name property of each contact form will keep your contact form response data properly separated.

In addition to CRM features, Contact Forms Enhanced allows visitors to upload files that you can download safely through through the Contact Form Enhanced area of your EverWeb Client Area.

Setting Up Contact Forms Enhanced Addon

To use the Contact Forms Enhanced Addon, start by either going to the Widget Settings of the Contact Form Advanced widget on your page, or add the widget to the page and style it as you want.

If you have not already purchased the Contact Forms Enhanced Addon, go to the ‘Contact Forms Enhanced Add-ons’ dropdown menu in the Widget Settings and select the ‘Add Contact Forms Enhanced Features…’ option. A dialog box will open with an option to ‘Buy Now’. Click on the button and follow the instructions to complete your purchase. Click on the ‘Learn More’ button to find out more, or the cancel button if you do not want to continue.

Once you have completed your purchase, you will receive three emails:the first confirming your order, the second confirming your payment then the last informing you that the addon has been set up and is ready for use in the Contact Form Advanced widget.

To activate the Contact Forms Enhanced features go back to your form. Click on the ‘Contact Forms Enhanced Add-on’ field’s dropdown menu. You will see the feature enabled e.g. you may see something similar to ‘Contact Forms Enhanced – 1GB (12345)’. If you do not see this, close and reopen the project file and try again. If this does not work, check that you are logged in to your EverWeb account using the EverWeb-> Preferences -> Account menu.

The Contact Forms Enhanced addon is now working. It is usually a good idea to name the form in the Contact Form Name (Online Management) field. This will help you easily identify and manage your form submissions if you have more than one form that uses the Contact Forms Enhanced Addon e.g. ‘Join Our Newsletter!’

Adding File Uploads To Your Form

If you want to include a file upload feature on your form you can now do so. Add a new field to the contact form by clicking the ‘Add’ button in the Form Controls section of the widget. Name the control as you want and set the ‘Control Type field’ to ‘File Upload’. The contact form will update to display a ‘Choose File’ button.

Publishing Your Form and Checking Form Submissions

Once you have set up the contact form, publish the website. Test the form to make sure that everything works properly before ‘going live’ with the form. In this way you can test that the form submissions are working correctly.

Once you have submitted your first form, you should receive an email confirmation in the mailbox of the email address that you stipulated in the ‘Email Address to Send Form to’ field of the contact form. 

The email confirmation will contain a link for you to follow to login to your EverWeb Client Area so that you can manage, search and export your form submission data. 

You will also be able to download any files that have been sent to you via the contact form. The email will also display information about the number of forms that have been submitted and the amount of server space already taken by any file uploads.

Form Submission Management, Reporting & File Uploads

Apart from clicking on the link in the email receipt, you can also access form submissions directly by logging in to your EverWeb Client Area. On the home screen you will see the ‘Contact Form Submissions’ section on the left of the window. Click on ‘View Form Submissions’ to access the form submission data.

The ‘Contact Form Enhanced’ page will be displayed with a summary at the top displaying the number of forms that you have using Contact Form Enhanced, the number of form submissions and the server space used by any file uploads. 

To view your form submissions, click on the ‘Please select your form to access its submissions’ dropdown menu. A list of your forms will be displayed. highlight the form you want and then click on the ‘Select’ button.

You will see the forms that have been submitted displayed. If you want to export the whole list click on the ‘Export’ button.

Use the Up/Down arrows next to any of the column headings to order your form submissions based on that column.

You can search the list too, just enter in the criteria you want and press enter e.g. you could select ‘2019-07’ to select all forms submitted in July 2019.

At the bottom of the page, you can select how many form submissions per page that you would like to see. The default is set at 10, but you can also choose either 25, 50 or ‘All’.

If you want to select all the forms in the list you can tick the empty box to the left of the column headings. Check this box again to deselect all form submissions. 

To select a custom list of form submissions tick the box next to each form submission that you want. Beneath the form submissions per page line, you can export (as CSV), or delete, your selected form submissions using the ‘With Selected’ box.

Contact Forms Enhanced Addon Pricing

You can purchase the Contact Forms Enhanced Addon by either using the Contact Forms Enhanced field in the Contact Form Advanced widget and selecting ‘Add Enhanced Features’ or via the Services menu of your EverWeb Client Area.

Contact Form Enhanced Addon is available in two configurations:

  • 1,000 Form Submissions, 1GB of server space for file uploads for $29.95 USD for one year with discounted pricing if you purchase for a two or three year period.
  • 10,000 Form Submissions, 10GB of server space for $49.95 USD for file uploads for one year with discounted pricing if you purchase for a two or three year period.

EverWeb on Social Media

You can also find EverWeb on the following social media platforms:

Facebook

Flipboard

YouTube

Twitter

Instagram

Introducing EverWeb version 2.8 with Responsive Web Design!

Thursday, November 15th, 2018

What's new in version 2.8

We’re thrilled to announce the immediate availability of EverWeb version 2.8 featuring all new, fully integrated, Responsive Website Design. EverWeb’s new responsive website building features are designed so that you can build either a responsive or traditional style website using the same User Interface, the same widgets and the same features as you have always done.

And that’s not all, as EverWeb comes with 50+ new and enhanced features in version 2.8 including Widget Organisation, Draft mode for Blog Posts, responsive blogs, improved Theme Template Chooser and much, much more. A detailed list of EverWeb version 2.8’s new and improved features as well as maintenance and stability enhancements can be found below.


EverWeb version 2.8 is available in two versions:

  • OS X 10.7 – 10.8 (32-Bit):  Lion, Mountain Lion
  • OS X/macOS 10.9 and higher (64-Bit): Mavericks, Yosemite, El Capitan,  Sierra, High Sierra, Mojave

If you are running OS X 10.6, EverWeb version 2.5.2 is available for you.


When updating to EverWeb version 2.8, the update process will automatically download the correct version of EverWeb for your macOS.


EverWeb version 2.8 Includes…


[NEW] All NEW Responsive Website Design built directly in to EverWeb

[NEW] Responsive Page Layout option in Page Settings enables responsive website design in EverWeb

[NEW] Responsive Row widget for Responsive Web Design in EverWeb

[NEW] Text Section widget for combining images, text and buttons in one highly customizable widget

[NEW] Responsive Image Gallery Widget

[NEW] FlexBox Responsive Widget

[NEW] Many widgets have been optimized for use in Full Width and Responsive page layouts

[NEW] Blogging environment optimized for Responsive Website Design

[NEW] Left and right margin settings for Full Width and Responsive objects in the Metrics Inspector

[NEW] ‘Embed In’ option to embed objects directly into the Responsive Row Widget when object is secondary clicked upon

[NEW] Responsive Blank Theme Template

[NEW] New Responsive Theme Templates have been added

[NEW] New Full Width Theme Templates have been added

[NEW] Theme Templates can be filtered to display either Fixed Width, Responsive, New or All Theme Templates

[NEW] Completely revised and redesigned EverWeb User Manual including a new Responsive Design chapter

[NEW] Widget Organization

[NEW] Updated icon design for the Navigation Menu widget

[NEW] Navigation Menu Widget now includes background color for the standard navigation menu

[NEW] ‘Stick to Top’ option in the Responsive Options section of the Navigation Menu widget pins the widget to the top of the pages when in Responsive Hamburger menu mode

[NEW] You can add a logo directly in to your navigation in the Navigation Menu widget when using Responsive Options

[NEW] Added a link to the Logo image in Responsive Options of the Navigation Menu widget

[NEW] Blog posts can be set as ‘Draft’ so they only publish when you want them to

[NEW] Blog Posts images now have Post Cover Image Options for Full Width and Responsive blogs to set maximum image height and width

[NEW] Use Website Publish Date as Blog Post Date

[NEW] Scale to Fill option added to Image Gallery widget

[NEW] PayPal Widget includes new Image and Description fields

[NEW] Weight options added to the PayPal widget. You can specify kilos or lbs.

[NEW] More descriptive error messages for FTP protocol errors

[NEW] The Insert-> Choose menu option now works in Blog Posts

[NEW] Compatibility with macOS Mojave (10.14)

[NEW] Site Publishing Settings includes an option to automatically include Google Fonts Links from Google’s Servers

[NEW] Paste at mouse location

[IMPROVED] Images should load faster and be sharper, including when used in Image Gallery and Slider widgets

[IMPROVED] Better error messages for publishing issues.

[FIX] Tracking ID in the PayPal widget has been changed to Unique ID

[FIX] Links in the regular Image Gallery widget now work correctly

[FIX] In some instances EverWeb would slow down when layout guides were selected in EverWeb-> Preferences

[FIX] When Auto Save is enabled in EverWeb-> Preferences-> Backup, the File-> Revert to Save menu option is no longer available.

[FIX] Apple Xcode Simulator now works correctly when selected from the File-> Preview menu


How To Update To EverWeb version 2.8

You can easily update to EverWeb version 2.8 by

  1. Launching EverWeb then going to the EverWeb menu at the top of the screen and selecting ‘Check for Update’ or by
  2. Downloading EverWeb from the EverWeb website.

Remember, you won’t lose any previous data when updating since your website project files are stored elsewhere on your computer.

EverWeb version 2.8 is free for EverWeb + Hosting users and EverWeb Standalone users who are within their 1 year of free upgrades and support period.

You can easily check your EverWeb Standalone free upgrade period from EverWeb’s Preferences window or your client area.

If you have passed your one year of free EverWeb upgrades, you can purchase 1 more year of upgrades and support from your client area.

You can easily re-download earlier versions of EverWeb from your client area if you are not ready to purchase an additional year of upgrades and support.

Login to your client area and go to the ‘Manage Product’ page. On the left of this page, select ‘Downloads’ and choose the version of EverWeb that you need, either the OS X 10.6 version, or OS X 10.7 and later, version.


More Information About EverWeb version 2.8

If you need more information about the new version of EverWeb, please check out the following resources:

  • The updated EverWeb website which has up to the moment information in it’s new blogging section
  • New EverWeb videos on YouTube
  • The updated EverWeb User Manual under EverWeb’s Help menu
  • The EverWeb Discussion Forum


If you can’t find what you need, or have any other questions, comments or feedback please let us know. We’re happy to help.


EverWeb version 2.8 Video Walkthrough

Find out more about the new release of EverWeb in our What’s new in EverWeb version 2.8 video.


EverWeb on Social Media

You can also find EverWeb on the following social media platforms:
Facebook

Flipboard

YouTube

Twitter handle @ragesw

EverWeb Site Shield Addon Q&A

Thursday, May 31st, 2018

EverWeb Site Shield Addon Q&A


Google’s recent announcement that the next release of its Chrome web browser would highlight non-secure websites is due to come in to effect on July 1, 2018. The change coming to Chrome version 68 makes this an ideal time to consider upgrading your website from a non-secure HTTP site to an end to end data encrypted HTTP site. Our blog post Google Chrome To Highlight Non-Secure Websites from July explains the background to the changes and how you can easily upgrade your EverWeb built website. Below is our Q&A on EverWeb’s Site Shield Addon


Q. What is EverWeb Site Shield Addon?

A. EverWeb Site Shield Addon enables end to end data encryption of your website data, right from EverWeb’s Hosting Server to your website visitor’s browser window.


Q. What version of EverWeb do I need to be able to use Site Shield Addon?

A. EverWeb version 2.3 or higher supports Site Shield Addon. If you are using a version of EverWeb prior to version 2.3 and have a current Support and Updates plan, use the EverWeb-> Check for Update… menu with EverWeb to update your version of EverWeb to the latest version. If you do not have a current Support and Updates plan, you can purchase this through your EverWeb Client Area.


Q. Is Site Shield Addon the same as an SSL Certificate?

Secure websites use HTTPS and this is enabled through an SSL Certificate. SSL stands for Secure Sockets Layer and it creates an encrypted connection that establishes trust in data transfer between web browser and web server. Site Shield Addon is EverWeb’s branding for the SSL Certificate including EverWeb’s exclusive easy HTTPS implementation from directly within the product at just the click of a button.


Q. Do I need an EverWeb+Hosting Account to be able to use Site Shield Addon?

A. Yes, Site Shield Addon requires an EverWeb+Hosting account.


Q. Can I still use Site Shield Addon with my own Hosting Provider?

A. Site Shield Addon is only available if you have an EverWeb+Hosting account. If you have your own hosting provider, you will need to work with them to obtain an SSL Certificate and to set up HTTPS for your website. Please refer to our post Google Chrome To Highlight Non-Secure Websites from July for more information.


Q. How do I get Site Shield Addon?

A. If you have an EverWeb+Hosting account will be able to access Site Shield Addon. If you have a an EverWeb+Hosting 10GB or higher account, Site Shield Addon is absolutely free.

If you have an EverWeb+Hosting 2GB account you can purchase Site Shield Addon through your EverWeb Client Area.


Q. How much does Site Shield Addon Cost?

A. If you have a EverWeb+Hosting 10GB or higher account, Site Shield Addon is absolutely free. For EverWeb+Hosting 2GB accounts, Site Shield Addon costs $29.95 USD per year. In both instances there are no additional costs involved in upgrading your website from HTTP to secure HTTPS.


Q. Why do I see a Grey/Black Padlock and not a Green Padlock when I have Upgraded to HTTPS?

A. When using HTTPS, you usually see a padlock displayed to the left of the website URL in the browser search bar. You may have noticed that the padlock on some websites is dark grey or black but on other other websites it is green. For all intents and purposes, there is no difference as both indicate that the website is secure. The difference in color indicates that encryption has been implemented technically in different ways.


Q. What happens if I have HTTP references in my website links in EverWeb? Do I need to change these?

A. It is not necessary to change these references, but it is better to do so as this will ensure data encryption.


Q. I checked the box ‘HTTPS Secure URLs’ and published my website, but don’t see the Padlock displayed.

A. If you do not see the padlock displayed in the browser search bar when viewing your website, check the URL in the search box of your browser. You should see that your URL starts with HTTPS. If not make sure that you publish your entire site using the File-> Publish Entire Site menu option.

If you still do not see the padlock, it  is possible that there is not a secure link to an image, widget, fonts or other object on the page. You may need to remove objects one by one to test to see which object is causing the problem. If you are tech savvy, you can use the ‘Inspect Element’ of Safari’s Developer menu to locate the problem (or your browser’s equivalent of this tool.) If you have inserted any code directly in to the page (using the HTML Snippet widget) or in the Page or Site Settings using the Header/Footer Code sections, this may also be the cause of the problem. Try removing any code you may have inserted and test again.


Q. If I have more than one website can I use Site Shield Addon for all of these as well?

Yes, if you have more than one website under your EverWeb website domain, you can use the HTTPS Secure URLs checkbox in Site Publishing Settings for all of your websites.


If you have a question about EverWeb Site Shield Addon, please let us know in the Comments Section below.


EverWeb on Social Media

Facebook

Google+

Flipboard

YouTube

Twitter handle @ragesw

EverWeb’s New Site Shield Addon Explained

Thursday, August 17th, 2017

EverWeb's Site Shield Add-on Explained


Over the last few years, web search giants such as Google and Microsoft have been encouraging website developers to encrypt all data  transmitted between their website’s host server and the end user’s desktop, tablet or mobile device browser window.


Why The Need For Data Encryption?

Data encryption is important for you, and your website visitors, as it provides a safe, secure way of transmitting data across the internet to all the devices your website visitors may be using. It is especially important where internet based financial transactions, such as web shopping carts, or confidential data, such as medical information, is involved. A secure website also gives your visitors more confidence and trust in your website. It’s also more professional and shows that you are up to date with today’s technology.


EverWeb’s Site Shield Addon

EverWeb version 2.4 debuted the Site Shield Addon providing a simple, easy, way to keep your website data secure through end to end data encryption. As you would expect with EverWeb, it only takes a couple of mouse clicks – EverWeb does all the complex, hard work behind the scenes!


To use EverWeb Site Shield Addon you will need:

  • EverWeb version 2.4 or higher. To find the version of EverWeb you are currently running, check the Projects Window that you first see when you launch EverWeb, or go to the EverWeb menu and click on the About option;
  • An EverWeb+Hosting plan. To add the Site Shield Addon to your EverWeb account, go to your EverWeb Client Area and add the EverWeb Secure Shield Addon to your account. If you have a 10GB or higher plan, EverWeb Site Shield is absolutely free. If you have a 2GB plan the Addon costs $29.95/year.


Using EverWeb’s Site Shield Addon

Using EverWeb Site Shield Addon is super easy:

  1. Launch EverWeb and open your Project file
  2. Go to the Site Publishing Settings.
  3. Check the “Use HTTPS Secure URLs” box.
  4. Publish your Entire Website using the File -> Publish Entire Site menu.

That’s all you need to do!


Checking Your Website

When your website has published, click on the ‘View Website Now’ button. You may not notice any change to your website, but if you look at your website’s URL in the browser search bar you may notice that the website now uses HTTPS as it’s prefix instead of HTTP. note that in some instances, you may need to click in the search box itself to see the full URL, or you may need to configure your browser settings to display full URLs.

You will notice that the web address starts with ‘HTTPS’. The ‘HTTP’ part stands for Hyper Text Transfer Protocol, and ‘S’ at the end means ‘Secure’. As such, your HTTPS website will encrypt any data communication between the EverWeb Server hosting your website and your visitors browser window. if your website is only HTTP then the end to end data communication is not encrypted and so not secure.

You may also notice that your website has a padlock symbol next to the URL. The padlock symbol acts a visual indicator that an HTTPS connection is in place and active. If you see ‘HTTPS’ displayed but no padlock symbol, check the page in the Project file. Third party widgets or third party code may be causing problems with the padlock displaying properly. Remember to check the Head/Footer Code section of your website’s ‘Site Publishing Settings’ and the Inspector Window of your web page as well to troubleshoot any issues.


Site Shield Addon For Better SEO

Site Shield Add-on has an addition benefit besides from being ideal for secure online end to end encrypted data transmission. It  is also great for your SEO Rankings as Google gives data encrypted websites a ranking boost over non-secure websites. If you use any analytics on your website, check them after a couple of weeks to see if you have any increase in traffic to your website. Remember that good SEO should always be part of your website design. Check out the SEO For EverWeb Video Course for more details.


EverWeb Site Shield’s the easy way for more secure websites and better search engine rankings all with just the click of a button!


Video Walkthrough

You can see EverWeb’s Site Shield Addon in action in our ‘EverWeb Site Shield‘ YouTube Video!


EverWeb on Social Media

You can also find EverWeb on the following social media platforms:

Facebook

Google+

Flipboard

YouTube

Twitter handle @ragesw

How to Stop Referral Spam in Google Analytics

Friday, July 10th, 2015

What is Referral Spam?

Referral spam is a technique used by spammers to make it seem like you are getting a lot of visitors from their website which entices you to visit their site. This gets more visits to the spammers website.

Although technically harmless to your website, the biggest issue is that referral spam appears in your analytics software, such as Google Analytics, and misrepresents the data in there. It will appear as if you are getting more traffic than you actually are and your conversion rates will be significantly lower.

You can see if you are getting referral spam by doing the following;


  1. Log into your Google Analytics account
  2. Go to your website Acquisition->All Traffic->Referrals
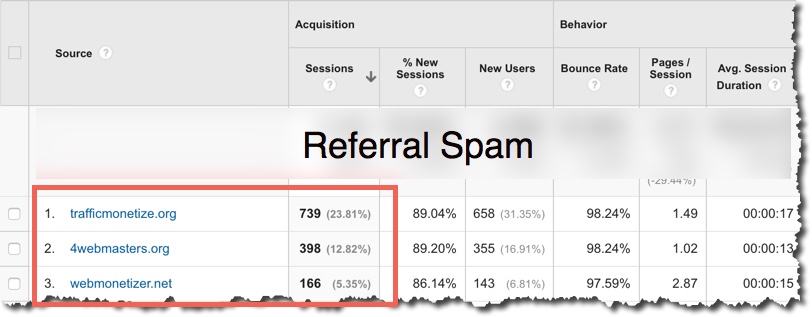
  3. You can usually identify referral spam because it will come from a domain that either has nothing to do with your website content, or implies it is related to seo, traffic monetization etc… Referral spam is usually 100% new users, 0% conversion and a very high bounce rate

Referral Spam Example List

Referral Spam Example List

Can Referral Spam be Stopped?

There are a couple things you can do to help slow down referral spam. However, because these spammers use many different domains and techniques, it does require some maintenance.

You also cannot remove any previous referral spam from your Google Analytics, you can only make sure that in the future you do not see them.

Also, there are so many different domains that spammers may use. In fact there are thousands of domains that may appear in your Google Analytics.

The technique suggested here requires a list of domains so that Google, or your website, know to either not count the traffic as real traffic, or completely block them from accessing your server.


How to Stop Referral Spam

You can stop referral spam by creating a Google Analytics filter which will make sure that when you check your stats in the future, these spam websites won’t appear in any Google Analytics reports. Unfortunately you won’t be able to remove them from previous reports with this filter. To do that, you’ll have to create a Segment which we’ll have to do another blog post for in the future.

To set up a filter to stop the referral spam, follow the steps;

  1. Log into Google Analytics
  2. Go to your Reports page for your website
  3. Click the Admin tab at the top of your browser
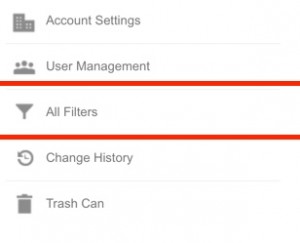
  4. On the next screen select ‘All Filters’All Filters
  5. Then press the ‘New Filter’ button
  6. New Filter Button
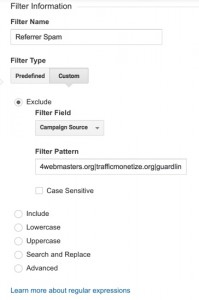
  7. On the next screen you will actually set up your filter. Here are the settings to use;
    1. Filter Name: Referral Spam
    2. Filter Type: Custom
    3. Exclude: Selected
    4. Filter Field: Campaign Source
    5. Filter Pattern: A list of domains separated by a | character. Do not include http:// or www. They are only domain names. The list will keep changing as you notice more referral spam from new domains. Here is what I have set up in this screenshot which you can copy and paste into this field;4webmasters.org|trafficmonetize.org|guardlink.org|best-seo-offer.com|howtostopreferralspam.eu|free-social-buttons.com|100dollars-seo.com|webmonetizer.net|erot.co|floating-share-buttons.com

      Google Analytics Referral Spam Filters

      Set up your referral filter as shown


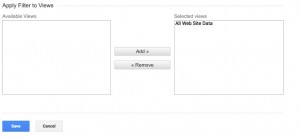
  8. Lastly select all ‘Available Views’ and press the ‘Add’ button to add them to the ‘Selected Views’ list.

    Google Analytics Referral Spam Filters

    Apply all your filters to your views


  9. Now click Save

Starting in 24 hours, your new reports will stop showing the domains you have entered in the above steps.

Blocking the Domains from Accessing your Website

You can actually block the domains from even accessing your website if you have the knowledge to create a .htaccess file. If you use your own web hosting provider you can create a .htaccess file as described here,

For EverWeb + Hosting customers will be adding this feature automatically for you in an upcoming release. Stay tuned for our announcement.


I hope this post was useful and if you have any questions, be sure to post in the comments below.


Who’s visiting your EverWeb website?

Tuesday, June 2nd, 2015

We’ve add the ability to easily check your visitor stats within your EverWeb client area (EverWeb + Hosting accounts only).

Without any configuration or installation on your end you can now see;

  1. How many visitors your website is getting
  2. Where your visitors come from (search engines, other websites, etc…)
  3. Where in the world your visitors are located
  4. Your top visited pages
  5. How your visitor count changes month over month
  6. Plus a lot more

To view your website stats simply follow these steps;

  1. Login to your client area
  2. Click the ‘Services’ tab and then ‘My Services’
  3. You will see a list of your services with us. Click the table row you want to check (most customers will have one hosting service listed)
  4. On the next page, press the ‘Metrics’ button near the bottom of the page

These stats will give you a very interesting overview of how your website is being used, who’s visiting your site and where your most popular pages.

If you’re looking for even more stats, EverWeb integrates very easily with Google Analytics. Remember, Google Analytics is very powerful with lots of features and may be overwhelming at first.

How To Set Up A Mobile Friendly iWeb Site

Tuesday, September 18th, 2012

More and more users accessing the internet via their mobile devices. As a result it is important for the user experience that the webpages they browse look good on their hand-held devices. The video tutorial below will show you how you can create a mobile friendly version of your iWeb website. Users visiting your website on an iPhone or Android device will automatically be redirected to the mobile version of your website. Be sure to use the sample code for setting up the redirect:

VIDEO TRANSCRIPT:

In this tutorial, I am going to show you how you can create a mobile version of your iWeb website, so that users visiting your site on an iPhone or Android will be directed to your mobile friendly website.

In order to follow this tutorial completely, you must have a RAGE Web Hosting account. You can sign up for a hosting account ragesw.com/hosting

You will also need iWeb SEO Tool, or SEIntelligence, which are two applications offered by RAGE Software that allow you to add search engine optimization features to your website.

Our first step in the process will be to setup the address for the mobile site. If you have paid attention in the past to the addresses of websites you have visited on your phone, you may have noticed that typing in facebook.com for example, will turn into m.facebook.com – In this case, M represents mobile.

Now we must set it up so that your address will turn into something similar. The first thing you need to do is login to cPanel. Your cPanel login information was sent to you in your RAGE Web Hosting: New Account Information email. When you are logged in click on the icon that reads Subdomains.

In the Subdomain text field, type in mobile just like you see here. You will notice that your mobile URL will now be the combination of this subdomain plus your domain. So in my case, it will be mobile.ragesw.net. Just a quick note, if you have multiple domains on your account, you can click this drop down menu to select the domain you want to use for the mobile site. You will notice that the Document Root field will automatically be filled with www/mobile. Take note of that because we will be using it later on in the video.

The next thing we are going to do is prepare our mobile sites in iWeb. What we will do is create a new site by going to File and selecting New Site. Since we want our mobile site to be mobile friendly, our best option is to choose the blank page. Now, I’m just going to get rid of this text box, and then disable the navigation menu. This is done by clicking on Inspector, and clicking on the Page tab, and unchecking the options to Include this page in the navigation menu, and DIsplay navigation menu. The reason we do this is because since we want to ensure mobile friendliness, we basically want a blank page and none of the page defaults from iWeb.

With the inspector window still opened to the Page tab, click on the Layout button, and change content width to 300 pixels. This is going to create a mobile size canvas for us to create our mobile sites on. Repeat this for all of the mobile pages you are going to make.

Now you can design a more mobile friendly version of your website. This can include images that are smaller in file size, and larger more compact text. It might be a good idea to visit some mobile friendly websites on your phone so you can get a better idea of how to design your mobile site. One tip is to always include a link to view your full site. A way to do this is to just create a text box that says View Full Site, highlight the text, open the Inspector window, go to the hyperlink tab, click to enable as hyperlink, and type in the non-mobile link for this respective page.

When you are done creating your Mobile friendly site, you will need to publish it. The important thing here is to publish the mobile site to that new subdomain that we just created.

So if you are using iWeb 09, you will go to the publish page by clicking on the site name, and select Publish to FTP server from the drop down menu. Customize the site name and contact email to your liking.

Input your server address, username, and password. In the Directory/Path field, type in the location of your subdomain, which if you remember from earlier, was www/mobile.

In the website URL field, make sure you type in your URL as http://mobile.yourdomain.com. In my case, I will type it in as http://mobile.ragesw.net

When you are all ready, click the Publish Site button to publish the site.

If you are using an older version of iWeb, publish this new mobile site like you would publish your regular site. The most important thing to remember is that you need to publish the site by putting www/mobile in the Directory Path field. If you forget to do this, it will not work, and you risk overwriting your original website, so do not forget about this step.

When the site has been published, you can visit it on your phone by going to mobile.yourdomain.com to make sure everything looks the way you want it to. If not, go back to iWeb and make your changes and then publish the site once again.

Once you are satisfied with the mobile version of your site, there is one last thing that needs to be done in order to make the phone know to send the user to the mobile version of your site.

Go to ragesw.com/blog. In the search field, type in web hosting tutorials, and select the result that reads RAGE Web Hosting Video Tutorials. The direct link to that page is this. On this page, locate and click on the link that reads Setting Up A Mobile Friendly iWeb Site.

On this page, you will see this link that reads “Be sure to use the sample code for setting up the redirect” Click on this link and copy the code that will appear on the page that follows.

Now, before we paste this code somewhere, I want you to first publish your main website from iWeb to a local folder on your hard drive. Then load that local folder into iWeb SEO Tool, or SEIntelligence, whichever program you use. In this example, I am using iWeb SEO Tool, but the same principle applies to SEIntelligence.

With your website loaded in the tool, paste the code that we just copied in the head code section of the Site Settings tab. Replace the URL which reads mobile.ragesw.net to your mobile URL. If you are using SEIntelligence, open the Site Settings tab, and paste the code in the Header Code/Google Analytics box. Also replace the mobile.ragesw.net URL with your mobile URL.

If you have another code in this box, such as Google Analytics, just paste this code above it. Then click on the Apply To Entire Site button.


Using Sparrow With Your RAGE Web Hosting E-mail Address

Friday, September 7th, 2012

Sparrow is a neat e-mail client that has gained much popularity over the last few months, especially since being bought out by Google. In the video below, you will learn how to easily setup Sparrow on your Mac to use with your e-mail address hosted with RAGE Web Hosting.

Video Transcript:

In this tutorial, I’m going to show you how to setup Sparrow for your RAGE Web Hosting email account. This tutorial assumes you have already setup your email address in cPanel. If you have not done that yet, please do so now and continue with this tutorial when you are finished.

The first thing we need to do is download Sparrow. This can be done at sparrowmailapp.com. Look for a button the says Sparrow for Mac. If the site looks different than what you see here, don’t worry, just find a button or link that either says Sparrow for Mac, or something similar to it. Once on the Sparrow for Mac page, find a Download button and click it to download. At the time of this tutorial, it is September 2012. You can either download a free version which has some ads in it, or pay the fee to download the non-ad version, whichever you prefer. Once downloaded and installed, launch Sparrow.

Upon initial launch, you should see a window that looks similar to this. Type in your e-mail addresses and password. This is the e-mail address and password that you setup in cPanel. For Port, leave as Auto, and then remove the Secure Connection check mark. Click on the Custom button so that we can enter custom details.

For server type, the default selection is IMAP. I recommend leaving that as your server type. Your server address will be mail.yourdomain.com So for example, since my domain is ragesw.net, my server address is mail.ragesw.net. When you are done, click the Next button.

On the next window, type in mail.yourdomain.com as the SMTP server. So since my domain is ragesw.net, I will type in mail.ragesw.net

For Port, make sure to put in 26 just like I am doing. Once again, remove the Secure connection check mark.

The other fields should already be filled in for you. If not, put a check in Use Authentication, and once again type in your e-mail address in the Login field and your password in the password field. Then click Next.

Sparrow is now setup for you and you can begin sending and receiving e-mails.

How To Transfer Multiple Domains To RAGE Web Hosting

Tuesday, July 17th, 2012

This instructional video is going to show you how to transfer more than one domain when signing up for RAGE Web Hosting.

VIDEO TRANSCRIPT

If you are signing up for RAGE Web Hosting for the first time, and you have multiple domains that you want to transfer over, follow these important steps.

First, click on the Sign Up Now button to be taken to the start of the signup process.

Next, select the second option for transferring your domain. Type in your domain, and select your domain’s extension from the drop down menu. Then click the Click to Continue button.

This next page will show you that your domain is available. This is true because you selected to transfer your domain. Had you typed in a non-existent domain, it will tell you that the domain is not available for transfer.

Double check that your domain has been spelled correctly, and then click the Click to Continue button.

Now select your billing cycle, and any add-ons that you want to purchase. Since you are transferring multiple domains, you will need to select the option to Host 3 Additional domains so that you can host more than one domain on your account. If you plan on having more than 3 domains, then you will need to order two hosting accounts.

When you are done, click on the Add to Cart button.

Here is where you will need to enter the EPP or authorization code for your domain. You need this code in order for us to transfer your domain correctly. You can get this code from your account at your current registrar, or you can phone or email them and ask them for it. You will also need to unlock the domain in order for the transfer to be put through.

When you are done, click on the Update Cart button.

You will now see your total with your hosting package, your domain you are transferring, and any add-ons you have included. Now, in order to include those other domains you want to transfer, click on the Home button, and then type in your domain, and select the Transfer button. It should say that your domain is available to transfer. Double check the correct spelling of your domain and then click Add to Cart. You will then need to enter the EPP or Authorization code for this domain.

When you are done, scroll down and click Update Cart. You will notice your other domain has now been added to the order. Let’s do this process one more time. Click on the Home button, and then type in your domain. Then click the Transfer button. Double check your domain’s spelling, and click Add to Cart. Enter your domain’s EPP or Authorization code, and then click on Update Cart. All of your domains will now have been added to your cart, and you can now checkout.

iWeb Publishing Error – There was an error communicating with the FTP server. Try again later, or check with your service provider

Thursday, June 21st, 2012

A common error that users are experiencing when publishing from iWeb is the error communication with the FTP server. Typically, this error stems from a file on your site having an incorrect file name. This is a bug in iWeb that causes the error to appear and the site to not fully publish. This tutorial below will address this issue, and show you an alternative for publishing the entire site.

Video Transcript

If you publish your site from iWeb, and receive an error message that says “There was an error communicating with the FTP server. Try again later, or check with your service provider”, you most likely have a file on your site that does not contain a proper file name, and is giving iWeb a hard time with publishing. This is a bug in iWeb, and because of this, you will not be able to publish your site through iWeb and many other FTP clients.

Unfortunately, we are not told which file or files are causing this, so locating the issue to remove it can be difficult.

Luckily, iWeb SEO Tool is able to handle this issue and can publish the site as is. I will show this by publishing this exact same website that gave me this error.

First, I will publish the site to a local folder.

Now I will launch iWeb SEO Tool, and load the folder that I just published from iWeb.

Next, I will click on the Publish button and enter my FTP details. I keep my FTP details bookmarked in iWeb SEO Tool, so all I need to do is click on the FTP account and all my information will appear. You can do this also by first filling out your FTP information and then clicking this plus sign down here.

So now I will click on the Upload button and publish my site. I will fast forward through the publish so that you can see at the end, my site has been published successfully, and I received no error message like I received in iWeb.

I just want to remind everyone that iWeb SEO Tool is free for any RAGE Web Hosting user who is signed up for at least one year, so if you are looking to use iWeb SEO Tool to help publish your site, I highly encourage taking advantage of the free iWeb SEO Tool promotion as well.