Archive for the 'RapidWeaver Help' Category

SEO Video Training : Keyword Research

Saturday, April 16th, 2011

In the first of two tutorials for the Planning Stage of our SEO process, we are going to discuss how to choose proper keywords, and an easy way to organize them. Remember to visit video course page, which will have all the tutorials outlined in a very organized manner.

Video Transcript

The reason we are starting with keyword research is because we will be using our keywords throughout all three stages. So to begin our keyword research, open up your web browser and go to google.com. Next, type in the search phrase “google keyword tool” and click on the first result, which should be the Google Adwords External Keyword Tool.

This will take us to the Google AdWords keyword suggestor tool. Type in the Captcha if the popup box appears for you. In the box that tells you to enter your word or phrase, type in a keyword or two that you think most closely relates to the content on your site. As an example, I will type in golf clubs.

After just a few seconds, a long list of potential keywords shows up. Let’s start with the first keyword we see. To the right of this keyword, we see that there is a green bar under Competition. What this means is that this particular key-term has many advertisers competing for top placements in the sponsored links section of a Google search. A key-term with not as much green in its advertiser competition bar will not have as many advertisers competing for the sponsored links section. What this indicates to you as you are creating your web site, is that targeting a key-term with high competition may be an extremely tough challenge, and as a result, you may find more success targeting a key-term with not as much competition, which would be indicated here by a smaller amount of green in its bar.

I’m going to just pause this demonstration of Google’s keyword tool, to show you a good way of double checking that the competition is in fact low. So let’s assume that the keyword I have found with low advertiser competition, and a high search volume is “golf tour club.” I will go to google, and search for this term. The first thing I will notice, is the number of results. This term actually has a relatively high number, so that might indicate to me that this term may be too competitive. The next thing I will do, is check out the sites that rank highly for this term. What you want to be asking yourself, is whether or not these sites are of high quality or low quality. If they are high quality sites, this is another indicator to you that this phrase may be hard to compete for. If they are low quality sites, then thats when you might decide to target this phrase. To figure out if they are high or low quality sites, it will have to be a judgment call by you, but you can visit the site, and see if it is professionally done, and then also see if it is a site that has a lot of incoming links, or even see if it has a high page rank. We will learn more about incoming links and page rank later on in the video. For now, let’s get back to Google’s keyword tool.


Beside the advertiser competition is the Global monthly search volume. This number is based on an average of the global monthly google searches for each key-term performed over a 12 month period.

The figure beside the Global monthly search volume is the Local monthly searches. This number is based on the 12 month search average for your targeted country and language. The search I am showing here is targeted for the United States, and English.

Finally, the Local Search Trends bar graph shows the monthly fluctuations in searches for this term. It is also based on your targeted country and language.

Another cool feature that Google has added to the keyword tool is the availability to sort the keywords. On the right side of your page, you should see a drop down menu right beside the words Sorted by. The default will be set to Relevance, however, you can change it to any of the options you see here such as keyword, competition, and global monthly searches.

As we scroll down the list, you will begin to see all of the other suggested related terms, along with their advertiser competition and search volume. It is highly recommended that you spend some time going over some of these key-terms, creating new ones, and figuring out some good terms that you can use that are still highly searched, but do not have as much competition associated with them.

When you see phrases that you like and want to use, click on the check box which is located on the far left side of the keyphrase. Repeat this for all keywords that you want to target. Once you are done, you can download these keywords. Click on the button that reads Download and choose Download Selected. Choose whichever format you’d like, and download your keywords. Keep this list handy as you will be referring back to it throughout your optimization.

RapidWeaver SEO – Introduction

Wednesday, April 13th, 2011

The first video in our RapidWeaver SEO Video Course outlines what this course is about and what you can expect from all of the tutorials in the course. Remember to get visit the video course page, which will have all the tutorials outline in a very organized manner.

Video Transcript

Hello, my name is Jeremy and over the next little while, I will be showing you how to properly optimize your RapidWeaver web sites so that you can have the best possible chance of ranking at the top of search engines.

Search Engine Optimization, or SEO for short, is the process of attracting more visitors through search engines. You will notice how I do not define SEO as having a top ranked site. This is because even if you have a site that ranks at the top of all search engines, there is no guarantee that searchers are typing in the specific keywords you rank for, and will even click your website in the search results. In this series of tutorials, we will cover the basics of how to discover highly searched key-terms and how to determine which ones are best to target.

These tutorials have been created to help you to understand the major optimizations, and how to implement them on your site. With so much information available on the web, search engine optimization can seem very confusing and time consuming to learn. These tutorials are to-the-point, and allow you to visualize what needs to be done, so that you can have a better understanding at a much quicker pace than if you had to sift through a 400 page book.

SEO is a process that we must go through in order to achieve our desired results. It’s not something you do once and just forget about. It’s a form of marketing and if you want to keep on improving your chances at success and growing your business it is something you will constantly evaluate. Remember, if SEO were an easy thing to do, every site would be number one in search engines, which is simply impossible.

This video will be broken down into three stages. The first stage, called the Planning stage, will be the briefest. We will go over a couple of things that we should do before we even begin optmizing our website. The second stage will be the on-page optimization stage. This is where we will be looking at the different methods for making our actual site more search engine friendly. The third and final stage will be the off-page optimizations, where we go over different methods of getting our RapidWeaver website noticed by search engines.

The video will be shown in step-by-step format. This does not mean that you must follow this plan perfectly, but it is setup that way so that those who require this type of instruction still have that opportunity.

I want to make a note that the applications I use in this video are available to purchase or download for free at www.ragesw.com. You are not obligated to purchase any of these applications. The work can be done by hand. That is, you can still complete the tasks without the applications, however, using the applications will make your life a lot easier.

Remember, if you have any questions or do not understand one or more of the concepts, you can start a thread in our SEO forums, or submit a ticket through our support system.

How To Use MapDesign With RapidWeaver

Wednesday, March 9th, 2011

In this video, we’re going to show you how you can add an image map made in MapDesign to a RapidWeaver 5 website.

Video Transcript

There are two types of image maps that you can make in MapDesign. A Simple map, and an Effects Map. This tutorial is going to show you how you can add a Simple Map to your RapidWeaver website.

After you have created your image map, you will need to export the image map by pressing the Export To Web Site button. Make sure Simple Image Map is selected and press the Next button and save your image map.

Once you save your image map, you will notice that you have an index  file, as well as an images folder that contains your image.

Open RapidWeaver and add a new page. Make sure you select the HTML Code page. Next, open the images folder, and drag and drop the image into the Resources section.

Now open up the index file in an HTML editor so that you can see the code. Highlight all of the code that is within the opening, and closing body tags. Copy this code, and go back to RapidWeaver, and paste the code in your HTML Code page.

Locate the image path, and replace images with resources just like I have done.

When you press the preview button, you will see your image map, and you can test to see if it works by clicking on the hotspots.

How To Add A Statcounter Code In RapidWeaver

Friday, February 4th, 2011

Keeping track of your website visitors is a very important way of analyzing users behavior on your website. It is also an important way of learning about the different search engines, and websites that refer users to your site. This tutorial is going to show you how you can add a Statcounter code to your website made in RapidWeaver 5. Remember to check out the SEO For RapidWeaver Video Course to learn how to make your RapidWeaver site start ranking higher in search engines.

Video Transcript

In this quick video tutorial, we are going to add a Statcounter.com code to a website made in RapidWeaver 5.

The first thing we will do, is open up our browser to www.statcounter.com. If you do not have an account with statcounter, click on the register button on the top left part of the navigation menu. Fill out all the required information and register your account. After you have registered, login with your username and password. Once you are logged in, you will need to create a new project in order to get your code. Click on the Add New Project button.

In the following form, you will need to enter a title for your website, your website URL, a category for your website, and your time zone. You also have the option of having the statcounter not count your visits to the site by blocking your IP. If you don’t care for this feature, just leave it blank.

After you click the “Next” button, you will then need to click on the Configure and Install Code button. You have a few options for which type of statcounter you want. It is recommend that you use the Invisible statcounter, that way, you are the only one who knows how many hits your site gets. Then click on the next button. The drop down menu should show have Default Installation Guide selected. If not, please make sure it is. Then press the Next button. Now we are given our Statcounter code. Again, we must highlight this code, and copy it.

In RapidWeaver, there will be a heading on the left part of the application that says STATS. Below that, is the Configure option. Click on Configure. In the text box that says Google Analytics, paste the code that we just copied.

If you already have a Google Analytics code in this same box, make sure that you are not replacing the Analytics code with the Statcounter code, but placing them both in the same text box.

To learn how to get your RapidWeaver website ranking higher in search engines, be sure to check out the SEO For RapidWeaver Video Course at ragesw.com

How To Get Your RapidWeaver Website Listed in Google

Tuesday, February 1st, 2011

Getting Google and other search engines to find all of the pages on your website can sometimes be difficult. In order to get these search engines to be aware of your website, it is a good idea to create an XML Sitemap and submit it to these search engines. The following video tutorial will teach you why we do this, and how it can be done easily with Sitemap Automator. Remember to check out the SEO For RapidWeaver Video Tutorial to learn how to make your RapidWeaver website more visible to search engines.

Video Transcript

In order to get your RapidWeaver website listed in search engines, I am going to show you how to create an XML Sitemap, and submit it to the major search engines such as Google, Yahoo, Bing, and Ask. We will also take it one step further by verifying our website with Google Webmaster Tools. The verification process is necessary so we can let Google know that we are the website owner and any confidential information is going to the right person or people.

First off, what is an XML Sitemap? An XML Sitemap is basically a blueprint of your website, made specifically for search engines. The Sitemap will contain the links to all visible pages on your website, so that search engines can be made aware of these links, and then index them in their search results.

To some, this process might sound somewhat complicated, but is simplified when we use a third-party tool. For this demonstration, I will be using our tool called Sitemap Automator. Sitemap Automator is available for download at www.ragesw.com
So to create your sitemap, first click on the New Sitemap button, and then type in your website URL. Next, you’ll need to click on the Create Sitemap button. Depending on how big your website is, this scanning process can take up to a few minutes. I will fast forward through this process.

When your site has been fully scanned, you can now click the Generate Sitemap button to proceed to the next step. The next thing we have to do, is upload our sitemap. Select Publish to FTP and press the Publish button. Fill in your server URL, followed by your username and password. For the Root Directory field, many of you can leave this blank, but for those who do not publish to the root directory, or have multiple websites on your hosting account, you will most likely need to type something in. For example, those who use RAGE Web Hosting, you will need to type in public_html. You can also choose to browse your server to locate the right folder to publish to. When you are done filling out all the fields, press the upload button.

After the sitemap has been published, we must then go to our Google Webmaster Tools account so that we can manually submit our sitemap. If you do not have an account, you can create a free one by going to http://www.google.com/webmastertools.

Once you are logged in, you will need to add your site by typing in the URL and pressing the continue button.

After you’ve typed in your URL and clicked continue , the next page will show us the verification method. As mentioned earlier, Google requires us to verify that we are the owners of the site so that we can be safely provided with information regarding our websites.

The first thing you want to do, is select Upload an HTML file as your verification method. Then click on the download link to download the verification file. You must know where this file is being saved in order to use it in our next step.

After you have downloaded the file, go back to Sitemap Automator, click on file in the menubar and select Publish Verification File. Then click on the Select Verification File and find the file that you just downloaded. The next step is to publish the file.

Your next step is to head back to Google Webmaster Tools and click the verify button. Once verified, you must now tell Google Webmaster Tools where it can find your sitemap. Click on your site URL, then click the plus sign next to Site Configuration. and then click on Sitemaps. Next, click the Submit a Sitemap button, and in the text box, type in sitemap.xml as you see here. Then click Submit Sitemap.

Finally, our last step, back in Sitemap Automator, click on the notify search engines button, and your sitemap will be submitted Google, Yahoo, Ask, and Bing.

How To Add Google Analytics To A RapidWeaver Website

Thursday, January 20th, 2011

This quick tutorial will show you how you can obtain a Google Analytics code and add it to your website made in RapidWeaver 5. Remember to check out the SEO For RapidWeaver Video Tutorial to learn how to make your RapidWeaver website rank higher in search engines.

Video Transcript
To add a Google Analytics code to your website made in RapidWeaver 5, the first thing you will need to do is get the code from Google Analytics.

Open your web browsers to google.com/analytics and press the Access Analytics button, and sign in with your username and password.

If this is your first time getting an analytics code, you will need to press the Sign Up button, otherwise, click on the Add New Account button, and follow the same procedure.

On the signup page, you will need to enter your website’s URL, give the Account a Name, and enter your country and time zone. Fill out the remainder of the signup form until you get to the fourth step of the process.

The fourth step will show you a code that says “Paste this code on your site.” Highlight that code and copy it.

In RapidWeaver, there will be a heading on the left part of the application that says STATS. Below that, is the Configure option. Click on Configure. In the text box that says Google Analytics, paste the code that we just copied.

When you publish your site, the Analytics code will be present. You may need to wait a few days until you start seeing stats in your account.

To learn how to get your RapidWeaver website ranking higher in search engines, be sure to check out the SEO For RapidWeaver Video Course at ragesw.com

SEO For RapidWeaver – How To Optimize Your RapidWeaver Website For Google

Thursday, October 14th, 2010

Update: The SEO for RapidWeaver Walkthrough Video Tutorial has been released. The tutorial will walk you through the entire process for optimizing your RapidWeaver website. The tutorial will be a huge time saver as it will teach you about the SEO methods, while also showing you how to accomplish them very quickly.

Optimizing a RapidWeaver website for search engines can be challenging, but can also be fairly easy when you know what to do, how to do it, and where it can be done.

Whether you are a beginner to RapidWeaver, or you’ve been using it for a long time, search engine optimization (SEO) can be a brand new subject to many webmasters. This article is meant to push you in the right direction for making your RapidWeaver website more search engine friendly. Read each step carefully, and follow the tips and advice accordingly.

Page Titles

Page titles (also known as ‘Title Tags’) are one of the most important SEO elements. They can really give search engines a great understanding of what a website is about. Page titles are found at the top of your web browser. A good page title is keyword rich and accurately depicts the content of each web page.

RAGE Software Title Tag In Safari

Changing your page titles in RapidWeaver is very easy to do. Simply highlight the page that you wish to update, and click on the Page Info button in the top right corner of RapidWeaver.

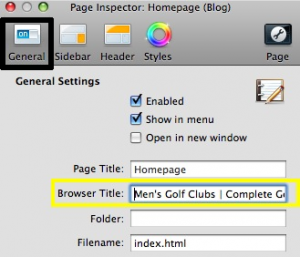
Under the General tab, locate the Browser Title field box, and enter your title tag. Remember to repeat this process for all of the pages on your website.

Title tag in RapidWeaver

Here are a few tips to keep in mind when making your title tags:

  1. Do not make your title tags excessively long
  2. Make sure your title tag is relevant to the actual page
  3. Each page should have a unique title tag

Did you know?

Your title tag is not only important for search engine optimization, but it is also very important for getting users to click on your website in the search results? The title tag also appears as the clickable link in the search results, making it an important factor for encouraging visitors to go to your site. An uninteresting title tag will certainly turn away potential visitors, while an attractive, and relevant title tag will surely increase your traffic.

Title tag in the search result

Page Description

The page description, much like the title tag, can be a very important factor for getting visitors to click on your website in the search results. A large majority of the snippets you see beneath the title tag in the search results come from the page description.  Because of this, it is very important for us to create exceptional page descriptions that are keyword rich and are convincing to people who are viewing them in the search results.

Meta Description In HTML Source Code

Description in the search result

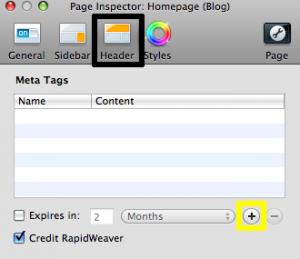
To change your page description in RapidWeaver, highlight the page that you wish to update, and click on the Page Info button. Ensure that the Header tab is selected. The next thing you are going to do is press the ‘Plus’ button which is located on the right hand side of the window, almost half way down.

page description in rapidweaver

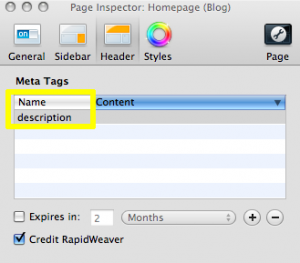
In the name field, type the word ‘description.’

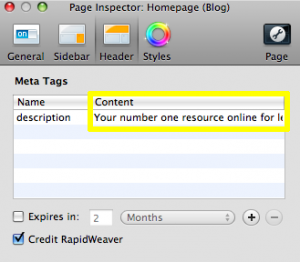
In the content field, type in your desired page description. Remember to make the description enticing enough for visitors to be interested in going to your website and learning more.  Since every page on your website is unique, so should each page’s description. Keywords are bolded in the search engine snippet when they match up with the users search query, so make sure to use good keywords in your description.

Anchor Text

The text we use to link to other pages on our website (or to external sites) can play an important role for search engine optimization. You have probably seen many websites use the phrase “click here” when linking to one of their pages.

Using “click here” for the anchor is wasted opportunity. Whenever linking to pages within your website, it is best to use keyword rich anchor text. Search engines rely on anchor text to identify what a page may be about.

For example, let’s assume a website sells left handed golf clubs. There are many different websites linking to this website using the anchor text “Left handed golf clubs.” Search engines now know to relate this website to left handed golf clubs. The end result will be better rankings for this website for that exact phrase.

Alternative Text For Images

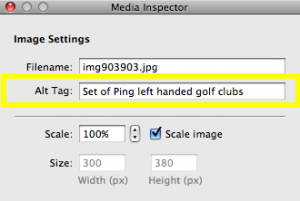
Image search engines have become increasingly popular over the years. While it may be difficult for search engines to understand what a picture is about, there are ways that we can help. Utilizing an images alt attribute can help us accomplish this. The benefit of this optimization is two-fold: Gaining more traffic from image searches, and being useful to users who are using browsers that do not support images.

In RapidWeaver, select an image, and then press the Media Inspector button. In the Alt Image field, type in your Alternative Text for your image. Remember to be descriptive, while not keyword stuffing. Avoid making your alt text misleading in any way.

Meta Keywords

While many people are aware that meta keywords are not important to Google, there still may be some search engines that do take this attribute into consideration. Because of this, it is always a good idea to add some keywords to every page of our website.

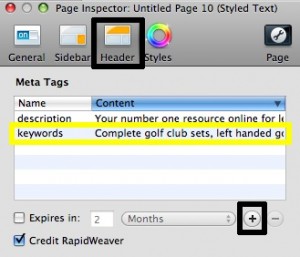
This process is going to be very similar to the page description process. Press the Page Info button, and make sure you are on the header tab. Press the ‘Plus’ button, and under the Name heading, type in ‘Keywords.’

In the content section, type in your keywords. Remember to separate each keyword or phrase with a comma. Do not add keywords or phrases which are irrelevant to your page. Keep this section to a minimum. Adding a bunch of keywords and phrases will not help your efforts. As an example, if this page was about left handed golf clubs, it wouldn’t make sense to add the phrase ‘Right handed golf clubs’ in the meta keywords. It would be more appropriate to save that phrase for your right handed golf clubs page.

Header Tags

In HTML, there are 6 header tags;

  • H1
  • H2
  • H3
  • H4
  • H5
  • H6

H1 is the “highest” and H6 is the “lowest.”

In search engine optimization, text within an H1 tag lets search engines know that the webmaster considers that text to be important. This gives a good indication to search engines as to what the page may be about.

RapidWeaver does not offer the most flexible way for putting unique H1 tags on every page. Instead, we are able to add one H1 tag, and one H2 tag that is constant across all pages on our website.

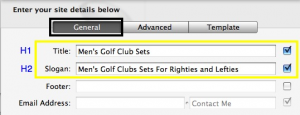
Click on the Setup button.

On the General tab, the Title is where our H1 tag goes, and the Slogan is where our H2 tag goes.

There are ways around this header situation, however, they are beyond the scope of this tutorial. For the time being, place any keywords you feel are appropriate for a header consistent throughout your entire site. If a business name is most appropriate, then that is what you should put as the header.