NEW In EverWeb 4.1: Lazy Loading, WebP Support, Draft Page Mode and More!
Thursday, January 25th, 2024We’re excited to announce the release of EverWeb 4.1! Our latest release includes WebP support for images so that your pages load faster than ever in browser windows! Plus new draft mode, lazy loading images, Video backgrounds for your browser background and much more! See below for full details!
Which Version of EverWeb is for You?
EverWeb is available in the following versions:
- If you are running Microsoft Windows 10 or 11, EverWeb 4.1 is available for you.
- If you are running an Intel Mac running macOS High Sierra, Mojave, Catalina, Big Sur, Monterey, Ventura or Sonoma, EverWeb version 4.1 is available for you.
- If you are running an Apple Silicon Mac running macOS Ventura, Monterey, Big Sur or Sonoma, EverWeb version 4.1 is available for you as a Universal Binary. EverWeb will run natively without the need to use Rosetta 2.
- If you are running OS X 10.10 – macOS 10.12 (OS X Yosemite, OS X El Capitan, macOS Sierra) EverWeb 3.4.2 is for you.
- If you are running OS X 10.7 – 10.9 (Lion, Mountain Lion, Mavericks) EverWeb version 2.9.1 is available for you.
When updating to the latest version of EverWeb, the update process will automatically download the correct version of EverWeb for your operating system.
EverWeb 4.1 Includes…
[NEW] Lazy Loading images – Your images load only when they are actually needed.
[NEW] Video Browser Backgrounds from four different sources, such as YouTube and Vimeo.
[NEW} WebP images supported with automatic image optimization to WebP format with correct resizing
[NEW] Draft Mode. Pages set to draft will not be published.
[NEW] Alt Text is now available for images in the Image Gallery Widget.
[NEW] Alt Text is now available for images in the Responsive Image Gallery Widget.
[NEW} Import images from CSV file to bulk load images in to the Responsive Image Gallery Widget.
[NEW[ Tile Vertically or Tile Horizontally for images used as Page Background.
[NEW] Image Scaling available for images used as Browser Background.
[NEW] Fixed Position for images used as Page and Browser Background.
[NEW] Image alignment options for Page and Browser Background.
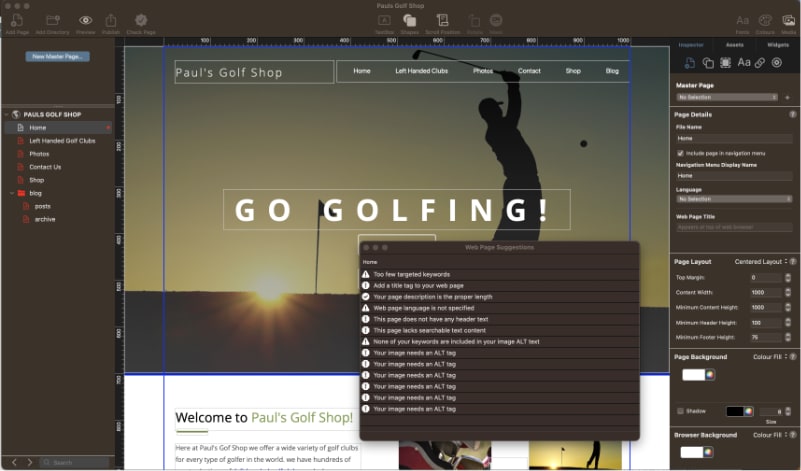
[NEW] Check Page updated to include new optimization suggestions.
[IMPROVED] Improved export of high-resolution images without relying on java script.
[IMPROVED] Code optimized for better W3C compliance.
[CHANGE] Updated Twitter widget to become the ‘X’ widget.
[CHANGE] Replaced the Twitter button with an ‘X’ button.
[CHANGE] The Google+ Button has been removed from the Insert-> Button menu.
[FIX] Blank Contact Forms Enhanced Addon field in Contact Form Advanced widget.
[FIX] Simple Passwords not being carried over has been fixed.
[FIX] Color settings issue in the responsive navigation bar fixed.
[FIX] Redefined styles from selection bug fixes.
[FIX] Full-width shapes exporting issue resolved.
[FIX] ‘Microsoft Edge Can’t read and write to directory’ Error for some users on Windows fixed
[FIX] Possible crash when using some widgets on ARM based Macs
[FIX] The URL field is properly changed to HTTPS when pressing the Use Secure HTTPS Urls option
[FIX] Fixed a crash when dragging from the Stock Photos on Windows
[FIX] Fixed ‘500 error’ on Preview
[FIX] Fixed crash when double clicking on a blank row in Manage Cache Window
[FIX] Fixed a potential crash on backup
[FIX] Some minor issues with SEO Check Page Fixed
[FIX] Many Improvements and bug fixes for EverWeb for Windows Users
[FIX] Fixes for the Stripe Payments widget
[FIX] Some Issues with Search fields fixed.
How To Update To EverWeb 4.1 for Windows
You can easily update EverWeb for Windows by either:
- Launching EverWeb then opening a project file. From the Help menu at the top of the screen select ‘Check for Update’ or by
- Downloading EverWeb from the EverWeb website.
After downloading EverWeb, double click on the EverWebSetup.exe file. Note that the file name may have the version number appended to it and that you may need to initially trust the file to be able to download it.
Follow the instructions in the Installation Wizard until the installation is finished. You can delete the EverWebSetup.exe file afterwards by dragging it to the Recycle Bin.
How To Update To EverWeb 4.1 for macOS
You can easily update EverWeb for macOS by either:
- Launching EverWeb then going to the EverWeb menu at the top of the screen and selecting ‘Check for Update’ or by
- Downloading EverWeb from the EverWeb website.
After downloading EverWeb, double click on the EVERWEB.DMG file. A window will open. Drag the EverWeb icon on to the Applications folder icon.
Once the file has been copied, you can close the installation window, delete the .DMG file and eject the EverWeb disk on the desktop by dragging it to the Trashcan.
About Your EverWeb Update
Remember, you won’t lose any previous data when updating as your website project files are stored elsewhere on your computer.
The update is free for EverWeb + Hosting users and EverWeb Standalone users who are within their 1 year of free upgrades and support period.
You can easily check your EverWeb update period from your EverWeb-> Preferences… window on macOS, from your Edit-> Options menu on Windows, or from your client area.
If you have passed your one year of free EverWeb updates, you can purchase 1 more year of upgrades and support from your client area.
You can easily re-download earlier versions of EverWeb from your client area if you are not ready to purchase an additional year of updates and support.
Login to your Client Area and go to the ‘Manage Product’ page. On the left of this page, select ‘Downloads’ and choose the version of EverWeb that you need.
More Information About EverWeb
For more information about the new version of EverWeb, please check out the following resources:
- The EverWeb website which has up to the moment information in its blogging section.
- New EverWeb videos on YouTube.
- The EverWeb User Manual in EverWeb’s Help-> User Manual menu.
- The EverWeb Discussion Forum.
If you can’t find what you need, or have any other questions, comments or feedback please let us know.

