Archive for the 'Third Party Software' Category

Justified Text in EverWeb? Yes You Can!

Monday, June 13th, 2016

2019 UPDATE: Easily justify text without widgets in EverWeb 2.9.

Original EverWeb Justified Text Post

Justified text is used extensively in printed books and newspapers as it’s flush left and right margins give content a clean, well ordered appearance. Broadsheet newspapers traditionally used this style of alignment to place as much text content within a  limited amount of page space. Many print edition newspapers today mix justified and left aligned text for both styling and readability reasons.

Printed books and academia also use justified text, printed books for much the same reasons as newspapers.  Academic works tend to use justified text where annotations or corrections need to be applied to text. Often specific rules about content layout are required, e.g. university dissertations often require justified text with double line spacing as it’s easier for assessors to annotate and mark the content this way.

The Problems With Justified Text

In the Internet Age there’s often argument that justified text has no place in the digital media and with good reason. Whilst it looks neat and tidy in print, on screen it can result in large gaps between words (see the screenshot below for an example of this.) These gaps can form ‘rivers’ of white space flowing down a column of justified text making distracting the reader and at worse making the text just difficult. There’s also a tendency for the right margin to be ‘over hyphenated’ to accommodate words having to be split from one line to the next to accommodate the justified text look. Again this can result in readability issues.

Studies indicate that justified text slows reading speed as the eye tends to track words and lines better when the right margin (in the Western World) is ragged rather than justified. Those who have reading disabilities also have more problems with justified text than with left aligned, ragged right text.

Justified Text Example

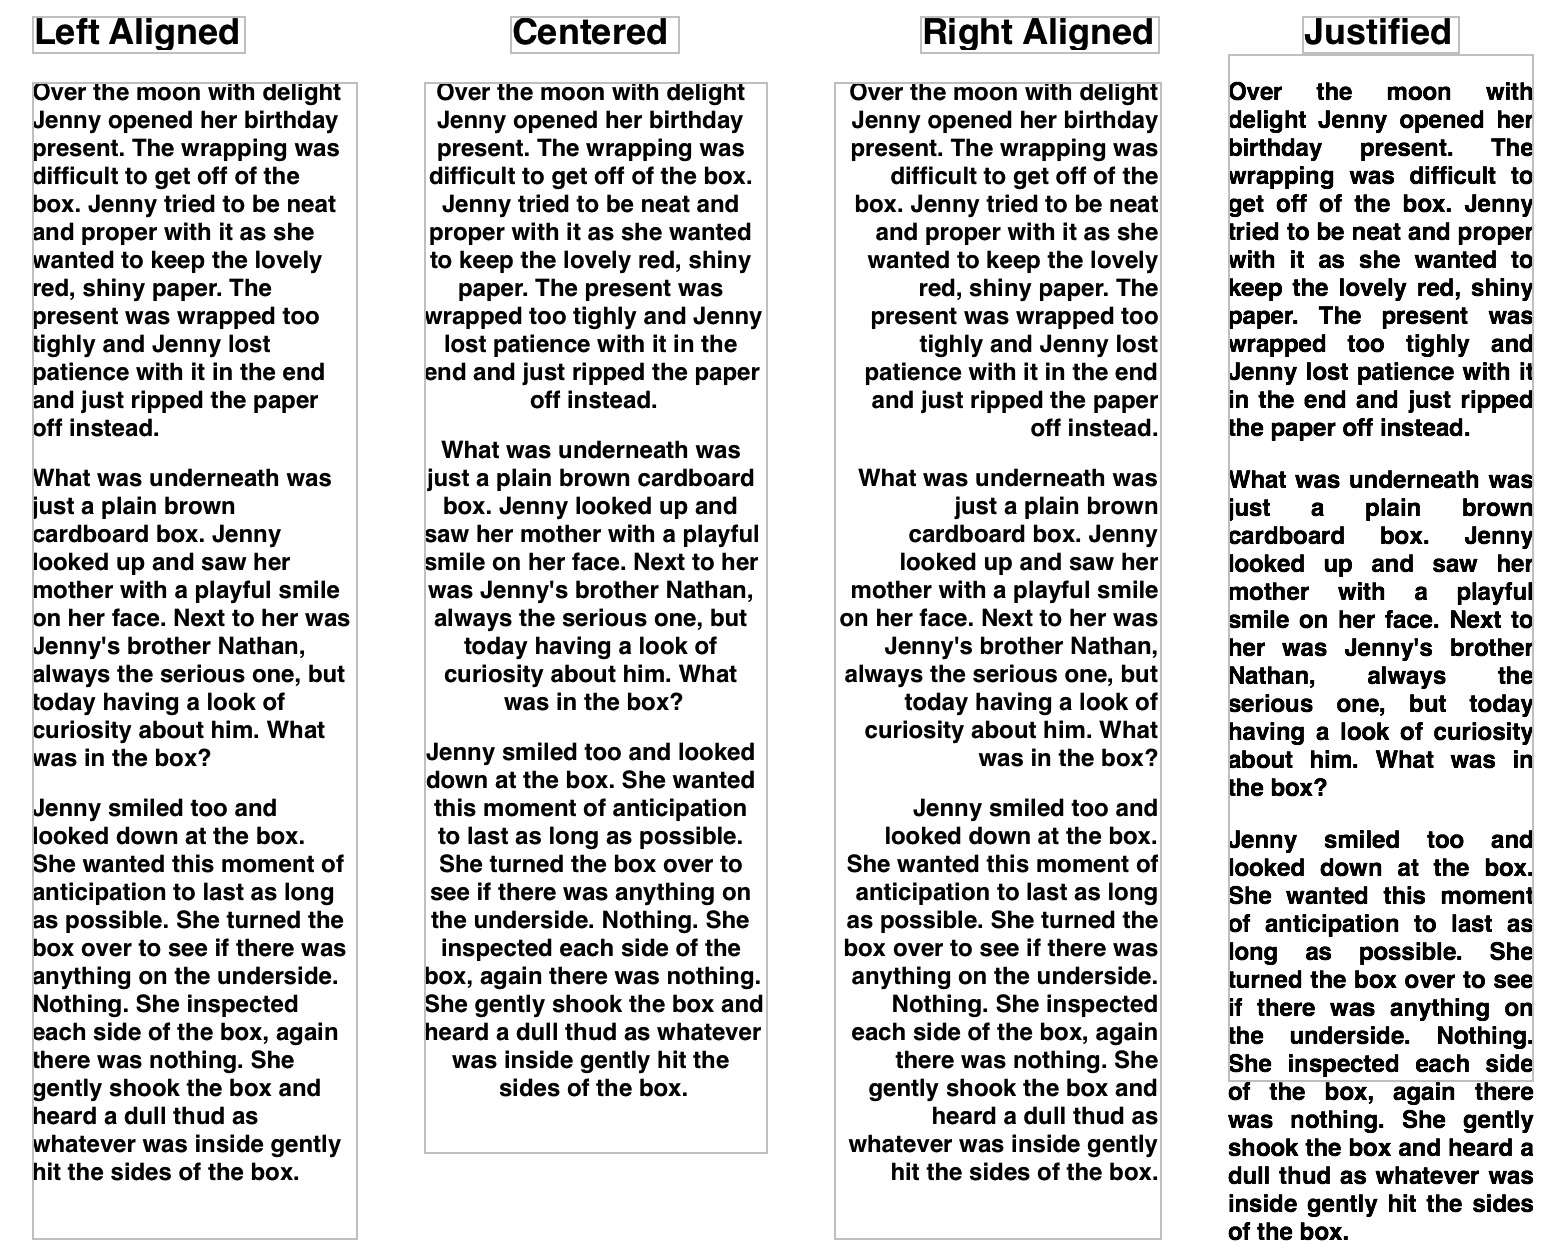
Comparison of left, centered, right and justified text. As can be seen, the justified text tends to result in large gaps between words creating rivers of white space in the column on the right.

Justified Text in The Digital World

Printed text solves the problems inherent with justified text through subtle changes of font size, spacing and other styling attributes to make text visually appealing. In the digital world, the tools available are generally not sophisticated enough to make justified text look as appealing as printed text. As such, in most cases text manipulation is the digital world is limited in scope which is where the typesetters eye is an advantage. HTML 5 and CSS offer limited support for justified text basically for the same reasons. As EverWeb complies with the standards set for HTML5 it therefore includes left aligned, right aligned and centered text options but not justified text.

Lastly, the Internet has expanded our concept of what a page is. When designing a website you have an unlimited “canvas” to use. Pages have no limits. As such, some of the original reasons for using justified text are no longer necessary. You don’t need to cram content any more in to limited space.

When to Use Justified Text

Even with all of the problems, justified text can create a neat and organized appearance to text and IS a great way to highlight particular areas of text. To create your own justified text in EverWeb just download the free Justified Text widget from EverWeb’s Third Party Add-Ons section or directly from AllAboutiWeb.com.

Installing and Using the Justified Text Widget

The AllAboutiWeb website explains how to download and install the Widget. Once installed you will see a message that the widget has been installed. When you launch EverWeb, you will see it in the Widgets Tab.

The widget works in the same way as all of EverWeb’s widgets, just drag and drop it to where you want it on the page. The Justified Text Widget lets you create up to three paragraphs. If you need more paragraphs just drag and drop another Justified Text Widget on to the page! You can style the text using the Fonts Panel to create the effect you want.

The Justified Text Widget from AllAboutiWeb.com gives you extra flexibility in your website design. Whilst it can give your web page a neat and tidy look, always remember to prioritize the readability of your website’s text content over it’s aesthetics.

What do you think of justified text? Does it have a place in website design today? Let us know your thoughts below!

How To Publish A WebCrusher Optimized Site To An FTP Client

Tuesday, July 19th, 2011

Although WebCrusher lets you publish your website directly to your FTP server some users want to use their own FTP client. If you like using an FTP client for publishing your website, you still have that option after you have run your site through WebCrusher. Follow the instructions in the video tutorial to learn how.

Video Transcript

To publish your WebCrusher optimized site using a third-party FTP client, follow these simple steps.

First, locate your optimized website folder by clicking Export, and selecting the Open Enclosing Folder tab. Then press the Next button, and your optimized website folder should appear in the Finder window.

Open your FTP client. For this demonstration, I am using CyberDuck which is a free FTP client which you can download from cyberduck.ch or the Mac App Store. Once your FTP login information has been entered, and you’ve connected to your server, locate the directory on your server that your website is associated with… and then drag and drop the optimized website folder into that directory. When your site has finished uploading, you can visit it and view the source code to make sure it has published correctly.

If your code looks tightly squeezed together like you see here, then you have published it properly.

How to add Google Analytics and Statcounter Codes In Sandvox

Wednesday, October 6th, 2010

Adding Google Analyitcs and Statcounter codes to your Sandvox websites is very easy to do, but can be very frustrating if not added correctly.

In this tutorial, we are going to quickly add both statistical trackers to our Sandvox websites.

The first code we will be adding is for Google Analytics. If you are unsure of what Google Analytics is and want to learn more, you can read up more about it on the Analytics website. In the meantime, here is a demonstration on how to add the code to your website. Open up your web browser to www.google.com/analytics.

If you do not have a Google account, you will need to click on the Sign up Now button. Otherwise, click on the Access Analytics button and login using your Google ID and password. Assuming this is your first time signing up for Google Analytics, you will need to click the Sign up button, located in the bottom left corner of the analytics page.

On the next page, you will need to enter your websites URL. You will also need to name the account. This name can be whatever you want it to be or you can simply leave it as your URL. Then select your country, and time zone, and hit the continue button. Fill out the remaining information required when signing up.

The final stage will ask you what you are tracking, which most of you can leave as A single domain. Finally, you will be told to paste a certain code on your site. Highlight that code and copy it by holding command and c or by going to Edit, and selecting Copy.

Head back to Sandvox, and in the menu bar, press Site, and then select Site Code Injection. Make sure that the Head Area tab is selected, and paste the code you just copied into the second of the two text fields. Your Google Analytics code will now be applied to all pages on your website.

Now I’m going to show you a very similar process, but this time we will be adding a Statcounter.com code. The first thing we will do, is open up our browser to www.statcounter.com. If you do not have an account with statcounter, click on the register button on the top left part of the navigation menu. Fill out all the required information and register your account. After you have registered, login with your username and password.  Once you are logged in, you will need to create a new project in order to get your code. Click on the Add New Project button.

In the following form, you will need to enter a title for your website, your website URL, a category for your website, and your time zone. You also have the option of having the statcounter not count your visits to the site by blocking your IP. If you don’t care for this feature, just leave it blank.

After you click the “Next” button, you will then need to click on the Configure and Install Code button. You have a few options for which type of statcounter you want. It is recommend that you use the Invisible statcounter, that way, you are the only one who knows how many hits your site gets. Then click on the next button. Make sure that Default Installation Guide is selected from the drop down menu. Then press the Next button. Now we are given our Statcounter code. Again, we must highlight this code, and copy it.

Back in Sandvox, we must have our Site Code Injection window opened again. This time, make sure the Document Body tab is highlighted. Once again, we are going to paste the code we just copied in the second of the two text fields.

When you publish your site, the Statcounter and Google Analytics codes will be applied to every page on your Sandvox website, and you will now be able to track your website visitors.

Keep Your Website Safe with Google Webmaster Tools

Tuesday, March 2nd, 2010

One of the things that many webmaster don’t realize is how vulnerable their website becomes when they start using social networking scripts such as forums and blogs to help build communities around their website. Although it is a very good idea to integrate these scripts on your site, when doing so you can potentially give your visitors access to sensitive parts of your website that they would normally not have

Since many blogs and forums are open source, malicious users have full access to the source code and can find vulnerabilities or take advantage of how a system works in order to gain access to protected pages on your site, spam your site, or use your site to help get your visitors to their site.

Google Webmaster Tools has always been a great way to find out if your website has been hacked by looking at the outgoing links or most common keywords. Now, Google Webmaster Tools can notify you on your dashboard if your website has been compromised. It can tell you;

  1. New versions of your installed blogs, forums and other software
  2. Spammy or abused user-generated content
  3. Abused forum pages or egregious amounts of comment spam
  4. Suspected hacking

This is very important to keep track of because if your site has been hacked Google will either remove your website completely from their search index or warn users every time they click your site in their search results. This can dramatically affect your reputation and prevent users from visiting your site.

A Google Webmaster Tools account is free to set up. You should submit your XML Sitemap file in order to get your website listed in Google and help Google’s crawler access the important pages on your website.

Google Translate Gets Some Cool New Features

Monday, November 16th, 2009

Google translate has been updated with some very cool new features. These new features include;

1. Instant Translation of Text
You no longer need to press the translate button. Google translate will now translate your text on the fly as you type.

2. Read and write in an langauge
Google translate can now teach you how to pronounce words by converting non-roman characters to english sounding words. In addition, you can even type words as they sound in English and Google can convert them to proper words in languages such as Arabic, Persian or Hindi.

3. Text to speech
Lastly with Google Translate you can now hear translations spoken to you.

All these new features to Google translate are definitely worth checking out.

Google Updates Webmaster Tools with New Keyword Tool

Wednesday, November 11th, 2009

Google recently updated Google Webmaster Tools with an all new keyword tool. Just like before, you get a list of your most prevalent keywords on your site except now you get additional information like the significants of the keywords and where the top 10 pages that the keyword can be found on.

Just click the Keywords link under “Your web site on the web” in your Google Webmaster Tools account. You will see a list of keywords just as before, except now a new significance column is also displayed. Click any of your keywords to see how many times they occur on your entire site and the top ten pages they occur on.

One great use of this feature is to help find out if your website has been hacked, and if so, where the affected pages are.

Usually when a spammer hacks your website they will load your site up with random keywords related to what they are trying to sell. Then they will link to the hacked pages from other pages on other websites they have hacked. With this new keyword tool you can not only discover whether or not your site has been hacked (loaded with spam keywords), but you can now see exactly which pages have been affected.

The above method is used commonly on sites with community driven resources such as forums, blogs, or other social networking scripts. Always make sure this has not happened with your site with this new Keywords Tool. If it has, this is something you need to fix ASAP because it may get your banned from Google and other search engines.

Check out this new addition to Google Webmaster Tools account. Make sure you have created your XML Sitemap file and submitted to your Webmaster Tools account.

Find Search Engine Keywords Before They Become Popular

Tuesday, June 23rd, 2009

We all know that in order for your website to appear in a search engine’s results page (SERP) you must either have that keyword included in your website content or have another website link to your website using that keyword.

Competing for keywords can be very difficult. Often times a keyword you want to rank high for involves competing with thousands, or millions, of other websites. So what if it were possible to find keywords before they became popular? Almost like seeing into the future.

Well you can get some “insight” into what keywords are rising in popularity with Google Insight for Search.

With Google Insight for Search you can find out what your customers are searching for before the keyword term has become popular. You can narrow your search down to specific countries or regions, look across different services such as Google Web search, news search image search, etc… and even narrow your search down by category.

Google Insights for Search will even provide popular synonyms and upcoming search terms that are gaining in popularity.

Try doing a search for one of your keywords within the last 30 days to see what your customers are searching for on Google Insights for Search.

Using RAGE ButtonDesign With Rapidweaver

Friday, October 5th, 2007

After last weeks video showing how to integrate RAGE MapDesign with Rapidweaver, we got more requests asking how to integrate RAGE ButtonDesign with Rapidweaver. So we have just completed this video tutorial which explains step by step how to do this.

If you have any further questions, feel free to post them on the RAGE Discussion Forum.

RAGE MapDesign & Rapidweaver

Sunday, September 23rd, 2007

So we have gotten a lot of emails asking whether or not RAGE MapDesign can easily be used with Rapidweaver. It definitely can be, and it is actually quite easy. We have created a short movie to show exactly how it is done.

The point where most users were have trouble was due to specifying the correct paths to your image files. The following tutorial will show how to add your interactive image maps to Rapidweaver. Although this shows how to add Effects based (CSS) image maps, adding purely HTML image maps can also be done easily. If you are having trouble with that, please feel free to contact support and we will be more than happy to walk you through it, and if necessary create an accompanying video.


Update: As of version 1.2 you no longer need to edit the files to rename the images directory to assets. Just go to the Preferences in RAGE MapDesign and select ‘Create Rapidweaver compatible image maps’. This will automatically use an assets folder instead of an images folder.