Archive for the 'web site optimization' Category

EverWeb Highlights: October 2015

Thursday, November 5th, 2015

EW Logo

October’s main highlight saw the release of the new EverWeb version 1.9. The latest version of EverWeb adds many under the hood features including an Enhanced HTML5 Publishing Engine for smaller, faster websites on both desktop and mobile. This and more to enjoy in this month’s Highlights edition…


EverWeb Latest News for October

EverWeb version 1.9 was released in late October with an Enhanced HTML5 Publishing Engine for faster, smaller websites. There are also some great UI enhancements such as a new Popup Window feature, Open In New Window feature, Presentation Mode and more! Check out the Blog ‘EverWeb 1.9 Released: Enhanced HTML5 Engine‘ for all the details!

Our Latest EverWeb Blog Posts

October’s Blogs focus on EverWeb version 1.9’s new Presentation Mode feature Duplicating a Project Features. There’s also in-depth blogs on how to get the best out of masking images in EverWeb, how to make a mobile website in three simple steps and much more! And feel free to comment or ask questions on any of the Blogs we feature!


EverWeb Highlights: September 2015

Building Mobile Websites in Just 3 Easy Steps

Creating Master Pages for EverWeb’s Theme Templates

Make Your Mark with Masking in EverWeb

EverWeb 1.9 Released: Enhanced HTML5 Publishing Engine

New User Interface Customisations in EverWeb 1.9

Getting the Best from Duplicating Projects in EverWeb version 1.9


Our Latest EverWeb Video Tutorials

EverWeb’s YouTube channel has four new videos to enjoy this month showcasing the new features of EverWeb version 1.9.

What’s New In EverWeb 1.9 – MacWebsite Builder

Cookie Consent Button Your EverWeb Website

Addon Domains for EverWeb+Hosting Accounts

Linking to a Popup Window In EverWeb


Keeping Up to Date With EverWeb

Keep up to date with EverWeb on the Internet! For the latest news, features, tutorials, blogs, comments and more just click on your choice below..

Facebook

Google+

Flipboard

YouTube

Or leave a comment below if you have any questions or want to know more…

How To Use EverWeb’s SEO Features

Friday, August 21st, 2015

One of the most important features of EverWeb is its Search Engine Optimisation (SEO) capabilities. However, you won’t find ‘SEO’ on any menu or listed in any dialog box. So why is SEO so important for your website and where do you find and effectively use EverWeb’s SEO features?

To answer such questions we need to first explore the nature of SEO. Much has been written about SEO as the ‘Holy Grail’ that every website developer must find. In reality, it boils down to the following things that you should know:

1. SEO is the term used to describe the way in which you make your website as visible as possible to Internet search engines such as Google, Bing, Safari etc.

2. SEO is important. With over 1 billion websites out there, SEO is the best way to get your website as high up in search engine results as possible.

3. SEO uses ‘Keywords’ to help search engines find your website pages through specific pieces of software called ‘Spiders’ .

4. Using the right type of Keywords is important so that search engines find your website more easily. If you use generic words for your Keywords e.g. ‘computer’, your website will never be found. The Keyword in this example is too general. A quick Google search finds 2,250,000,000 results!

5. SEO does not guarantee anything. However, it can be a great help in improving your website’s visibility if used properly.

6. SEO should be used on any pages that you want to draw attention to. Again focus on what is unique to your website. ‘About’ and ‘Contact’ pages will be too generic to be of much use for SEO.

7. SEO should be used on both your ‘mobile’ and ‘desktop’ web pages. Mobile is a priority for Google and it should be for you too!

8. There is no magic to SEO, you just need to know how it works so that you can get the best possible search result listing.


EverWeb and SEO

The use of good Keywords is, therefore, important in optimising your website for search engines. The question is, where do I put my keywords and what words should I use? let’s start with the Where…

The first thing to note is that you may want to use SEO on different pages of your website as different pages have different purposes. You will want your Keywords to be tailored to what the purpose of the page is.

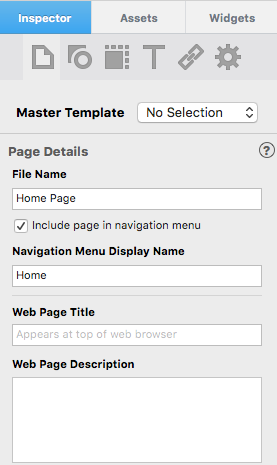
In EverWeb you can enter Keywords in to the following fields in the Page Inspector (see screenshot below):

1. File Name: You can use the file name of your page to act as a Keyword.

2. Navigation Menu Display Name: This field is good to use for SEO as it provides links to other pages. This is something that search engines look for

3. Web Page Title: This is the text that you see at the top of the browser window. It’s great if you can add in some Keywords in to the Title, but remember that you should not sacrifice your visitor’s experience just for the sake of SEO.

4. Web Page Description: The page description is not a field used in SEO but you can use keywords in the description. Again remember your visitor experience when writing your description.

Inspector SEO

You should also use SEO with any Image files you are using. Search engines look at image file names as well as text Keywords. Therefore, it’s important that your image files have an appropriately descriptive name. If not then rename the image files before importing them into EverWeb. If you have already imported your image files in to EverWeb, rename them via the Assets tab.

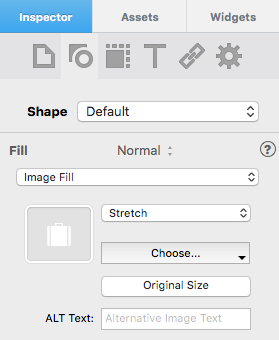
In addition to using descriptive file names for your images, your SEO may be helped by adding Alt Text to your image files in EverWeb. Use the ‘Alt Text’ field in the Shape Options tab to add in a sort description of your image (see screenshot below).

Shape Options SEO


Which Keywords Should You Use?

This is where you need to have a Keyword strategy and do your research before using adding in Keywords. As discussed above, if you used ‘computer’ as a keyword you would have no chance of standing out from the crowd. Instead think of Keywords that are specific and focused on what your clients are going to be looking for. As an example, if you are a company selling shoes, think about any specialist type, or brands, of shoe that you sell, for instance, clogs. The word ‘clog’ is a more specific and better Keyword than using the word ‘shoe’. The more specific and focused your Keywords, so much the better!

Use just a few Keywords in the fields mentioned above. Remember that having too many Keywords may lessen the focus of your SEO, and may also undermine your visitor experience. Having a website just littered with Keywords without meaningful text is not very appealing.

The good news is that help is available for finding the Keywords that are best for you to use. Google provides the ‘Google Keyword Planner’ just for this very purpose as part of Google Analytics. See https://adwords.google.com/KeywordPlanner for more information.

In answering the original question posed at the start, SEO is baked in to EverWeb in many different places. It underpins EverWeb, so be sure to remember to fill in the appropriate fields with a few well chosen Keywords when you are building your web pages. Having an appropriate, sensible SEO strategy that balances visitor experience against your search engine ranking will help you get more hits on your web site, and hopefully more online business!


What Next?

We have only been able to give you an overview of SEO in this Blog. There is much more to discover so why not begin by exploring the ‘SEO for EverWeb Video Course’.

How To Effortlessly Increase Mailing List Signups By 300 Percent

Friday, December 7th, 2012

So you have a mailing list sign up form set up on your website, but are you getting enough users to notice it and willingly give you their email addresses?

Watch the tutorial below to learn an easy way to triple your mailing list sign ups! Don’t forget to subscribe to our YouTube channel to never miss out on our great website tips and tricks.

Video Transcript:

A very good way of collecting user’s email addresses is to offer them something in return for signing up to your mailing list. This popular strategy is widely used across many sites on the web.

In this tutorial, I am going to show you a way of setting up your mailing list created using MailShoot to automatically deliver the free item when the user confirms their subscription.

This tutorial will assume you already have your mailing list set up. If you do not have your mailing list set up, or you are new to MailShoot and want to learn how to do everything from start to finish, visit this page to view our other training tutorials.

The first thing you will need is to have your free gift handy. Since we are dealing with the internet and computers, we will need to have our gift be in digital form. For my example, the gift I am offering is this PDF that I have here on my desktop.

Now, I will open up my web browser to ge.tt which is a website that allows users to upload files to share with others. All I will do is drag and drop my PDF onto the screen here. This might be different depending on which web browser you are using.

When the upload has completed, we will be given a link to access the item that was just uploaded. What you will need to do is now copy that URL.

Now, in MailShoot, open up your mailing list, or click on the Subscribe Page button. Then select the Messages tab. On this page, here is where you will paste the link that we just copied. You can write a message next to the link to let the user know that this link is where they will find the free gift that was promised. When you are done, click the Publish button.

Now when users sign up to your mailing list, and then confirm the subscription, they will see this Welcome message and will be able to download your free gift using that link.

For more website tips and tricks, please subscribe.

iWeb SEO Tool Instructions

Thursday, September 15th, 2011

READ THIS FIRST

The videos listed below give you detailed instructions on how to use iWeb SEO Tool the proper way. It is very important to follow these instructions in order to limit errors. The videos are in order and should be watched that way.

While these videos are very helpful in teaching you the proper ways of using iWeb SEO Tool, they cannot substitute the content that is in the SEO For iWeb Walkthrough Video Tutorial. That walkthrough video tutorial goes beyond the basics of using iWeb SEO Tool and can help you dramatically improve your website’s rankings in all major search engines. Your business is definitely worth it, so we highly recommend checking out that walkthrough video tutorial. It will also save you a lot of time and heartache in the future.

1. How to open your site in iWeb SEO Tool

2. How to optimize your site in iWeb SEO Tool

3. How to publish your site to FTP in iWeb SEO Tool

4. Updating your iWeb website and using iWeb SEO Tool

5. How to make sure you published your site correctly from iWeb SEO Tool

6. How to back up your data stored in iWeb SEO Tool

7a. How to have a shortened iWeb URL by using iWeb SEO Tool

7b. How to get rid of the site redirect AND shorten the iWeb URL

8. How to use the Favicon feature in iWeb SEO Tool

9. How to publish only changes with iWeb SEO Tool

10. Setting up a Mobile friendly iWeb site

SEO For RapidWeaver: Alternative Text

Wednesday, June 22nd, 2011


Video Transcript

The old saying of a picture is worth a thousand words is anything but true when it comes to search engines. For the time being, search engines cannot view an image and then know what keywords to associate them with. Instead, search engines rely on the webmaster to give an indication of what the image is about, via the alternative text feature.

In RapidWeaver, select an image, and then press the Media Inspector button. In the Alt Image field, type in your Alternative Text for your image. Remember to be descriptive, while not keyword stuffing. Avoid making your alt text misleading in any way.

Remember, try and include the keywords or phrases you have been using throughout your site while also keeping the text short, to the point, and relevant to the actual photo. Do this for all images you deem necessary to having alternative text. Do your best to avoid putting too many words in the alt text.

SEO For RapidWeaver: Header Tags

Saturday, June 18th, 2011

Video Transcript

Another method of emphasizing your most important key-terms is by utilizing header tags. Header tags can be used in various ways on a website. They are sometimes used to display the title of a page, like the one you see here, or as the headings for content, similar to what you see here on this site. There are six different header tags in HTML. The most important header tag is said to be the h1 tag.

The situation with header tags in RapidWeaver is this: Currently, there is one H1 tag, and one H2 tag. These are located in the title…and slogan, respectively. The biggest downside to this is that the location of these headers make it kind of difficult for you to customize the header to fit each page. In addition, these headers are identical on every page of your website.

My recommendation is this: If the header tags don’t concern you all that much, then don’t worry about them. If you want to have a good consistent site title or slogan across all pages of your website, then do so. You could attempt to make this title or slogan include some good keywords, and that might be a good idea.

Here is an alternative to creating your own header tags. This method is going to have you not include anything in your title or slogan, which might look a bit strange on some templates, but very normal of some of the other templates.

This method really is optional. If you don’t want to do it, don’t feel that you have to. Not having your header tags as optimized as they can be will not completely ruin your chance at ranking high in search engines. The first thing you are going to do, is turn off the Title and Slogan, by pressing the Setup button, going to the General tab, and unchecking the boxes next to Title and Slogan. Then, in the RapidWeaver edit window, we’re going to create our H1 tag. To do this, type the code exactly as I am doing. Replace the word KEYWORD with your own keyword. Having just one H1 tag per page should suffice.

If you feel it is appropriate to do so, you can add an H2, or even H3 tag to your page the exact same way. So when it is appropriate to do so? The answer to that depends on a few different factors. The H1 tag should contain your most important, or primary keyterm. If your webpage touches upon things related to your other keyterms, then it may make sense to put another keyterm in an H2 tag. The one thing you need to ask yourself when adding these header tags is ‘does this help my visitors better understand my page?’ if the answer is ‘no,’ then you might be better off only including the H1 tag. Adding header tags just for the sake of SEO is not the right way to do it.

SEO For RapidWeaver – Meta Keywords

Tuesday, June 14th, 2011

Video Transcript

The meta keywords attribute has been around for quite some time. Unfortunately, too many webmasters were using this feature incorrectly by adding keywords that were unrelated to the content on their site. As a result, the meta keywords tag became less and less reliable. Nonetheless, it still exists, and there has been some speculation that some search engines still do take it into account. Therefore it only makes sense for us to include our keywords in them.

Putting in our meta tags is very simple. This process is going to be very similar to the page description process. Press the Page Info button, and make sure you are on the header tab. Press the ‘Plus’ button, and under the Name heading, type in ‘Keywords.’

In the content section, type in your keywords. Remember to separate each keyword or phrase with a comma. Do not add keywords or phrases which are irrelevant to your page. Keep this section to a minimum. Adding a bunch of keywords and phrases will not help your efforts. As an example, if this page was about left handed golf clubs, it wouldn’t make sense to add the phrase ‘Right handed golf clubs’ in the meta keywords. It would be more appropriate to save that phrase for your right handed golf clubs page.

SEO For RapidWeaver: Page Description

Friday, June 10th, 2011

Video Transcript

The description tag is a place where you can give a quick description of what is on your webpage. This isn’t a place to just pack in some keywords, but it is a great spot for you to write one or two sentences that really describe your page. It can also be thought of as a way of selling users on coming to your site. The reason for this is that sometimes, your description will show up in search engine results, right below the title tag here. So as you can see, this little blurb here reads “At Lefties Only, left handed golf clubs are our specialty.” If I were to click to go to this site, and then view the source code, we can see that that blurb actually came straight from the meta description. This isn’t always the case, but you have seen first hand how important it is to have a great description.


To change your page description in RapidWeaver, highlight the page that you wish to update, and click on the Page Info button. Ensure that the Header tab is selected. The next thing you are going to do is press the ‘Plus’ button which is located on the right hand side of the window, almost half way down. In the name field, type the word ‘description.’ In the content field, type in your desired page description. Remember to make the description enticing enough for visitors to be interested in going to your website and learning more. Since every page on your website is unique, so should each page’s description. Keywords are in bold in the search engine snippet when they match up with the users search query, so make sure to use good keywords in your description

SEO For RapidWeaver: Title Tags

Monday, June 6th, 2011


Video Transcript

The title tag is one of the most important elements for search engine optimization. The title tag consists of the words and phrases found at the top of your web browser when you are visiting any given website. It is also what is shown as the first line when you are doing a search engine search.

The title tag should contain your most important keywords. Some of the biggest mistakes we see when it comes to title tags are seeing titles that simply read “Home,”  “Welcome,” or some other non-descriptive term. Another mistake is having just your company name as the title tag. Unless you are a company such as Nike or Pepsi for example, your company name alone, should not be in your title tag. The reason for this is that in your online business venture, you are trying to gain customers who have might not be aware of your existence. If they don’t know your business exists, how will they know to type your business name in a search query? You still should put your company name in your title tag, for branding purposes, or to make it helpful for the users who do know your company name to find your site. Just make sure that you order them properly by having keywords first, followed by the company name.

The title tag is located near the top of each page in the “head” tags. Google will only show up to about the first 70 characters in its results, so as mentioned earlier, make sure that your most important keywords are near the beginning of your title. Do your best to make each page on your site have a unique title. The title should also be very relevant to the content on the actual page.

To change your title tags in RapidWeaver, highlight the page on the left hand side, and press the Page Info button. In the field that says browser title, type in your desired title tag. Remember to use all of the tips mentioned earlier when creating your title tag.

So how do you know if you’ve created a good title tag? Well your best option is to try it out for a few months, and see if anything is going on with your rankings. If nothing has really improved, it might be time to change them up. If you are going to change them, make sure that you are not changing title tags on pages that currently do have rankings. You will risk ruining those rankings.

SEO For RapidWeaver: Anchor Text

Wednesday, June 1st, 2011

Video Transcript

When it comes to placing links on our page, the anchor text, or the phrase that you can click on that takes you to the destination page, plays a far greater role than most people imagine. For example, let’s do a Google search for the term “click here.” You will notice that the first result is for Adobe Reader. No where on the Adobe site does click here appear, yet it ranks number one for the term. The reason for this, is because many other websites, including very high authority sites such as educational institutions, link to this exact page, and the anchor they use is “click here.”

I want to show another good example of anchor text that will really illustrate how the anchors influences the results in searches. As you can see here, this particular anchor is actually a typo. Instead of typing AppTorial, this webmaster accidentally typed in AppToria. Also take note of the destination URL for this link. Let’s see what happens when we search for the term AppToria in Google. You will notice that in the results, the exact page that had the link for AppToria appears. No other page on the AppTorial site appears for this search term.

When you make your site, keep this SEO tip in mind. When you link to other pages on your website, avoid using common phrases like click here or anything similar to it. Instead, use some of the keywords and phrases that you have written down. So for example, if I want to send my users to my page that talks about left handed golf clubs, I will type in “left handed golf clubs” highlight the string of text, right click and select Add Link. Then, I will link to the appropriate page on my site.