We are pleased to announce that EverWeb version 1.9.7 is now available for download for anyone with an active license and macOS Sierra (10.12) installed. Please read the information in the ‘How to Update to EverWeb version 1.9.7’ section below before updating.
This version of EverWeb focuses on compatibility with the new macOS Sierra operating system. A big update is coming soon with EverWeb version 2.0 which will add a host of new, exciting features to the product. We will have more news soon!
EverWeb 1.9.7 Features
Supports Apple macOS Sierra operating system
Fixes issues when previewing websites in EverWeb on macOS Sierra
How To Update To EverWeb version 1.9.7
EverWeb version 1.9.7 is available only with macOS Sierra installed. The update is not available if you are using OS X El Capitan or earlier.
If you have installed macOS Sierra you can easily update to EverWeb 1.9.7 by launching EverWeb and going to the EverWeb menu at the top of the screen and selecting ‘Check for Update’.
EverWeb will check to see if you are running macOS Sierra. If you are, the Software Update window will appear where you can update EverWeb to version 1.9.7.
If you are running an older Operating System version, you will not see the Software Update window and will remain on your current version of EverWeb.
Remember that you won’t lose any previous data when updating since your website project files are stored elsewhere on your computer.
If you purchased EverWeb as a standalone product the upgrade will not be free if your license has expired. You can check your license expiry date at any time using the EverWeb-> Preferences… menu. The ‘Next Due Date’ in the ‘Account’ tab shows the date your license is due for renewal.
The EverWeb Standalone license entitles you to EverWeb plus one year of upgrades and support. You can always use your purchased version of EverWeb without ever paying again. If your EverWeb license has expired and you want to renew it to receive another year of updates and support, click on the ‘Manage Account’ button. This will take you to the EverWeb Client Area. Select the Services-> My Services menu. On the ‘My Products & Services’ page, double click on the EverWeb product that has expired. The ‘Manage Product’ page is where you renew your license. Once you have renewed your license, you can update your product to the latest version.
In May 20111 the European Union enacted a directive giving EU citizens the right to refuse to use cookies that could reduce their online privacy. The directive requires websites to gain consent from visitors if the website stores or retrieves any information about the visitor on any type of computing device.
What are Cookies?
Cookies are small packets of data that a website asks a web browser to store so that the data can be used in the future. The data stored typically helps identify visitors, visitor preferences or visitor actions. Cookies can be either be valid for the browser session or persistent i.e. permanent.
What Does This Mean For My Website?
EverWeb itself does not create or use cookies, so for most website developers cookie consent is probably not required.
However, there may be instances where you do use cookies e.g. if using Google Analytics in your website, if you have added custom scripts that use cookies or if you are using third party tools and add-ons in your website that use cookies as part of their functionality. If you use cookies you should add a cookie consent bar to your website.
Even if your website is targeted towards a market or audience outside of the EU, cookie consent is probably good to include anyway in case visitors from the EU find your website.
If you need to have a cookie consent, there are a couple of simple ways to add it to your website which we have outlined below.
EverWebPowerUp.com offers a free and easy to use Cookie Content bar for EverWeb. Silk tide is a free tool that adds some Javascript to your website whilstRoddy McKay’s EverWeb CodeBox offers a Cookie Bar Widget as part of the Touch Widget set that’s available to purchase from the EverWeb Codex website.
Using The EverWebPowerUp.com Free Cookie Consent Widget
The free Cookie Consent Bar from EverWebPowerup.com is easy to use. Simply download it from EverWebPowerUp.com and then double click it to automatically install it in EverWeb.
Drag and drop the widget onto the page you would like to use it on
From the ‘Widgets’ tab in the Inspector you can modify the text and style shown by the Cookie Bar
The Cookie Bar can appear either at the top or bottom of your page. However, within EverWeb it will appear where you place it on your page. When you preview or publish it will appear at the location you have selected in the Inspector.
If you want the Cookie Consent Bar to appear on all pages, consider creating a Master Page and adding the Cookie Consent Bar to that master page. There is a video tutorial covering Maser Pages in more more detail.
Using Silktide for Cookie Consent
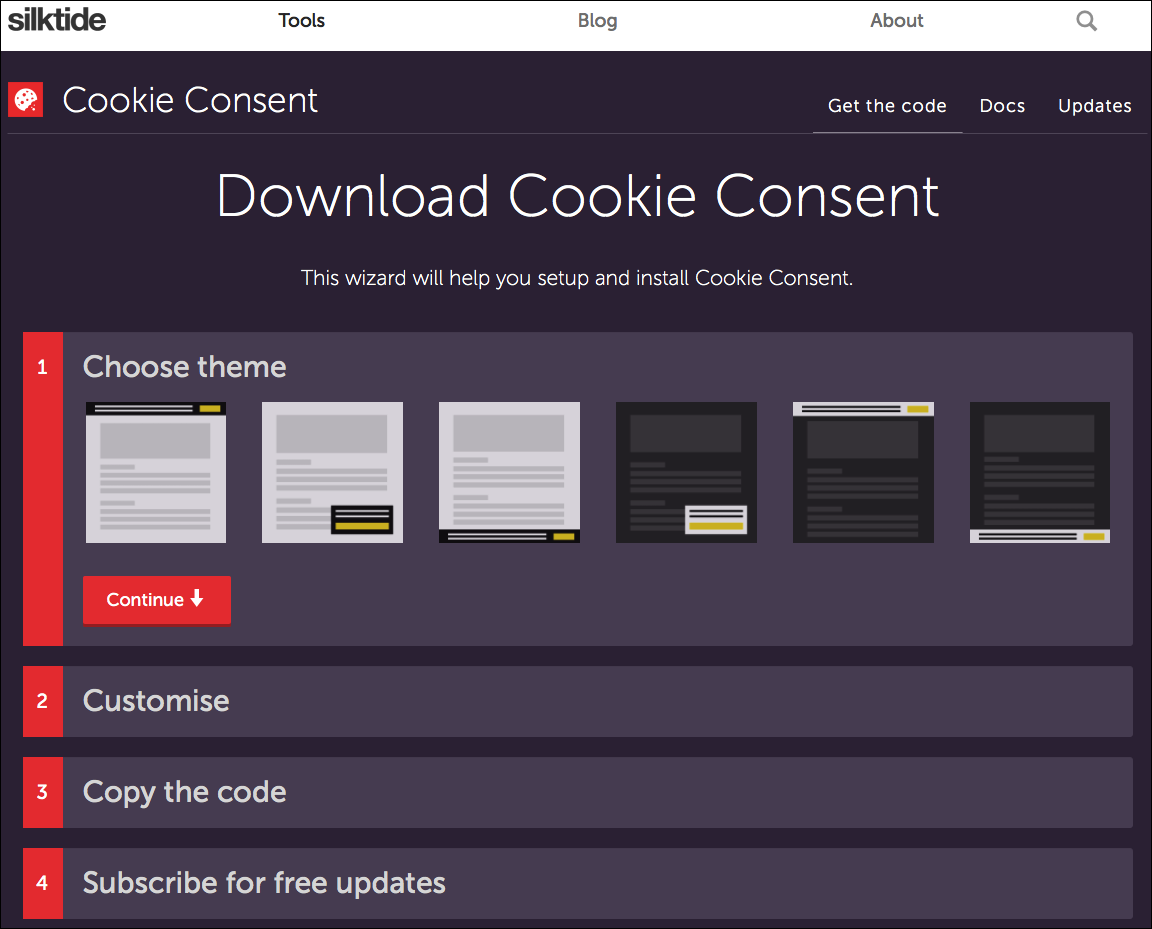
Silktide’s Wizard quickly guides you through setting up and customizing your Cookie Consent bar.
Silktide offers a free to use Cookie Consent bar using Javascript that’s injected in to your website. The website uses a wizard (see above screenshot) that guide you through the Cookie Consent setup process, first by selecting and customising the theme you want to use, linking to a cookie policy page if you have one, then copy the code that is produced to the clipboard.
The code that you have copied to the clipboard should be added to your Site Publishing Settings. To access the Site Publishing Settings, click on your website name in the Web Page List of your project, or use the File-> Edit Publishing Settings menu.
In the Head/Footer Code section, paste the copied code in to the Head section. Publish your website and test to see the results. If you use Preview, you may not see the Cookie Consent bar.
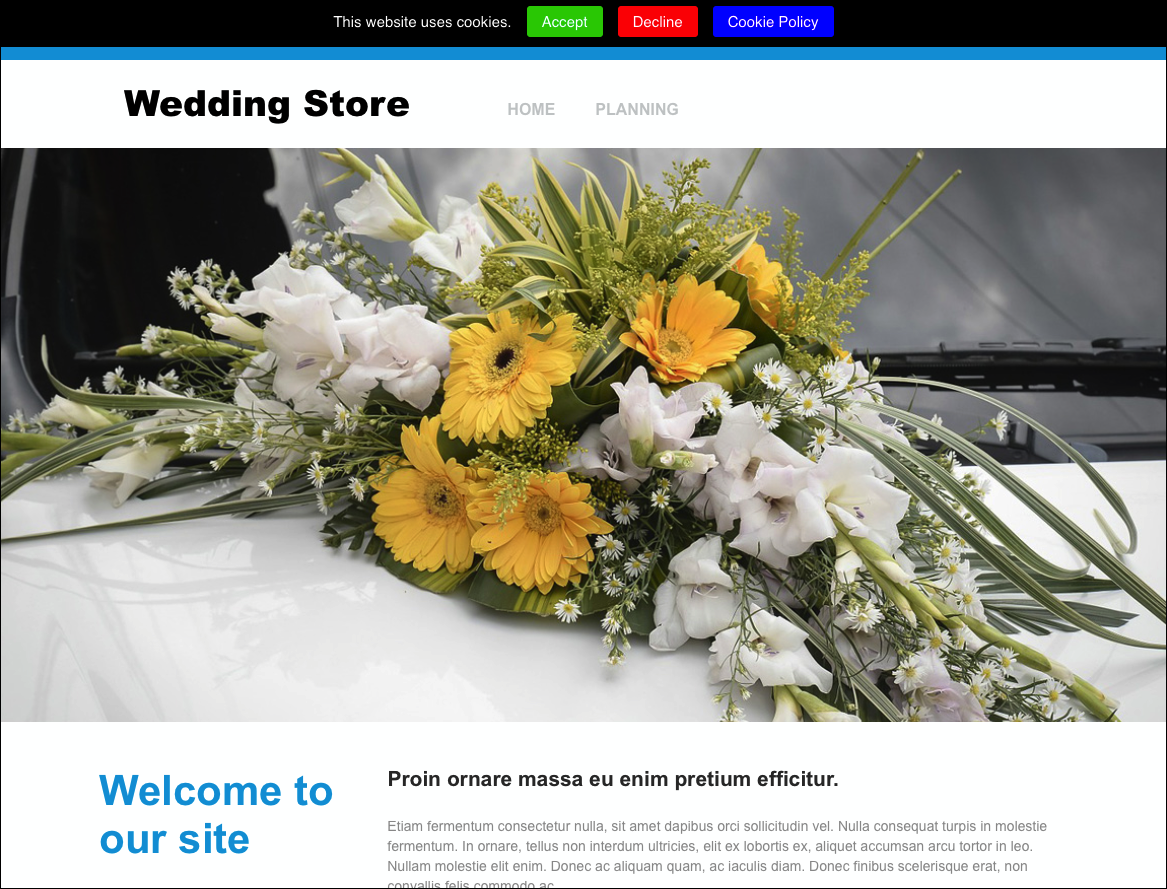
The EverWeb Codebox Touch Cookie Bar lets you customize many features of the Cookie Consent Bar to match your website’s design.
Using The EverWeb Codebox Widget
The EverWebCodeBox from EverWeb super user Roddy, includes a Touch Cookie Bar Widget that is available for purchase as part of the Touch Widgets collection. Once purchased and installed, drag and drop the Touch Cookie Bar Widget on to your web page. It is best to do this on the home page on your website as this is typically the first page visitors will access on your website. you can add the Widget to all of your website pages, but this may be irritating for your visitors!
Once the Widget has been placed on your page, go to the Metrics Inspector and tick ‘Full Width’ and ‘Always On Top’. The remaining settings for the Widget can be found in the Widget Settings tab. The Cookie Bar is placed at the top of the browser window by default but can be placed at the bottom of the screen by ticking the ‘Fix To Bottom’ checkbox.
The Touch Cookie Bar Widget is fully featured so you can include ‘Decline’ and ‘Cookie Policy’ buttons if desired (see screenshot above). Color, spacing and text options can be applied to give the Cookie Bar the look that matches your website’s design.
Further information about the EU Cookie Consent Directive can be found in the European Commission’s ‘EU Internet Handbook‘.
Welcome to the Summer Edition of EverWeb Highlights which rounds up all the news, features, articles, tips and tricks about EverWeb from the last few months.
The EverWeb April 2016 Survey
A big thank you to everyone who completed the April Survey on the EverWeb Discussion Forum. We really appreciate all your feedback and suggestions on what you would like to see in future releases of EverWeb. We’re working hard on including some highly requested feature suggestions in to the next major release of EverWeb so stay tuned to the Announcements section of the Discussion Forum for the latest news!
EverWeb versions 1.9.5 & 1.9.6 Released
Since our EverWeb Highlights: Winter Edition, there have been two updates to EverWeb: Version 1.9.5 featured optimisations for speed, memory efficiency and stability. The Video Widget also received an big update with many requested customization options added such as volume settings, autoplay and video poster images. For more information on the feature list of 1.9.5 please see ‘Introducing EverWeb version 1.9.5’.
April 2016 introduced EverWeb version 1.9.6. featuring performance and stability improvements. The full release notes can be found in ‘Introducing EverWeb Version 1.9.6’
The release notes also detail how you can update your product to the latest version if you haven’t done so already.
Blog Updates
There are a number of new Blogs articles to read up on, including:
We’ve added 12 great new videos to our YouTube Channel, highlighting EverWeb product features, hints and tips and many ‘How to Do’s’. Our YouTube Channel has plenty of new and updated videos and is updated regularly and it’s easy to sign up to. Some of the titles we’ve recently added include
Adding and Embedding a Video
The Projects Window
Google Maps
The Audio Widget
Adding a Facebook Like to Your EverWeb Website
How to add Jump and Smooth Scroll Anchor Links to Your Website
Adding Retina Images to Your EverWeb Website
Resizing Header on Scroll – Full Width Resize Header Widget for EverWeb
Using Google Fonts in EverWeb
How to Transfer an EverWeb Project File to Another Computer
Introduction to EverWeb – A Quick Start Guide
Sticky Header in EverWeb – Making a Fixed Position Header
EverWeb on Social Media
We all have a favorite Social Media platform for staying connected! As well as the EverWeb website and Discussion Forum, you can find all the latest EverWeb news and info on the following social media…
EverWeb’s popup window hyperlink feature is an extremely useful and versatile website design tool. It’s great for keeping visitors focused as the browser background is greyed out when the popup window is in use. That’s useful when you want your visitor to concentrate on filling out a Contact Form or anything else that may require a ‘call to action’. Popup windows are also good to use for additional information that’s useful, but not essential, to the main message, or theme, of your page e.g. clicking on an image of a person shows a popup biography, clicking an address link shows a map etc. There are almost unlimited ways to use a popup window. In the example below we show how you can use to use a popup window for downloading a PDF file. A fictional company, ‘iPicture’, wants to offer it’s customers a free download of their photography e-book ‘Point, Shoot, Share’. Their website uses EverWeb’s built in ‘Software’ Theme Template.
1. Firstly, a PDF file should be made ready. A PDF file is a good choice for downloads as it’s file format is operating system independent. That makes PDF’s easy to access almost anywhere. Many apps, such as Microsoft Word and Apple Pages, can convert their own native document formats to PDF file format.
2. Once you have created your PDF file, convert it into a ZIP file. A ZIP file will compress the file making it quicker to download for your visitor. Locate the PDF file in OS X’s Finder, then right click on it. Select the option to ‘Compress’ the file. This will produce a new file with the same name as the original but with a ZIP extension added at the end. You may edit the name of the new file to remove the ‘PDF’ extension. Remember to keep the ‘ZIP’ extension though.
2. With the ZIP file ready, open your EverWeb Project file. If you haven’t done so already, create the page that will contain the hyperlink to the popup widow. The hyperlink can be a piece of text, an image or a button. Often a button is best as it acts as a ‘Call To Action’, i.e. something that is clearly visible and gets your visitor to respond, to take action!
3. If you want to use a button, you can easily create on by drag and dropping a rectangle shape on to the Editor Window. Next, style the rectangle as you want. Double click inside the rectangle to add the button text, in the same way you do for a text box. Use the Fonts Panel to style and size the text. To center the button text, highlight the text itself. Use the horizontal and vertical alignment buttons in the Text Inspector to center the text. If the button does not align properly, make sure sure that ‘After Paragraph’ is set to zero.
4. After creating your download link button, you need to create the popup window. This is just another page that is suitability sized and styled. Start by adding a new page. In our example, we used the blank page style of the ‘Software’ Theme Template. Name the page appropriately to indicate it’s function e.g. ‘Popup PDF Download’.
5. As this is a popup window, it will only part of the page. In this example we will make it 400 x 400 px. To achieve this effect, go to the Page Inspector tab and use the following settings:
Top Margin: 0
Header Height: 0
Content Width: 400
Content Height.: 350
Footer: 50
Note that the Content Height and Footer combined equal 400.
6. With the popup window’s page dimensions set, design the popup window page as desired. Add a button, in the same way as we did above, that will be used to initiate the PDF File download.
7. With the button selected, go to the Hyperlinks Inspector and ‘Enable as Hyperlink’. In the ‘Link To’ drop down box, select ‘A File’. You will see a ‘Choose…’ button appear below the ‘Behavior’ drop down section. Click on the ‘Choose…’ button and select the ZIP file you created earlier.
8. You have now completed your popup window page. Return to the original page containing the link button to the popup window page so that you can add the link in.
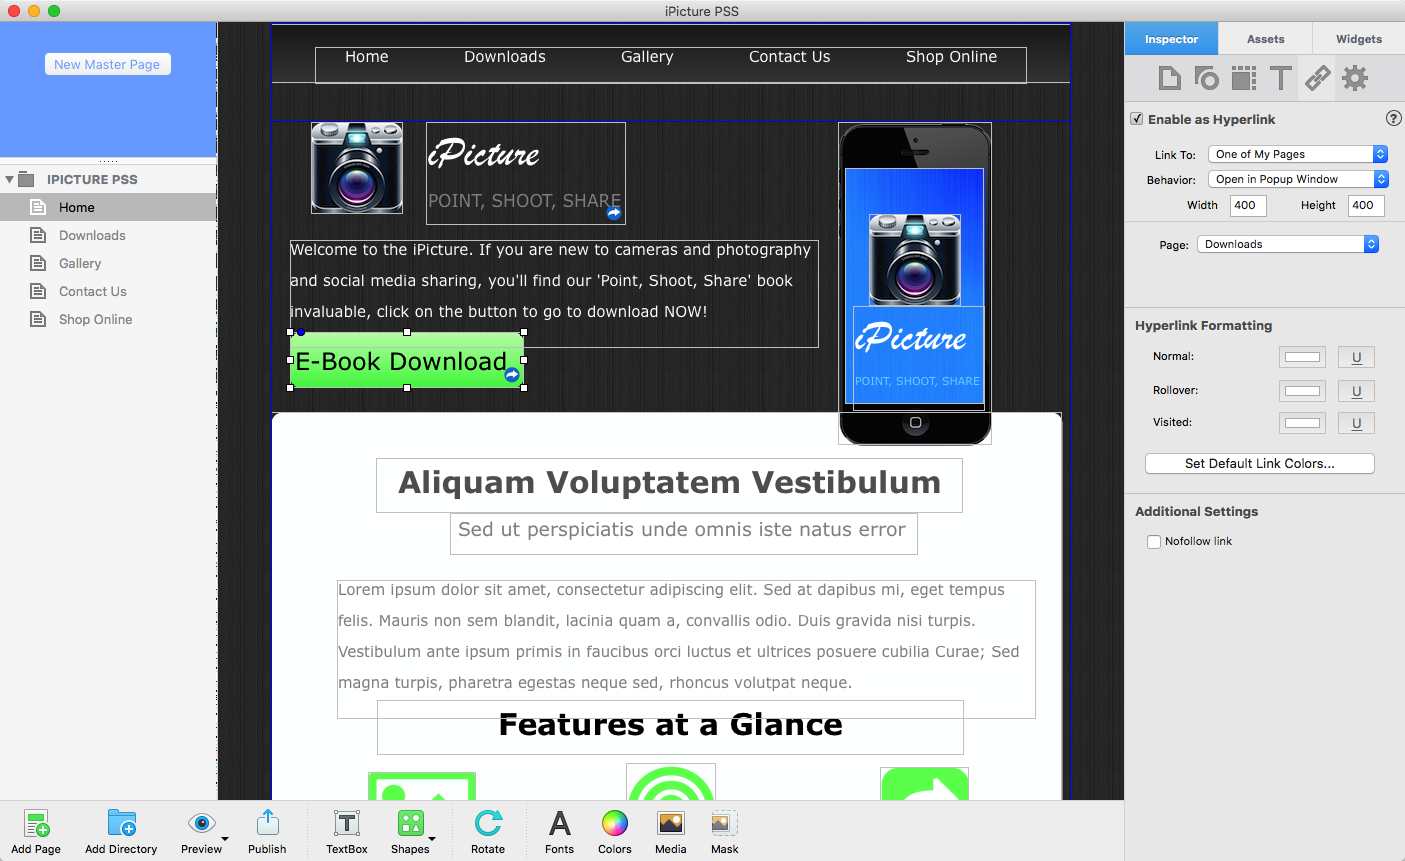
The E-Book Download button’s settings in the Hyperlinks Inspector
9. Click on the link button to select it then go to the Hyperlinks Inspector. This time, leave the ‘Link To’ drop down as ‘One of My Pages’. In the ‘Behavior’ drop down box, set it to ‘Open in Popup Window’.
10. When you change the ‘Behavior’ to ‘Open in Popup Window’ options to change the height and width of the popup window will appear. Set both values to 400. See the above screen shot.
11. Finally set the ‘Page:’ drop down box to your popup window page.
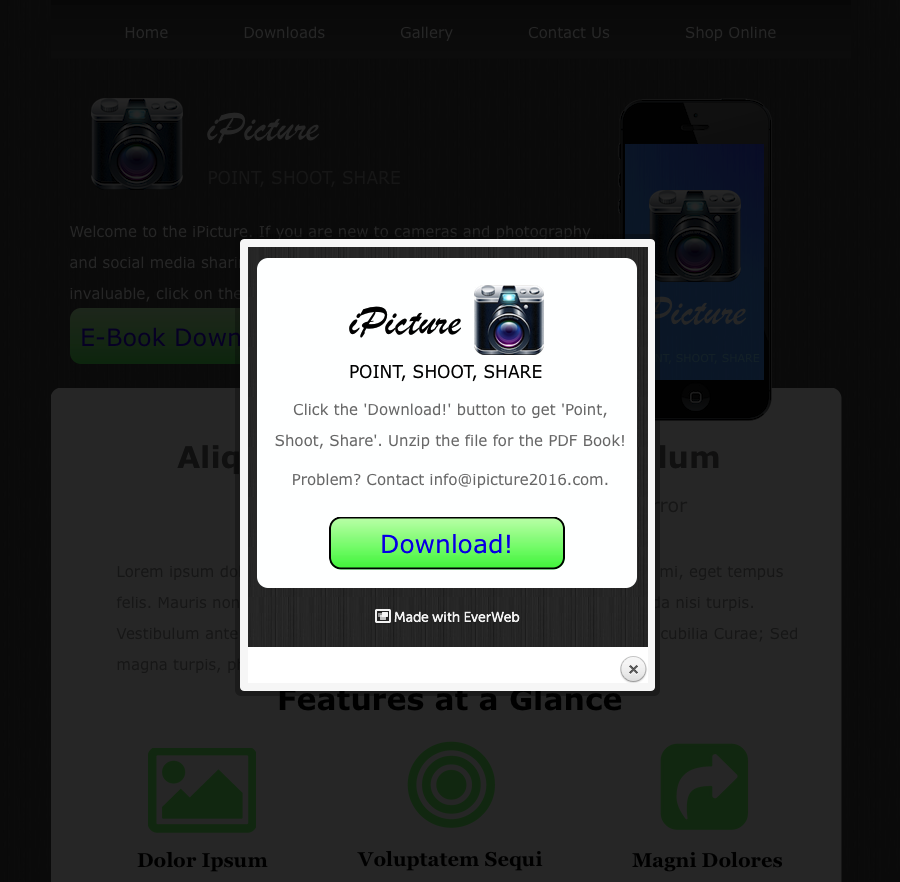
The Popup Window with the page that links to the popup window greyed out in the background.
You’re finished! When publishing your website, don’t forget to test that the file downloads and unzips properly to your computer. In our example, when the visitor clicks on the ‘E-Book Download’ button on the Home page, the popup window in the screenshot above will display. The Home page background can see seen ‘greyed out’, focusing the visitor on how to download the e-book.
If you have a question about Popup Windows in EverWeb, please let us know in the Comments Section below. We’re happy to help!
EverWeb’s Heading Tags Widget makes it easy to insert HTML Heading Tags into a web page without having to code. In this blog we explain what Heading Tags are, how to use them with the widget and why Heading Tags are good for your website’s SEO.
Headings, HTML and Heading Tags
Text is often organised in such a way to make it easy to read and understand. Written articles often include a title with the text broken down by headings, sub-headings , sub sub-headings and so on. The title has the most importance followed by the article’s headings which are of secondary importance, followed in third by sub-headings and so on. This hierarchy can continue further if needed, although having more than three or four levels can leave readers a bit lost..
When developing web pages in EverWeb, you probably use the same approach. Your web pages may have some form of title and the page text organised either formally, or informally to give your content a logical, readable, flow. When you ‘Publish’ your website the web pages are converted in to HTML (HyperText Markup Language) code and uploaded to the host server.
EverWeb generates code that is structured to HTML standards. In HTML, Heading Tags act as a language element used explicitly to add structure to the generated code. If you take this blog as an example, it has a title at the top of the page and headings to break the text content down in to smaller, more manageable parts. If we want, we can explicitly make the page titles and headings in to specific HTML Headings using the Heading Tags Widget.
HTML has six levels of Heading, the most important heading is ‘h1’ with the least important heading referred to as ‘h6’. For example, an ‘h1’ tag would be used for the title of this blog as it’s the most important piece of text on the page. The blog’s headings would have an ‘h2’ tag. Any subheadings would use an ‘h3’ tag and so on… This blog’s tags would therefore be:
h1= EverWeb’s Heading Tags Widget
h2= Headings, HTML and Heading Tags
h2= Heading Tags and SEO
h2= The Heading Tags Widget
h2= Heading Tags Widget Tips
Heading Tags and SEO
Heading Tags should be used in EverWeb as it’s good for your SEO. Search engines can target Heading Tags that have been placed in a web page. Without Heading Tags, search engines treat the headings in your web page just as regular text and so will not be able to distinguish what is important to highlight, in SEO terms, on the page. This in turn may have an effect on your web page rankings.
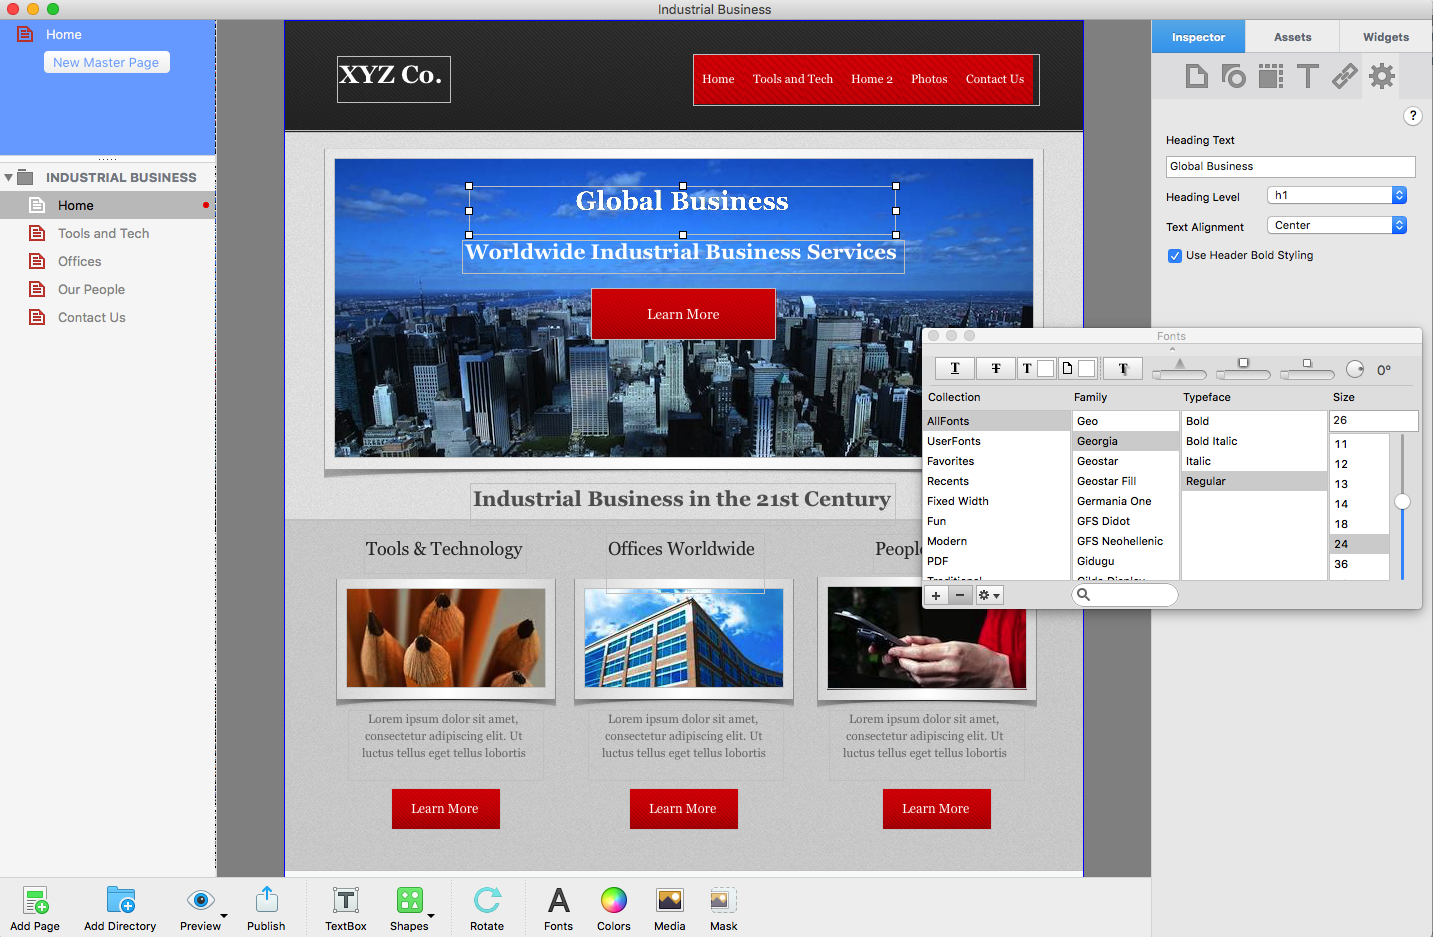
The title ‘Global Business’ has been converted in to an H1 Heading Tag with the fonts and colours matched properly using the Fonts Panel. The heading below the title could be converted to an H2 tag and the ‘Tools & Technology’ title in to an H3 tag if desired.
The Heading Tags Widget
It doesn’t matter if you have already created web pages or not, you can still use the Heading Tags Widget. On an existing web page, start by taking the most important piece of text and converting it into a Heading Tag. This will probably be the page title. To convert the heading to a Heading Tag:
If you have a page title already on the page, copy it to the clipboard. If it is a new page, you can manually enter the title in to the Heading Tags Widget later on.
Next, drag and drop the Heading Tags Widget on to the page.
Paste the text from the clipboard in to the ‘Heading Text’ box in the Widget Settings Inspector or enter the text that you want to use for the title in the box.
Select the Heading Level you want to use for the text, in this example it will be h1 as the title is the most important heading on the page.
The heading tag can be aligned to the left, centered or to the right using the ‘Text Alignment’ drop down box.
You can apply a bold styling to the tag by ticking the ‘Use Header Bold Styling’ box.
With the Heading Tag created you can now match it’s style with the rest of the page using the Fonts Panel.
When you have finished styling the Heading Tag, place it where you want on the page, or replace the original text with the newly created Heading Tag.
Heading Tags Widget Tips
Don’t overuse Heading Tags in your web pages. Search engines can detect the overuse of tags, called ‘stuffing’, and will demote your web page rather than improve it’s ranking.
Use just one h1 tag per page. You can use more than one h2-h6 tags on the page as you need. Again, use wisely and sparingly.
Including multiple tags at the same tag level on a page is perfectly acceptable with the possible exception of the h1 tag.
Save Heading Tags for important pages only. Inserting Heading Tags on pages such as Contact and About pages will not be of benefit.
As always, don’t sacrifice your web page content for the possibility of a higher search engine page ranking. It is always better to have a better visitor experience than better SEO.
Heading Tags are useful and easy to implement, and are another tool in your SEO arsenal!
If you have any questions, please let us know! We’re happy to help!
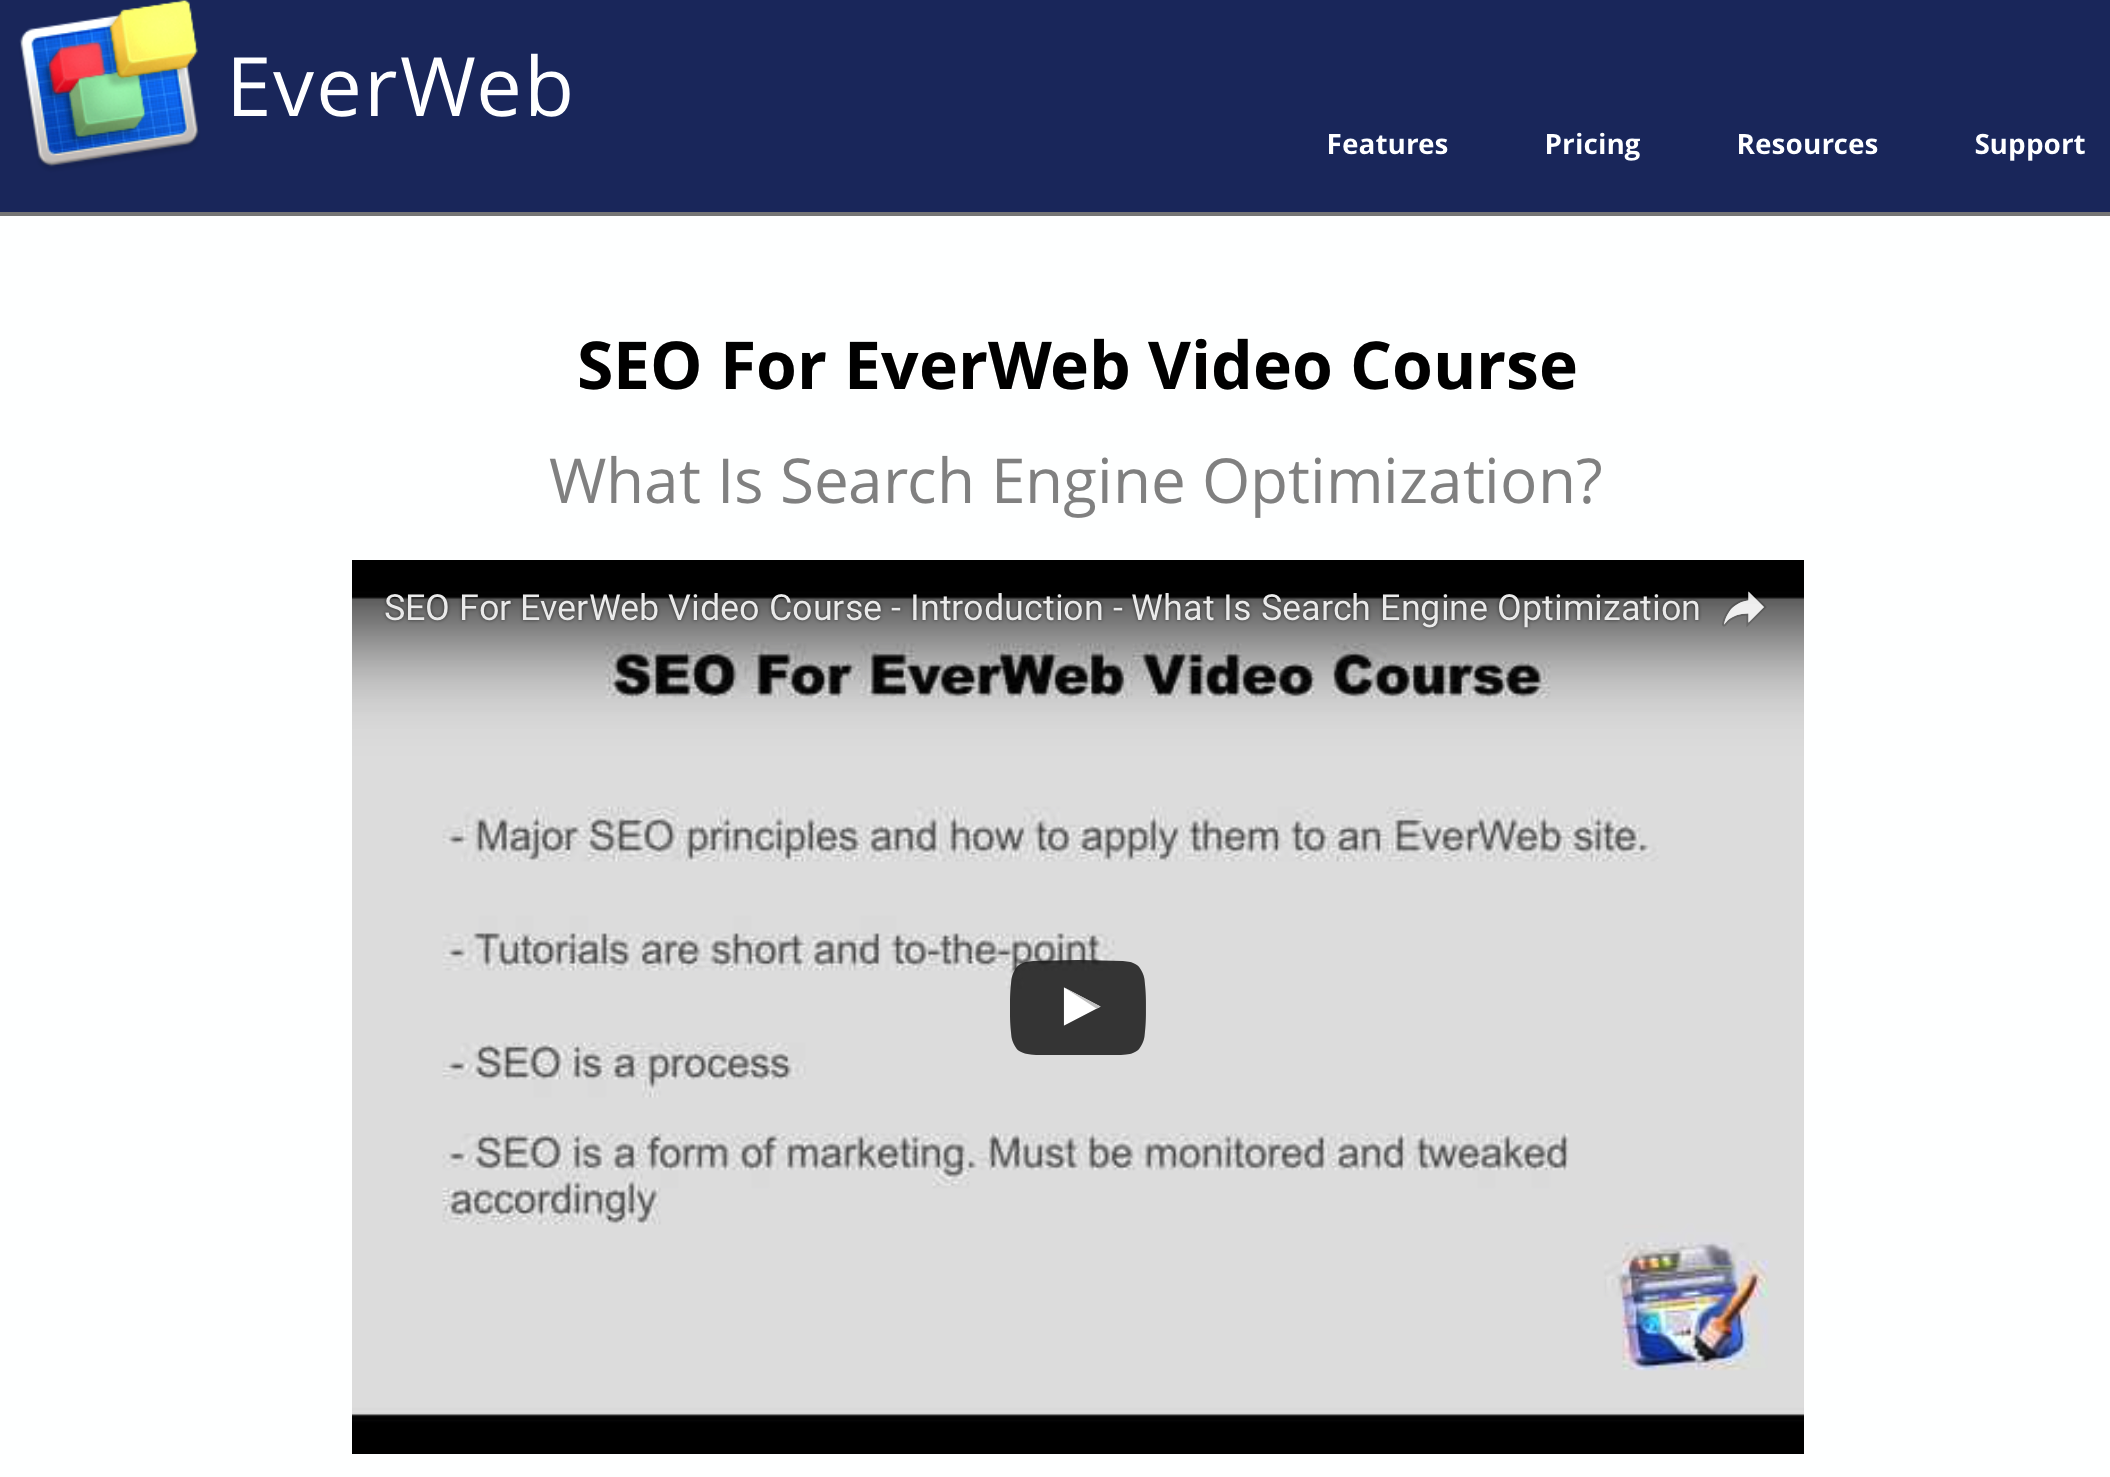
One of the most important aspects of website development is Search Engine Optimisation (SEO.) It’s an essential element to incorporate in your web pages as it may affect your website ranking in search engine results pages (SERPs.) When creating your website in EverWeb you should add ‘Keywords’ to your web pages so they are optimized for search engine spiders. If you have not added Keywords to your website, or have not thought about SEO yet, take a look at the ‘SEO for EverWeb Video Course‘ which explains all you need to know about SEO and how to implement it in EverWeb.
The SEO for EverWeb Video Course is the perfect start to learning about how to apply SEO in EverWeb.
SEO itself is not a static concept, it’s dynamic and constantly changing as our patterns of Internet usage change and technology develops. In this Blog we’re feature some recent SEO articles below to help you stay up to date with SEO to keep your website tuned to keep it’s SERP ranking optimized.
Don’t Avoid Linking To External Websites
Do you include links to external websites in your own website? There’s a tendency to exclude external links from websites as developers and website owners believe that such links take visitors away from their own site. Google’s Gary Illyes has a different view on external links:
“The internet is built upon links, links are essential for the internet.”
What happens if the focus of your website changes over time?
When developing your website you should include SEO as part of the development process. However, do you review your website’s SEO when you update or change it’s content? And what happens if you decide to change the focus of your website at a later date? Will this change your ranking? Find out more in ‘How Google Handles a Site When It Changes Topic Focus‘
Google Launches Mobile Friendly Update Algorithm
Google’s ‘Mobile First’ strategy for SEO gained a boost in May when it completed the launch of it’s mobile friendly ranking algorithm. It’s a good reminder that mobile’s importance is growing fast and that all websites should have a mobile version, with SEO included!
We recently released a popular video tutorial that demonstrates how to create a full width header that can resize as the user scrolls down the page. This can make your website have a more modern feel to it, as this type of header is becoming more widely used on professionally built websites.
This effect not only will make your site look and feel more modern, but it also adds a bit of convenience to your website visitors. Rather than having to scroll all the way back up to the top of the page, visitors will be able to access your website’s navigation menu at all times, making it much easier to navigate from page to page.
Check out the video below and see how you can add this feature to your website. The widget can be found at EverWebCodeBox.
Video Transcript
With the help of a very powerful widget, you can add a sticky header that resizes when you scroll down the page of your EverWeb site. Here is an example of a basic sticky header that I will show you how to create in EverWeb.
The widget that we will be using to create this header was developed by a third-party EverWeb widget developer named Roddy. The widget is available for purchase at a modest price on Roddy’s website everwebcodebox.com
You can locate it by clicking on the Widgets 3 link, followed by hovering over Responsive and selecting resize header. Scrolling down this page will show you another example of this widget in use.
In this tutorial I am going to show you how I created this header using the widget. This widget is powerful and comprehensive, so I will be skipping over some of the controls that I don’t need to use or ones that I accept the default values for. I am making sure that I cover the most important aspects of the widget, and provide you with enough information to be able to move forward with creating your own header.
I also want to point out that Roddy actively updates his widgets, so if you see a control in your widget that you do not see here, it is because the widget has been updated after the release of this video.
The header that we will be creating has 4 main parts to it. There is the background, the logo, the text, and the navigation menu.
So starting with a blank page for the purpose of this demonstration, I will drag and drop the widget onto the page. This is what appears by default.
The very first thing I will do is make the header full width. I do this by clicking on the Metrics tab, and then enabling the Full Width option.
I will now click on the Widget Settings tab.
The Background
The first thing I will do to the widget settings is change the background color of the header. This is done by clicking on the color control next to where it says Background. You will also notice that there is a Background B. This is because by default, the background will be a Gradient. Since I want a solid color, I will also make Background B the same color as the one I chose before.
The Logo
Next I am going to add the image. I have already added the image to the assets list, so I just need to click on Choose and then select it.
My logo appears much smaller than I want, so I will adjust the value next to width, until my desired width for my logo is displayed.
I also want the logo to be closer to the top of the header, so I will adjust the value next to Top.
The logo is also a bit further to the left than I want it to be so I will adjust the value next to Left.
I will also adjust the Resize Width so that the logo is my desired size once it has been resized.
I will also adjust the Resize Top value so that the logo is a bit further from the top.
The Text
The next thing I will do is replace the heading with my own.
I will also type in my desired Font Family. Since this is a Google Font, I will check the option for Google Font.
You will also notice that the text is overlapping with the logo, so I am going to adjust the value next to Left to move it a bit to the right.
I will also modify the resize left value.
The Navigation
The next thing we will do is add the navigation menu. This is done by adding the navigation menu widget by dragging and dropping it onto the header.
Next, I will click on the Metrics tab and enable the Full Width option. Back on the Widget Settings for the navigation menu, I am going to change the alignment from Left, to Right, since my navigation is on the right side of my header. I will also position the navigation menu somewhere around the middle of the header.
I will also click on the Fonts button to open up the fonts window to select my font.
The rest of the modifications that I make to the navigation menu will be done using the controls on the Full Width Resize Widget, so I will click back to that widget, and then select the Widget Settings tab in the Inspector, and then scroll down to the navigation menu section.
I am going to increase the value next to Resize Top so my navigation menu is bit further away from the top.
I will now adjust the link color, as well as the hover color. You will notice that some of the changes made to the navigation menu will not appear in EverWeb. This is normal. Your navigation menu will appear much different when your site is previewed or published.
I also do not want there to be a background for my navigation menu so I will select Transparent background.
I will modify the font size since I want it to be a bit larger.
I am going to decrease the minimum width for the links in the navigation menu because I want this spacing between links to be a bit smaller.
My navigation menu does not contain a drop down menu so I will skip over the drop down menu style controls.
The last thing I will do is check the boxes to fix the header and navigation and activate the resize on scroll.
We have now just re-created this header.
Just a quick reminder about all of the values that I just set. These values correspond to my logo and the way I want it to appear. Your values will all differ based on the logo and based on how you want your header to look. The way you will determine most of the values that you input will be through trial and error, which is how I determined the values for this header. For most of values that we adjusted, you will be able to see the result of changing the values right away. But for the values that have Resize next to them, you will need to preview the page in order to see the change.
And even though I skipped over some of the controls, you might still find them useful for you, so feel free to play around with them when creating your header.
EverWeb allows you to create anchor links – links that can send visitors on your site from one section on your page to another. Anchor links allow to you guide the visitor to certain sections on the page, making it easier for them to navigate your content. For example, let’s say that your home page has some important content, but that content is located near the bottom of the page. Rather than just hoping the visitor will scroll down to the bottom, you can guide them right to that particular section by using an anchor link.
There are 2 styles of anchor links that you will be able to use on your site. One style is a basic ‘jump’ that will just send the user directly down the page. The other style is a ‘smooth scroll’ which will gently scroll the visitor down the page.
This video tutorial will show you how you can accomplish either of these methods. You will need to refer to some code for one of the smooth scrolling options. There is also a widget that can be purchased to make this process even easier.
VIDEO TRANSCRIPT
In this video tutorial, I am going to show you how you can create anchor links so that you can link from one section of your page to another.
I am going to show you three different ways of accomplishing this, and I encourage you to watch all 3 methods before determining which one will best suit your needs.
The first method will be a simple method which will just jump the user from one part of the page to another.
The second method adds a couple more steps, but will allow you to have a smoother scroll to the other section of your page.
The third method is the easiest, allowing you to setup smooth scroll anchor links, but will require the purchase of a third-party widget. I will provide more information on this later in this tutorial.
So for the first method, I have this page here and I want to setup an anchor that will let the user jump from up here near the top of the page, to a section closer to the bottom.
The first thing I am going to do is create my link that will allow the user to click to go to the bottom of the page. I am just going to create some basic text, and then hyperlink the word or words that I want the user to click on.
I’m now going to enable this as a Hyperlink by clicking on the Hyperlinks tab in the Inspector window, and checking the box to enable as hyperlink. I will choose to link to an external page. In the URL field, I will type in the pound sign, followed by any text that I want to refer to this as, so in this case I am just going to call it bottom
The next thing I will do is add an HTML snippet to the page. In the Widget Settings box, I am going to type in some simple HTML. The important thing to note here is that I am putting in the same word which is bottom, that I linked to in our previous step.
I also wrote bottom inside the tags, and that does appear on the page here. So what I will do is just find an object that this can hide behind nicely, and I will just hide it by going to Arrange, and then selecting Send to back.
When the site is previewed or published, you will see that I can jump to the bottom when I click on the link.
The next method will provide us with a smooth scrolling anchor. This is going to be done using some code, which you can obtain from everwebcodebox.com, hovering your mouse over the Links menu, and then clicking on Links & Anchors. You can now scroll down to the bottom of the page, or click on the Smooth Scroll link to get there smoothly.
We’re going to highlight the script that is here, and copy it.
Back in EverWeb, this script is going to be pasted into the Footer Code section. If you only plan on having the smooth scrolling anchors on one page of your site, you can actually just paste it into the footer code box for that particular page. But if you plan on having it on multiple pages, or you are not 100% sure yet, pasting the script into the site wide footer code section will be fine.
Next, I’ll head back to everwebcodebox and copy the code next to Hyperlink code.
I am going to add an HTML snippet and then paste this code. The anchor-name can be changed to whatever you want, as well as the text that will appear as the anchor link.
Place this on your page where you want the anchor link to be located.
Now I will head back to everwebcodebox again, and copy the code for the anchor.
Drag and drop another HTML snippet onto the page, and paste the code.
I’m going to replace anchor-name with the same name I gave to the anchor in the previous step, which was bottom.
Now place this where you want the user to end up when they click on the anchor link.
When the site is previewed or published, you will be able to see that you can scroll smoothly.
This next method, which is my preferred method, involves using two widgets that are available for purchase on everwebcodebox.com. If you prefer the smooth scroll over the jump, this method is by far the easiest to accomplish and provides the most flexibility for your text link.
These widgets can be purchased by going to everwebcodebox.com, clicking on the Widgets 1 link and then go to Layout and click on Anchors.
To use these widgets, first drag the A Link widget onto your page. In the Pre Text field, type in whatever you want to appear before the link. Then in the Link Text field, type in the text that you want to appear as the anchor link. Then type whatever you want to appear after the link in the Post Text field. You can also change the font, the size, the text color, the link color, and select if you want the link to be underlined.
Then you can give the hyperlink an ID. I’ll just use the same ID I have been using throughout this tutorial which is bottom, but you can of course use whatever you want.
Place this on your page where you want the anchor link to be located.
Then go back to the Widgets tab and drag and drop the Anchor widget.
In the anchor ID field, type in the anchor ID that we just entered in the previous step.
Now you can place this anchor wherever you want the smooth scroll link to the take the user.
When the site is previewed or published, you will be able to see that you can scroll smoothly.
And those are three different ways you can setup anchor links on your site in EverWeb.
Justified text is used extensively in printed books and newspapers as it’s flush left and right margins give content a clean, well ordered appearance. Broadsheet newspapers traditionally used this style of alignment to place as much text content within a limited amount of page space. Many print edition newspapers today mix justified and left aligned text for both styling and readability reasons.
Printed books and academia also use justified text, printed books for much the same reasons as newspapers. Academic works tend to use justified text where annotations or corrections need to be applied to text. Often specific rules about content layout are required, e.g. university dissertations often require justified text with double line spacing as it’s easier for assessors to annotate and mark the content this way.
The Problems With Justified Text
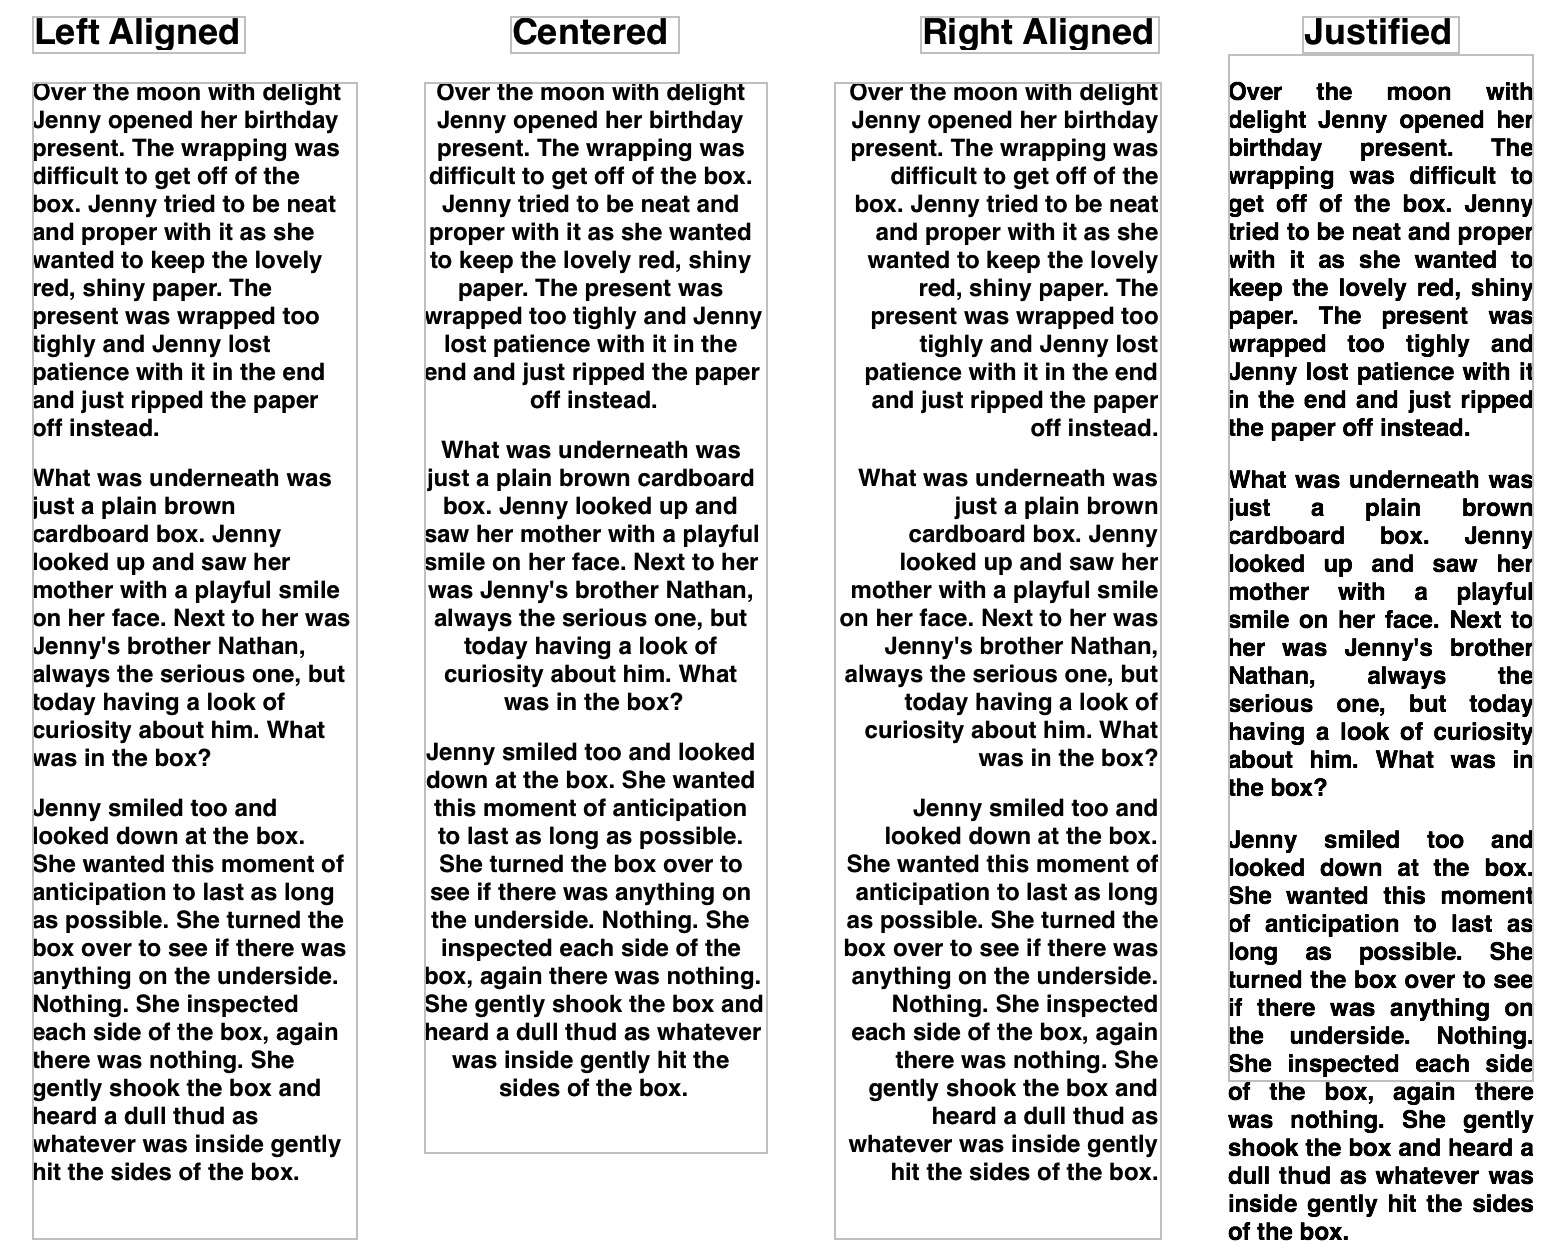
In the Internet Age there’s often argument that justified text has no place in the digital media and with good reason. Whilst it looks neat and tidy in print, on screen it can result in large gaps between words (see the screenshot below for an example of this.) These gaps can form ‘rivers’ of white space flowing down a column of justified text making distracting the reader and at worse making the text just difficult. There’s also a tendency for the right margin to be ‘over hyphenated’ to accommodate words having to be split from one line to the next to accommodate the justified text look. Again this can result in readability issues.
Studies indicate that justified text slows reading speed as the eye tends to track words and lines better when the right margin (in the Western World) is ragged rather than justified. Those who have reading disabilities also have more problems with justified text than with left aligned, ragged right text.
Comparison of left, centered, right and justified text. As can be seen, the justified text tends to result in large gaps between words creating rivers of white space in the column on the right.
Justified Text in The Digital World
Printed text solves the problems inherent with justified text through subtle changes of font size, spacing and other styling attributes to make text visually appealing. In the digital world, the tools available are generally not sophisticated enough to make justified text look as appealing as printed text. As such, in most cases text manipulation is the digital world is limited in scope which is where the typesetters eye is an advantage. HTML 5 and CSS offer limited support for justified text basically for the same reasons. As EverWeb complies with the standards set for HTML5 it therefore includes left aligned, right aligned and centered text options but not justified text.
Lastly, the Internet has expanded our concept of what a page is. When designing a website you have an unlimited “canvas” to use. Pages have no limits. As such, some of the original reasons for using justified text are no longer necessary. You don’t need to cram content any more in to limited space.
When to Use Justified Text
Even with all of the problems, justified text can create a neat and organized appearance to text and IS a great way to highlight particular areas of text. To create your own justified text in EverWeb just download the free Justified Text widget from EverWeb’s Third Party Add-Ons section or directly from AllAboutiWeb.com.
Installing and Using the Justified Text Widget
The AllAboutiWeb website explains how to download and install the Widget. Once installed you will see a message that the widget has been installed. When you launch EverWeb, you will see it in the Widgets Tab.
The widget works in the same way as all of EverWeb’s widgets, just drag and drop it to where you want it on the page. The Justified Text Widget lets you create up to three paragraphs. If you need more paragraphs just drag and drop another Justified Text Widget on to the page! You can style the text using the Fonts Panel to create the effect you want.
The Justified Text Widget from AllAboutiWeb.com gives you extra flexibility in your website design. Whilst it can give your web page a neat and tidy look, always remember to prioritize the readability of your website’s text content over it’s aesthetics.
What do you think of justified text? Does it have a place in website design today? Let us know your thoughts below!
The last instalment of the ‘Getting Started with EverWeb’ series focuses on the Asset Tab. It’s a part of EverWeb you may not immediately think you need to get to grips with when building your website. However, it’s worth getting acquainted with the Assets Tab as it has many features that help your workflow, SEO and website Project file management.
What is the Assets Tab?
The Assets Tab is the file management center of your EverWeb Project and contains two ‘Assets Lists’:
Image Files: Any image you drag and drop in to your Project are listed here. Image files are imported in their native format except for TIFF, PDF and PSD files that are converted to a JPG format. Retina display images are also supported.
External Files: Media files such as audio or video and files used in hyperlinking e.g. PDF files are listed as External Files. The reason for this is that EverWeb uploads the ‘external’ file to the server when you publish your website so that it can be downloaded, or accessed, from the server as needed.
How Do I Use The Assets Tab?
There are a number of different ways in which the Assets Lists can be used and managed. Most of the features of the Asset Tab are self explanatory, so below we explore how to get the best out of the Assets Tab as well as some of it’s lesser known features…
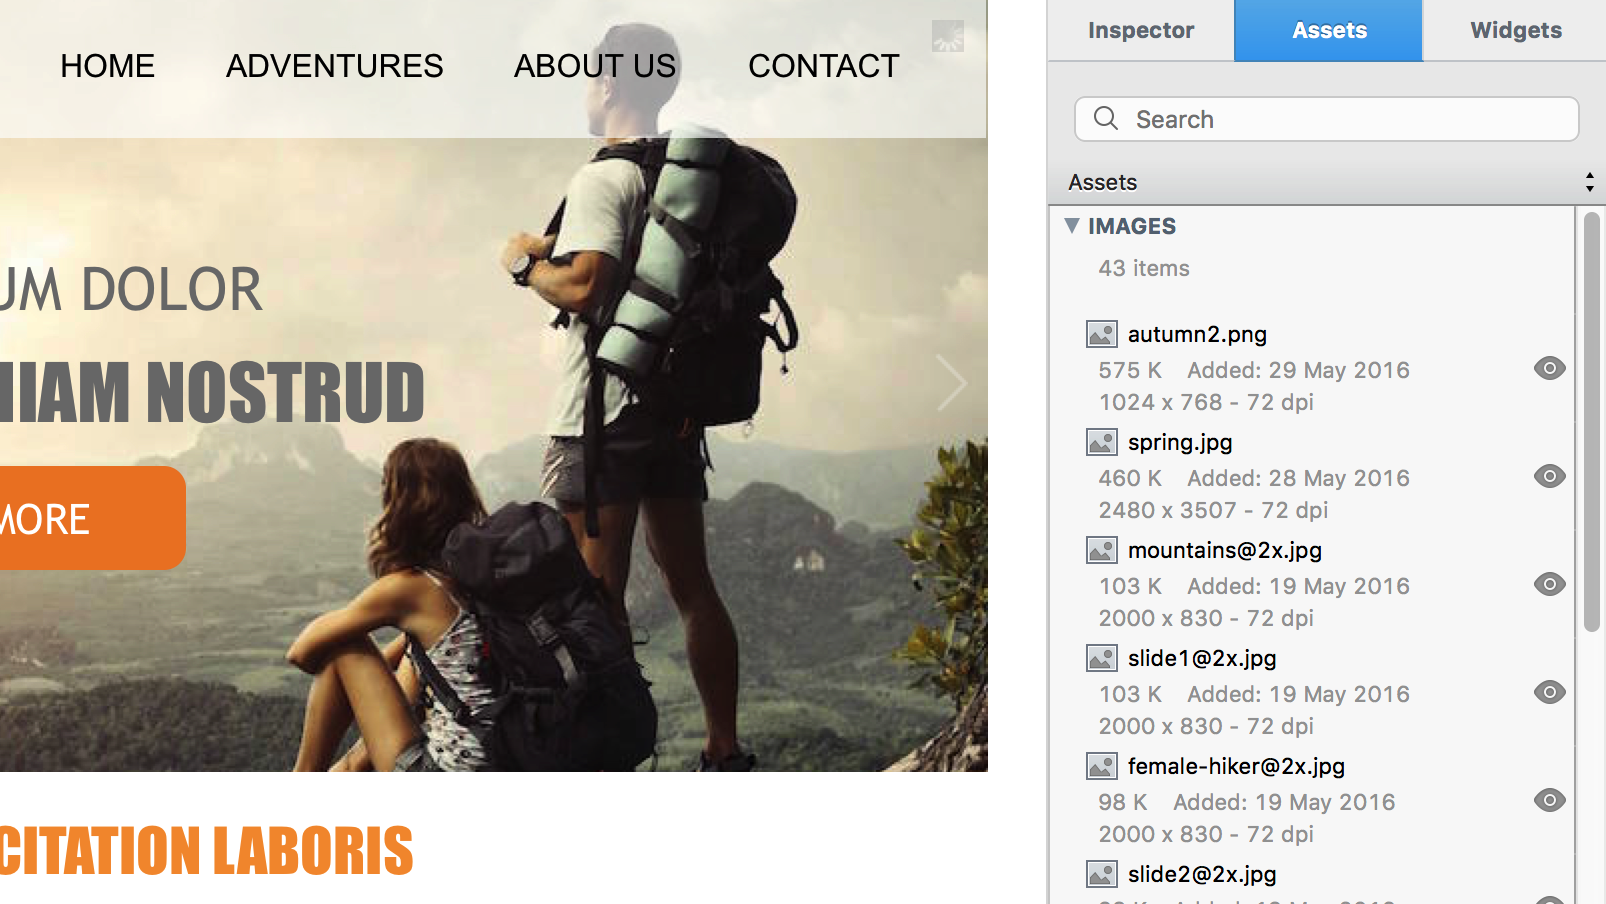
Predictive Search
When using the Assets List, you can search for assets with the search box (see screenshot below). You can also find assets using predictive search. Highlight the first asset in the list then start typing the name of the asset you want to find. The more you type, the closer you get to the locating the asset you want.
Previewing an Asset
To preview an Asset, you click on the preview eye to the right of the asset. You can also preview an asset by starting to drag the asset out of the Asset List. As you do so, you will see an image thumbnail. If you do not want to use the asset just drop it back in t’s original place in the Assets List.
Reusing Imported Image Files
Once you have imported an image file there is no need to reimport it if you want use it more than once. Just drag and drop the image from the Assets List on to your page as often as you need it. There’s no need to reimport the same image every time you want to use it. Using the same image file is efficient than having the same image multiple times in your Assets List.
Troubleshoot Slow Loading Web Pages
If you have a web page that loads slowly when published, you can use the Assets Tab to check if there are any large image files that may be causing the problem. If the Assets List just shows a list of file names without any extra information included, click on the up/down arrows at the top of the Assets List (see screenshot below) tick ‘Show File Info’. Next, select the page in the Web Page List that loads slowly. Click on each of the page’s images in turn to see if any of them are large enough to affect the page load speed. If you do have a large image file, delete the image from the Assets List, optimize the original image so that it’s smaller and reimport it.
Part of the Editor Window showing the Assets Tab, The up/down arrows above and to the right of the Assets List are used to access menu options.
Which Images are Used on Which Pages?
To quickly locate all pages that use a particular image file, first highlight the image file in the Assets List. Next, secondary click on the highlighted file and select ‘Find Pages Using Asset’ from the menu. Any pages using the image file are highlighted in the Web Page List.
To remove the highlight, secondary click on a page name in the Web Page List and select “Clear ‘Using Assets’ Indicator”.
Better SEO with the Assets Tab
Before importing an image file into your Project, make sure the filename is meaningful e.g. if you are importing a picture of the US flag, you may want to call the file ‘USFlag.jpg’. This approach is better for your SEO. Many image files use automatically generated filenames which is not good for SEO.
If you have already imported files that have non-meaningful names rename them in the Assets List. Double click on the filename and overtype the name with a more meaningful one and press Enter to finish. Although renaming image files before importing them in to EverWeb is best, renaming files that are already in EverWeb Assets List still helps.
Housekeep Your Project File
As you develop your website you may build up a collection of unused assets, e.g. image files you were going to use but later decided not to. The space these assets take up can be reclaimed by deleting them from the Assets List. Click on the up/down arrows above the Assets List and select ‘Find Unused Assets’. EverWeb will highlight all assets not currently in use and will ask if you want to delete them.
Deleting unused assets saves disk space by reducing the physical size of your website project file. It is also a good way of un-cluttering your Project’s Asset List.
The Assets List is a versatile tool to manage your EverWeb Project’s Image Files and External Files. If you have a question about the Assets Tab and it’s capabilities please let us know in the Comments section below.
More Related Blogs…
For more ‘Getting Started with EverWeb’ blogs please click on the link that you are interested in below
