
Customizing the Editor and Using Document Modes
WebDesign's text editor provides many different features and settings to help you code faster, produce more efficient code and locate errors quickly. Syntax coloring helps you quickly locates specific tags, function declarations, attributes or even errors in your document such as missing quotes. Line numbers provide an easy way to track down errors especially when working with PHP documents. Auto indent options allow you to write cleaner code without a lot of effort on your part and Smart Auto Indenting takes this one step further. There are many more options that you can explore and test on your own. They are described in more detail below.
Before going any further it is important to know how WebDesign works. WebDesign contains a set of built in document modes which include regular Text, HTML, XHTML, PHP, CSS, JavaScript, ASP, XML, and VBScript. These document modes contain default settings that make working with the respected language more convenient. For example, each document mode has it's own Syntax file which defines how text is colored in your document so you can easily spot any potential coding errors. Other settings, like Smart Indenting Braces is enabled for PHP documents so that when you create a function like the following;
function "Hello_World" {
print "Hello World"
}
it is properly indented for you removing the need for those extra keystrokes each time. These document modes are basically presets for each kind of language and can be completely customized to suite your coding behavior. The WebDesign technotes explains in detail how to create custom Syntax Files for WebDesign.
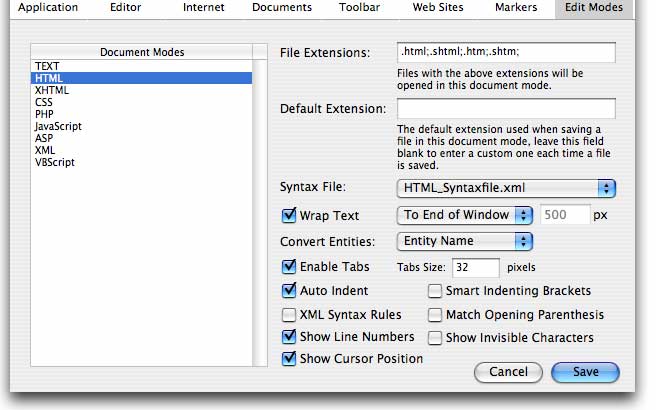
Now lets say you open one of your pages in WebDesign. WebDesign will automatically set the document mode, and apply all of the settings you have selected for that mode. It does this by reading the file extension and finding the document mode that corresponds to that extension. For example, a file with the extension '.html' will open in the HTML mode. Likewise, a file with the extension '.php' will open up in PHP mode. The way WebDesign matches document modes to extensions can be modified in the 'Editor Modes' tab of the Preferences. As well from this tab, you can customize all other settings for the selected Document mode, as shown below. Of course you can switch between document modes for already opened documents from the 'Pencil' icon at the top of the Editor window.

Customize the built in Document Modes by going to the 'Edit Modes' tab on the Preferences.
- File Extensions: Set the file extensions, separated by a semicolon (;), that should be opened under the selected Document Mode. For example, HTML files are recognized by files with the extensions 'html', 'shtml', 'htm' and 'shtml' in the picture above.
- Default Extension: The default extension is the extension that an unsaved document will use when using the selected document when you save a file. In this picture above no default extension is used but you can type .html for all files saved under the HTML Document Mode. The default extension only applies to the Save As dialog box and no file extension is appended when opening and existing document. Note: In Mac OS X, if a default extension is specified, it cannot be changed in the Save As dialog. This is the way Apple designed the Save As dialogs in Mac OS X and is why the default extension for all document modes is not set.
- Syntax File: Lets you select the syntax file or add a new one to your Syntax Files Folder located in the Support Folder in the same folder as the WebDesign Application. Creating Syntax files is very easy and is discussed more in the technotes section of the User Manual. When you add new syntax files they are moved to your Syntax Files folder.
- Wrap Text: Enable or disable soft wrapped text. Soft wrapped text can be wrapped at the end of the window or at a certain pixel length. The different between soft wrapped and hard wrapped text is with soft wrapped text the text is wrapped to a new line when it hits a certain spot (the end of the window or the specified pixel length) while hard wrapped text only wraps when you create a new line break.
- Enable Tabs: If you want to be able to use tabs as well as specify the tab width, enable this option.
- Auto Indent: This option, when checked, will start new lines containing the same amount of tabs and spaces as the line above it up to the first real character. For example if the current line is tabbed 3 spaces over, the next line, after pressing return, will start at 3 tabs over. This is helpful in keeping readable code while preventing you from having to type those extra keystrokes each time.
- Smart Indenting Braces: This option, depicted above with the PHP function example, will auto indent text when the current line contains a '{' character and detab when you close the function by entering the '}' character.
- Use XML Syntax Rules: This option will adhere to XML syntax rules, such as entering text in lower case, not leaving out quotes etc... It is used specifically for the XHTML and XML Document Modes.
- Show Line Numbers: This option shows the line numbers in your document along the left hand side so you can easily see which line you are typing in.
- Show Cursor Position This option will show the line number and the location of the insertion point in the current line in the bottom left hand corner of each document window.
- Match Opening Parenthesis: When you close a parenthesis, WebDesign can highlight the opening parenthesis or flash the menu bar if it can't find one so you can easily spot a missing parenthesis in your code.
- Show Invisible Characters: Select this option if you want to see where any spaces or returns are. This is helpful to spot double spaces that should be removed (note: cannot currently be enabled along with the Use Tabs option).
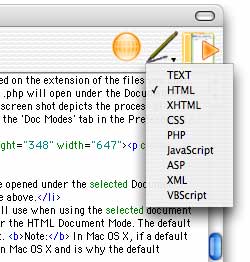
WebDesign lets you easily switch between Document Modes right from within the Editor. So for example if you are working with a document that was recognized as a PHP file but contains mostly HTML code, you can switch to the HTML Document Mode by using the Document Modes menu in the editor window as show below;

Change the Document Mode from WebDesign's editor.
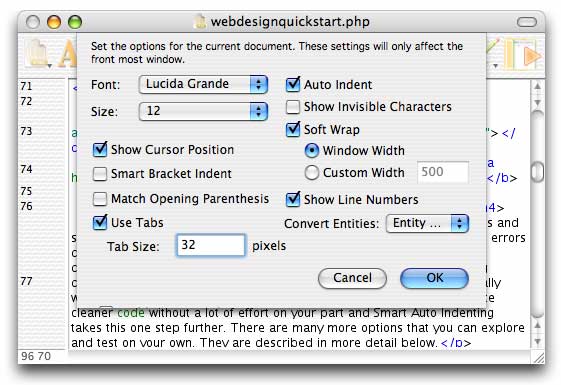
If you have to quickly change a single setting, or even a bunch of settings for WebDesign's editor for the current document you can open the 'Document Settings' dialog from under the 'Edit' menu. From here, you have access to all the settings that can be customized for the current document.

Got Any Questions? Post them on our FREE online discussion forum.


